Brother International PEDESIGN 8.0 Users Manual - English - Page 165
Sew Setting Stage
 |
View all Brother International PEDESIGN 8.0 manuals
Add to My Manuals
Save this manual to your list of manuals |
Page 165 highlights
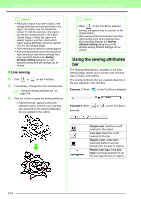
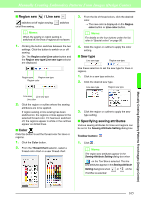
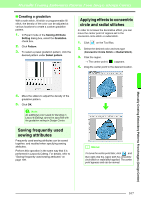
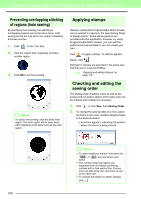
Manually Creating Embroidery Patterns From Images (Design Center) Sew Setting Stage After editing the outline in the Figure Handle Stage, continue to the Sew Setting Stage, where the sewing attributes can be set. Use the zooming tools available to display the pattern enlarged or reduced. b Memo: • You can change the color and sew type either before or after applying sewing attributes to the region. c "Color" on page 165 and "Sew type" on page 165. • You can also use the settings in the Sewing Attribute Setting dialog box to define other attributes of the sew type. c "Specifying sewing attributes" on page 165. Toolbar button: 1. Click , or click Stage, then To Sew Setting. → The pattern is displayed in the Design Page of the Sew Setting Stage. 3. Click the enclosed region to apply the sewing attributes. → "Marching lines" appear around the selected region, and the color and sew type selected on the Sewing Attributes bar are applied to the region. Manually Creating Embroidery Patterns From Images (Design Center) b Memo: In the Sew Setting Stage, the colors of the Design Page and background can be changed from the Design Page Property dialog box (displayed by clicking Option, then Design Page Property in the menu). Applying sewing attributes to lines and regions ■ Region sewing Applying sewing attributes to regions 1. Click on the Tool Box. 2. If necessary, change the color and sew type. c "Using the sewing attributes bar" on page 164 a Note: If the attributes cannot be applied to a region, go back to the Figure Handle Stage and make sure that region is closed. Edit any broken lines with the Point Edit tool. 163
-
 1
1 -
2
-
3
-
4
-
5
-
6
-
7
-
8
-
9
-
10
-
11
-
12
-
13
-
14
-
15
-
16
-
17
-
18
-
19
-
20
-
21
-
22
-
23
-
24
-
25
-
26
-
27
-
28
-
29
-
30
-
31
-
32
-
33
-
34
-
35
-
36
-
37
-
38
-
39
-
40
-
41
-
42
-
43
-
44
-
45
-
46
-
47
-
48
-
49
-
50
-
51
-
52
-
53
-
54
-
55
-
56
-
57
-
58
-
59
-
60
-
61
-
62
-
63
-
64
-
65
-
66
-
67
-
68
-
69
-
70
-
71
-
72
-
73
-
74
-
75
-
76
-
77
-
78
-
79
-
80
-
81
-
82
-
83
-
84
-
85
-
86
-
87
-
88
-
89
-
90
-
91
-
92
-
93
-
94
-
95
-
96
-
97
-
98
-
99
-
100
-
101
-
102
-
103
-
104
-
105
-
106
-
107
-
108
-
109
-
110
-
111
-
112
-
113
-
114
-
115
-
116
-
117
-
118
-
119
-
120
-
121
-
122
-
123
-
124
-
125
-
126
-
127
-
128
-
129
-
130
-
131
-
132
-
133
-
134
-
135
-
136
-
137
-
138
-
139
-
140
-
141
-
142
-
143
-
144
-
145
-
146
-
147
-
148
-
149
-
150
-
151
-
152
-
153
-
154
-
155
-
156
-
157
-
158
-
159
-
 160
160 -
 161
161 -
 162
162 -
 163
163 -
 164
164 -
 165
165 -
 166
166 -
 167
167 -
 168
168 -
 169
169 -
 170
170 -
171
-
172
-
173
-
174
-
175
-
176
-
177
-
178
-
179
-
180
-
181
-
182
-
183
-
184
-
185
-
186
-
187
-
188
-
189
-
190
-
191
-
192
-
193
-
194
-
195
-
196
-
197
-
198
-
199
-
200
-
201
-
202
-
203
-
204
-
205
-
206
-
207
-
208
-
209
-
210
-
211
-
212
-
213
-
214
-
215
-
216
-
217
-
218
-
219
-
220
-
221
-
222
-
223
-
224
-
225
-
226
-
227
-
228
-
229
-
230
-
231
-
232
-
233
-
234
-
235
-
236
-
237
-
238
-
239
-
240
-
241
-
242
-
243
-
244
-
245
-
246
-
247
-
248
-
249
-
250
-
251
-
252
-
253
-
254
-
255
-
256
-
257
-
258
-
259
-
260
-
261
-
262
-
263
-
264
-
265
-
266
-
267
-
268
-
269
 |
 |
