Brother International PEDESIGN 8.0 Users Manual - English - Page 67
Displaying a preview of the, embroidery, Preview, Realistic Preview
 |
View all Brother International PEDESIGN 8.0 manuals
Add to My Manuals
Save this manual to your list of manuals |
Page 67 highlights
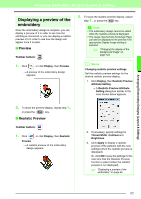
Arranging Embroidery Designs (Layout & Editing) Arranging Embroidery Designs (Layout & Editing) Displaying a preview of the embroidery Once the embroidery design is complete, you can display a preview of it in order to see how the stitching is connected, or you can display a realistic preview of it in order to see how the design will appear once it is sewn. ■ Preview Toolbar button: 1. Click , or click Display, then Preview. → A preview of the embroidery design appears. 2. To leave the realistic preview display, repeat step 1., or press the Esc key. a Note: • The embroidery design cannot be edited while the realistic preview is displayed. • The image imported into the Design Page can also be displayed in the preview if the appropriate Display Image setting is selected. c "Changing the display of the background image" on page 123. b Memo: Changing realistic preview settings Set the realistic preview settings for the desired realistic preview display. 1. Click Display, then Realistic Preview Attribute Setting. → A Realistic Preview Attribute Setting dialog box similar to the ones shown below appears. 2. To leave the preview display, repeat step 1., or press the Esc key. ■ Realistic Preview Toolbar button: 1. Click , or click Display, then Realistic Preview. → A realistic preview of the embroidery design appears. 2. If necessary, specify settings for Thread Width, Contrast and Brightness. 3. Click Apply to display a realistic preview of the patterns with the new settings (when the realistic preview is displayed). Or, click OK to save the settings for the next time that the Realistic Preview function is select (when the realistic preview is not displayed). c "Displaying a preview of the embroidery" on page 65. 65
-
 1
1 -
2
-
3
-
4
-
5
-
6
-
7
-
8
-
9
-
10
-
11
-
12
-
13
-
14
-
15
-
16
-
17
-
18
-
19
-
20
-
21
-
22
-
23
-
24
-
25
-
26
-
27
-
28
-
29
-
30
-
31
-
32
-
33
-
34
-
35
-
36
-
37
-
38
-
39
-
40
-
41
-
42
-
43
-
44
-
45
-
46
-
47
-
48
-
49
-
50
-
51
-
52
-
53
-
54
-
55
-
56
-
57
-
58
-
59
-
60
-
61
-
 62
62 -
 63
63 -
 64
64 -
 65
65 -
 66
66 -
 67
67 -
 68
68 -
 69
69 -
 70
70 -
 71
71 -
 72
72 -
73
-
74
-
75
-
76
-
77
-
78
-
79
-
80
-
81
-
82
-
83
-
84
-
85
-
86
-
87
-
88
-
89
-
90
-
91
-
92
-
93
-
94
-
95
-
96
-
97
-
98
-
99
-
100
-
101
-
102
-
103
-
104
-
105
-
106
-
107
-
108
-
109
-
110
-
111
-
112
-
113
-
114
-
115
-
116
-
117
-
118
-
119
-
120
-
121
-
122
-
123
-
124
-
125
-
126
-
127
-
128
-
129
-
130
-
131
-
132
-
133
-
134
-
135
-
136
-
137
-
138
-
139
-
140
-
141
-
142
-
143
-
144
-
145
-
146
-
147
-
148
-
149
-
150
-
151
-
152
-
153
-
154
-
155
-
156
-
157
-
158
-
159
-
160
-
161
-
162
-
163
-
164
-
165
-
166
-
167
-
168
-
169
-
170
-
171
-
172
-
173
-
174
-
175
-
176
-
177
-
178
-
179
-
180
-
181
-
182
-
183
-
184
-
185
-
186
-
187
-
188
-
189
-
190
-
191
-
192
-
193
-
194
-
195
-
196
-
197
-
198
-
199
-
200
-
201
-
202
-
203
-
204
-
205
-
206
-
207
-
208
-
209
-
210
-
211
-
212
-
213
-
214
-
215
-
216
-
217
-
218
-
219
-
220
-
221
-
222
-
223
-
224
-
225
-
226
-
227
-
228
-
229
-
230
-
231
-
232
-
233
-
234
-
235
-
236
-
237
-
238
-
239
-
240
-
241
-
242
-
243
-
244
-
245
-
246
-
247
-
248
-
249
-
250
-
251
-
252
-
253
-
254
-
255
-
256
-
257
-
258
-
259
-
260
-
261
-
262
-
263
-
264
-
265
-
266
-
267
-
268
-
269
 |
 |
