Brother International PEDESIGN 8.0 Users Manual - English - Page 209
Creating a New Pattern
 |
View all Brother International PEDESIGN 8.0 manuals
Add to My Manuals
Save this manual to your list of manuals |
Page 209 highlights
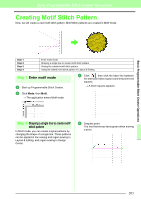
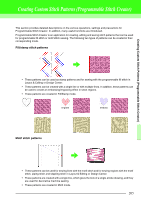
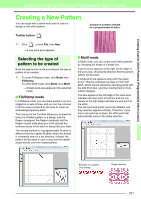
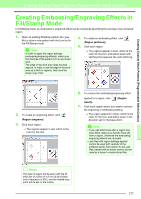
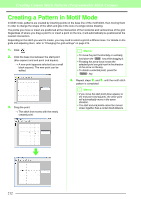
Creating Custom Stitch Patterns (Programmable Stitch Creator) Creating Custom Stitch Patterns (Programmable Stitch Creator) Creating a New Pattern You can begin with a blank work area in order to design a new stitch pattern. Toolbar button: Example of a pattern selected for a programmable fill stitch 1. Click , or click File, then New. → A new work area appears. Selecting the type of pattern to be created Enter the appropriate mode according to the type of pattern to be created. 1. To enter Fill/Stamp mode, click Mode, then Fill/Stamp. To enter Motif mode, click Mode, then Motif. → A blank work area appears in the selected mode. ■ Fill/Stamp mode In Fill/Stamp mode, you can make a pattern out of a single line or sets of lines, and you can then choose to fill the areas enclosed by the lines to create an embossing/engraving effect. The Line tool in the Tool Box allows you to draw the lines of a fill stitch pattern or a stamp, and the Region (engrave), the Region (emboss) and the Region (reset) tools allow you to fill and edit the enclosed areas of the stitch or stamp that you draw. The sewing method for a programmable fill stitch is different from the regular fill stitch, where the thread is constantly sewn in a set direction. Instead, the pattern will be sewn in such a way that the needle drops directly over the created pattern. ■ Motif mode In Motif mode, you can create motif stitch patterns by changing the shape of a single line. A green arrow appears at the right center edge of the work area, showing the direction that the pattern (stitch) will be sewn. A single pink line appears along with the green arrow. This line indicates the base for the motif stitch, which can be altered by inserting points with the Edit Point tool, and then moving them to form custom designs. The blue square at the left edge of the work area indicates the start point of that line and the red square at the right edge indicates the end point of the stitch. The start and end points cannot be deleted, and they must be aligned vertically. Therefore, if you move one point up or down, the other point will automatically move in the same direction. Example of a pattern Line sewing Region sewing 207
-
 1
1 -
2
-
3
-
4
-
5
-
6
-
7
-
8
-
9
-
10
-
11
-
12
-
13
-
14
-
15
-
16
-
17
-
18
-
19
-
20
-
21
-
22
-
23
-
24
-
25
-
26
-
27
-
28
-
29
-
30
-
31
-
32
-
33
-
34
-
35
-
36
-
37
-
38
-
39
-
40
-
41
-
42
-
43
-
44
-
45
-
46
-
47
-
48
-
49
-
50
-
51
-
52
-
53
-
54
-
55
-
56
-
57
-
58
-
59
-
60
-
61
-
62
-
63
-
64
-
65
-
66
-
67
-
68
-
69
-
70
-
71
-
72
-
73
-
74
-
75
-
76
-
77
-
78
-
79
-
80
-
81
-
82
-
83
-
84
-
85
-
86
-
87
-
88
-
89
-
90
-
91
-
92
-
93
-
94
-
95
-
96
-
97
-
98
-
99
-
100
-
101
-
102
-
103
-
104
-
105
-
106
-
107
-
108
-
109
-
110
-
111
-
112
-
113
-
114
-
115
-
116
-
117
-
118
-
119
-
120
-
121
-
122
-
123
-
124
-
125
-
126
-
127
-
128
-
129
-
130
-
131
-
132
-
133
-
134
-
135
-
136
-
137
-
138
-
139
-
140
-
141
-
142
-
143
-
144
-
145
-
146
-
147
-
148
-
149
-
150
-
151
-
152
-
153
-
154
-
155
-
156
-
157
-
158
-
159
-
160
-
161
-
162
-
163
-
164
-
165
-
166
-
167
-
168
-
169
-
170
-
171
-
172
-
173
-
174
-
175
-
176
-
177
-
178
-
179
-
180
-
181
-
182
-
183
-
184
-
185
-
186
-
187
-
188
-
189
-
190
-
191
-
192
-
193
-
194
-
195
-
196
-
197
-
198
-
199
-
200
-
201
-
202
-
203
-
 204
204 -
 205
205 -
 206
206 -
 207
207 -
 208
208 -
 209
209 -
 210
210 -
 211
211 -
 212
212 -
 213
213 -
 214
214 -
215
-
216
-
217
-
218
-
219
-
220
-
221
-
222
-
223
-
224
-
225
-
226
-
227
-
228
-
229
-
230
-
231
-
232
-
233
-
234
-
235
-
236
-
237
-
238
-
239
-
240
-
241
-
242
-
243
-
244
-
245
-
246
-
247
-
248
-
249
-
250
-
251
-
252
-
253
-
254
-
255
-
256
-
257
-
258
-
259
-
260
-
261
-
262
-
263
-
264
-
265
-
266
-
267
-
268
-
269
 |
 |
