Brother International PEDESIGN 8.0 Users Manual - English - Page 178
Creating Split Embroidery Designs
 |
View all Brother International PEDESIGN 8.0 manuals
Add to My Manuals
Save this manual to your list of manuals |
Page 178 highlights
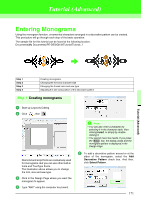
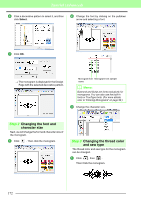
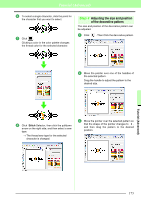
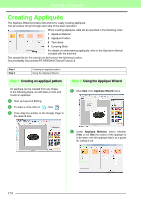
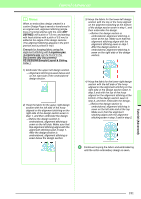
Tutorial (Advanced) Creating Split Embroidery Designs Layout & Editing has a function for creating split embroidery designs when the embroidery pattern being created is larger than the embroidery hoop. The sample file for this tutorial can be found at the following location. Documents(My Documents)\PE-DESIGN 8\Tutorial\Tutorial_9 Step 1 Step 2 Step 3 Step 4 Step 5 Step 6 Step 7 Specifying the Design Page size in Layout & Editing Creating the embroidery design Checking the embroidering order Attaching stabilizer to the fabric Marking the embroidering position Hooping the fabric Embroidering Step 1 Specifying the Design Page size in Layout & Editing First, we will specify the size of the Design Page to match the size of the embroidery design. 1 Start up Layout & Editing. 2 Click Option, then Design Page Property. 4 Click in the Section Size (for Hoop Size) selector, and then select the size of the sections (your embroidery hoop). For this example, select 120 × 170 mm (130 × 180 mm). 3 Select Custom Size, and then type or select the desired width and height for the Design Page. The setting range for Width and Height is 100 mm to 1000 mm (3.9 inch to 39.4 inch). This setting is to specify the exact width and height of a design. For this example, set width to 230 mm and height to 330 mm. 176 b Memo: • With the Section Size (for Hoop Size) setting, the width and height of the sections are 10mm smaller than the actual hoop size in order to provide space for fine positioning adjustments with adjustment sections. The 10mm is for overlapping. • It is not necessary for the Section Size (for Hoop Size) to match the Design Page size. Select the hoop size to be used for sewing. 5 Click OK.
-
 1
1 -
2
-
3
-
4
-
5
-
6
-
7
-
8
-
9
-
10
-
11
-
12
-
13
-
14
-
15
-
16
-
17
-
18
-
19
-
20
-
21
-
22
-
23
-
24
-
25
-
26
-
27
-
28
-
29
-
30
-
31
-
32
-
33
-
34
-
35
-
36
-
37
-
38
-
39
-
40
-
41
-
42
-
43
-
44
-
45
-
46
-
47
-
48
-
49
-
50
-
51
-
52
-
53
-
54
-
55
-
56
-
57
-
58
-
59
-
60
-
61
-
62
-
63
-
64
-
65
-
66
-
67
-
68
-
69
-
70
-
71
-
72
-
73
-
74
-
75
-
76
-
77
-
78
-
79
-
80
-
81
-
82
-
83
-
84
-
85
-
86
-
87
-
88
-
89
-
90
-
91
-
92
-
93
-
94
-
95
-
96
-
97
-
98
-
99
-
100
-
101
-
102
-
103
-
104
-
105
-
106
-
107
-
108
-
109
-
110
-
111
-
112
-
113
-
114
-
115
-
116
-
117
-
118
-
119
-
120
-
121
-
122
-
123
-
124
-
125
-
126
-
127
-
128
-
129
-
130
-
131
-
132
-
133
-
134
-
135
-
136
-
137
-
138
-
139
-
140
-
141
-
142
-
143
-
144
-
145
-
146
-
147
-
148
-
149
-
150
-
151
-
152
-
153
-
154
-
155
-
156
-
157
-
158
-
159
-
160
-
161
-
162
-
163
-
164
-
165
-
166
-
167
-
168
-
169
-
170
-
171
-
172
-
 173
173 -
 174
174 -
 175
175 -
 176
176 -
 177
177 -
 178
178 -
 179
179 -
 180
180 -
 181
181 -
 182
182 -
 183
183 -
184
-
185
-
186
-
187
-
188
-
189
-
190
-
191
-
192
-
193
-
194
-
195
-
196
-
197
-
198
-
199
-
200
-
201
-
202
-
203
-
204
-
205
-
206
-
207
-
208
-
209
-
210
-
211
-
212
-
213
-
214
-
215
-
216
-
217
-
218
-
219
-
220
-
221
-
222
-
223
-
224
-
225
-
226
-
227
-
228
-
229
-
230
-
231
-
232
-
233
-
234
-
235
-
236
-
237
-
238
-
239
-
240
-
241
-
242
-
243
-
244
-
245
-
246
-
247
-
248
-
249
-
250
-
251
-
252
-
253
-
254
-
255
-
256
-
257
-
258
-
259
-
260
-
261
-
262
-
263
-
264
-
265
-
266
-
267
-
268
-
269
 |
 |
