Brother International PEDESIGN 8.0 Users Manual - English - Page 136
Automatically converting an image to, a cross stitch pattern Cross Stitch
 |
View all Brother International PEDESIGN 8.0 manuals
Add to My Manuals
Save this manual to your list of manuals |
Page 136 highlights
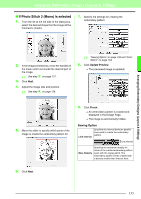
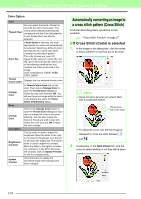
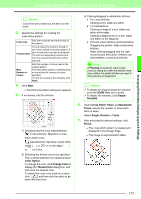
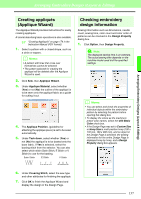
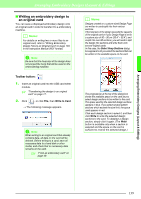
Arranging Embroidery Designs (Layout & Editing) Color Option Color You can select the brand of thread to use with the Color Set function. The Thread Chart colors will be selected automatically correspond with the Color Set selection. A user thread chart can also be selected. Color Set If Auto Select is selected, the most appropriate four colors will automatically be selected. Selecting a different option specifies the four colors used when creating the embroidery pattern. The color choices are: cyan (C), magenta (M), yellow (Y), black (K), red (R), green (G) and blue (B). Select one of the following combinations that contains the colors most used in the image. Color combinations: CMYK, RGBK, CRYK, BMYK Thread Colors Used Displays the four selected thread colors. Change Color In Thread Colors Used click on the color. Then click on Change Color to open the Thread Color dialog box. Select the new color and click OK. You will see the color change within the photo in the preview box within the Photo Stitch 2 Parameters dialog. Mono Change Color Click on the Change Color button to open the Thread Color dialog box if you wish to change the color of the photo stitching. You can also change the brand of thread you wish to sew with. Select the color and click OK to make the color change. Color/Mono Brightness / Contrast The top slider is used to adjust the brightness. Move the slider to the right to increase the brightness or to the left to decrease the brightness. The bottom slider is used to adjust the contrast. Move the slider to the right to increase the contrast or to the left to decrease the contrast. Click on Update Preview to see the changes made. Update Preview Click this button to update the previewed image after settings have been changed. Automatically converting an image to a cross stitch pattern (Cross Stitch) A tutorial describing basic operations is also available. c "Cross Stitch Function" on page 27 ■ If Cross Stitch (Color) is selected 1. In the image in the dialog box, click the areas to select whether or not they are to be sewn. b Memo: • Areas not set to be sewn are shown filled with a crosshatch pattern. These areas will not be sewn. • To adjust the zoom ratio that the image is displayed in, move the slider between and . 2. If necessary, in the Omit Colors list, click the colors to select whether or not they will be sewn. 134
-
 1
1 -
2
-
3
-
4
-
5
-
6
-
7
-
8
-
9
-
10
-
11
-
12
-
13
-
14
-
15
-
16
-
17
-
18
-
19
-
20
-
21
-
22
-
23
-
24
-
25
-
26
-
27
-
28
-
29
-
30
-
31
-
32
-
33
-
34
-
35
-
36
-
37
-
38
-
39
-
40
-
41
-
42
-
43
-
44
-
45
-
46
-
47
-
48
-
49
-
50
-
51
-
52
-
53
-
54
-
55
-
56
-
57
-
58
-
59
-
60
-
61
-
62
-
63
-
64
-
65
-
66
-
67
-
68
-
69
-
70
-
71
-
72
-
73
-
74
-
75
-
76
-
77
-
78
-
79
-
80
-
81
-
82
-
83
-
84
-
85
-
86
-
87
-
88
-
89
-
90
-
91
-
92
-
93
-
94
-
95
-
96
-
97
-
98
-
99
-
100
-
101
-
102
-
103
-
104
-
105
-
106
-
107
-
108
-
109
-
110
-
111
-
112
-
113
-
114
-
115
-
116
-
117
-
118
-
119
-
120
-
121
-
122
-
123
-
124
-
125
-
126
-
127
-
128
-
129
-
130
-
 131
131 -
 132
132 -
 133
133 -
 134
134 -
 135
135 -
 136
136 -
 137
137 -
 138
138 -
 139
139 -
 140
140 -
 141
141 -
142
-
143
-
144
-
145
-
146
-
147
-
148
-
149
-
150
-
151
-
152
-
153
-
154
-
155
-
156
-
157
-
158
-
159
-
160
-
161
-
162
-
163
-
164
-
165
-
166
-
167
-
168
-
169
-
170
-
171
-
172
-
173
-
174
-
175
-
176
-
177
-
178
-
179
-
180
-
181
-
182
-
183
-
184
-
185
-
186
-
187
-
188
-
189
-
190
-
191
-
192
-
193
-
194
-
195
-
196
-
197
-
198
-
199
-
200
-
201
-
202
-
203
-
204
-
205
-
206
-
207
-
208
-
209
-
210
-
211
-
212
-
213
-
214
-
215
-
216
-
217
-
218
-
219
-
220
-
221
-
222
-
223
-
224
-
225
-
226
-
227
-
228
-
229
-
230
-
231
-
232
-
233
-
234
-
235
-
236
-
237
-
238
-
239
-
240
-
241
-
242
-
243
-
244
-
245
-
246
-
247
-
248
-
249
-
250
-
251
-
252
-
253
-
254
-
255
-
256
-
257
-
258
-
259
-
260
-
261
-
262
-
263
-
264
-
265
-
266
-
267
-
268
-
269
 |
 |
