Brother International PEDESIGN 8.0 Users Manual - English - Page 129
Automatically converting a photo to an, embroidery pattern Photo Stitch 1/Photo Stitch 2
 |
View all Brother International PEDESIGN 8.0 manuals
Add to My Manuals
Save this manual to your list of manuals |
Page 129 highlights
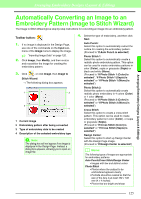
Arranging Embroidery Designs (Layout & Editing) Arranging Embroidery Designs (Layout & Editing) b Memo: • If necessary, in the Omit Region Colors list and Omit Line Colors list, click the colors to select whether or not they will be sewn. You can select whether or not areas will be sewn by selecting their colors. Automatically converting a photo to an embroidery pattern (Photo Stitch 1/Photo Stitch 2) ■ If Photo Stitch 1 (Color) is selected A tutorial describing basic operations is also available. c "Photo Stitch Function" on page 24 1. From the list at the left side of the dialog box, select the desired shape that the image will be trimmed to (mask). • Colors that are crossed out are set to not be sewn. 6. After selecting the desired settings, click Finish. → An embroidery pattern is created from the analyzed data, the appropriate thread colors and sew type settings are applied, and then the pattern is displayed in the Design Page. → The image is automatically hidden. b Memo: The sew type settings of the created embroidery pattern can later be changed in the same way as the settings for other patterns. 2. In the image preview box, move the handles of the mask until it surrounds the desired part of the image. b Memo: • To display the Image Tune dialog box, where you can adjust the image, click Image Tune. • To display the image enlarged (or reduced), move the ZOOM slider up (or down). • To create any shape of mask, select , and then move, enter or delete points to adjust the mask shape. To add points, click the outline of the mask. To delete points, select the point, and then press the Delete key. • If Auto Generate was clicked, is selected and an outline of mask was automatically detected from the image. • With a single-colored background, click Auto Generate to automatically detect the outline of the image. The outline can be adjusted by moving or deleting points. 127
-
 1
1 -
2
-
3
-
4
-
5
-
6
-
7
-
8
-
9
-
10
-
11
-
12
-
13
-
14
-
15
-
16
-
17
-
18
-
19
-
20
-
21
-
22
-
23
-
24
-
25
-
26
-
27
-
28
-
29
-
30
-
31
-
32
-
33
-
34
-
35
-
36
-
37
-
38
-
39
-
40
-
41
-
42
-
43
-
44
-
45
-
46
-
47
-
48
-
49
-
50
-
51
-
52
-
53
-
54
-
55
-
56
-
57
-
58
-
59
-
60
-
61
-
62
-
63
-
64
-
65
-
66
-
67
-
68
-
69
-
70
-
71
-
72
-
73
-
74
-
75
-
76
-
77
-
78
-
79
-
80
-
81
-
82
-
83
-
84
-
85
-
86
-
87
-
88
-
89
-
90
-
91
-
92
-
93
-
94
-
95
-
96
-
97
-
98
-
99
-
100
-
101
-
102
-
103
-
104
-
105
-
106
-
107
-
108
-
109
-
110
-
111
-
112
-
113
-
114
-
115
-
116
-
117
-
118
-
119
-
120
-
121
-
122
-
123
-
 124
124 -
 125
125 -
 126
126 -
 127
127 -
 128
128 -
 129
129 -
 130
130 -
 131
131 -
 132
132 -
 133
133 -
 134
134 -
135
-
136
-
137
-
138
-
139
-
140
-
141
-
142
-
143
-
144
-
145
-
146
-
147
-
148
-
149
-
150
-
151
-
152
-
153
-
154
-
155
-
156
-
157
-
158
-
159
-
160
-
161
-
162
-
163
-
164
-
165
-
166
-
167
-
168
-
169
-
170
-
171
-
172
-
173
-
174
-
175
-
176
-
177
-
178
-
179
-
180
-
181
-
182
-
183
-
184
-
185
-
186
-
187
-
188
-
189
-
190
-
191
-
192
-
193
-
194
-
195
-
196
-
197
-
198
-
199
-
200
-
201
-
202
-
203
-
204
-
205
-
206
-
207
-
208
-
209
-
210
-
211
-
212
-
213
-
214
-
215
-
216
-
217
-
218
-
219
-
220
-
221
-
222
-
223
-
224
-
225
-
226
-
227
-
228
-
229
-
230
-
231
-
232
-
233
-
234
-
235
-
236
-
237
-
238
-
239
-
240
-
241
-
242
-
243
-
244
-
245
-
246
-
247
-
248
-
249
-
250
-
251
-
252
-
253
-
254
-
255
-
256
-
257
-
258
-
259
-
260
-
261
-
262
-
263
-
264
-
265
-
266
-
267
-
268
-
269
 |
 |
