Brother International PEDESIGN 8.0 Users Manual - English - Page 243
Converting Characters (Japanese, Chinese, Korean, etc) to Embroidery Patterns
 |
View all Brother International PEDESIGN 8.0 manuals
Add to My Manuals
Save this manual to your list of manuals |
Page 243 highlights
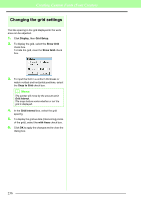
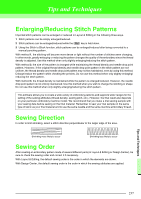
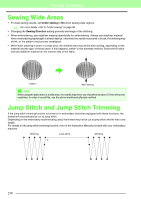
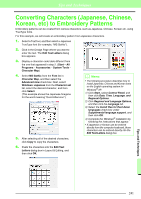
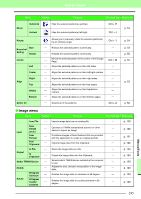
Tips and Techniques Converting Characters (Japanese, Chinese, Korean, etc) to Embroidery Patterns Embroidery patterns can be created from various characters, such as Japanese, Chinese, Korean etc, using TrueType fonts. For this example, we will create an embroidery pattern from Japanese characters. 1. Select a Text tool, and then select a Japanese TrueType font (for example, "MS Gothic"). 2. Click in the Design Page where you want to enter the text. The Edit Text Letters dialog box appears. 3. Display a character code table different from the one that appeared in step 2. (Start - All Programs - Accessories - System Tools - Character Map) 4. Select MS Gothic from the Font list in Character Map, and then select the Advanced view check box. Next, select Windows: Japanese from the Character set list, select the desired character, and then click Select. (This example shows the Japanese hiragana for the word meaning "Good Afternoon".) b Memo: • The following procedure describes how to install Japanese, Chinese and Korean fonts on the English operating system for Windows® XP. 1) Click Start, select Control Panel, and then click Date, Time, Language, and Regional Options. 2) Click Regional and Language Options, and then click the Language tab. 3) Select the Install files for East Asian languages check box under Supplemental language support, and then click OK. 4) Complete the Windows® installation by following the instructions that appear. • If Japanese or Korean can be entered directly from the computer keyboard, those characters can be entered directly into the Edit Text Letters dialog box. 5. After selecting all of the desired characters, click Copy to copy the characters. 6. Paste the characters into the Edit Text Letters dialog box in Layout & Editing, and then click OK. Tips and Techniques 241
-
 1
1 -
2
-
3
-
4
-
5
-
6
-
7
-
8
-
9
-
10
-
11
-
12
-
13
-
14
-
15
-
16
-
17
-
18
-
19
-
20
-
21
-
22
-
23
-
24
-
25
-
26
-
27
-
28
-
29
-
30
-
31
-
32
-
33
-
34
-
35
-
36
-
37
-
38
-
39
-
40
-
41
-
42
-
43
-
44
-
45
-
46
-
47
-
48
-
49
-
50
-
51
-
52
-
53
-
54
-
55
-
56
-
57
-
58
-
59
-
60
-
61
-
62
-
63
-
64
-
65
-
66
-
67
-
68
-
69
-
70
-
71
-
72
-
73
-
74
-
75
-
76
-
77
-
78
-
79
-
80
-
81
-
82
-
83
-
84
-
85
-
86
-
87
-
88
-
89
-
90
-
91
-
92
-
93
-
94
-
95
-
96
-
97
-
98
-
99
-
100
-
101
-
102
-
103
-
104
-
105
-
106
-
107
-
108
-
109
-
110
-
111
-
112
-
113
-
114
-
115
-
116
-
117
-
118
-
119
-
120
-
121
-
122
-
123
-
124
-
125
-
126
-
127
-
128
-
129
-
130
-
131
-
132
-
133
-
134
-
135
-
136
-
137
-
138
-
139
-
140
-
141
-
142
-
143
-
144
-
145
-
146
-
147
-
148
-
149
-
150
-
151
-
152
-
153
-
154
-
155
-
156
-
157
-
158
-
159
-
160
-
161
-
162
-
163
-
164
-
165
-
166
-
167
-
168
-
169
-
170
-
171
-
172
-
173
-
174
-
175
-
176
-
177
-
178
-
179
-
180
-
181
-
182
-
183
-
184
-
185
-
186
-
187
-
188
-
189
-
190
-
191
-
192
-
193
-
194
-
195
-
196
-
197
-
198
-
199
-
200
-
201
-
202
-
203
-
204
-
205
-
206
-
207
-
208
-
209
-
210
-
211
-
212
-
213
-
214
-
215
-
216
-
217
-
218
-
219
-
220
-
221
-
222
-
223
-
224
-
225
-
226
-
227
-
228
-
229
-
230
-
231
-
232
-
233
-
234
-
235
-
236
-
237
-
 238
238 -
 239
239 -
 240
240 -
 241
241 -
 242
242 -
 243
243 -
 244
244 -
 245
245 -
 246
246 -
 247
247 -
 248
248 -
249
-
250
-
251
-
252
-
253
-
254
-
255
-
256
-
257
-
258
-
259
-
260
-
261
-
262
-
263
-
264
-
265
-
266
-
267
-
268
-
269
 |
 |