Brother International PEDESIGN 8.0 Users Manual - English - Page 123
Creating a portrait image, Change Both Left and Right, Display With, Other Parts, Variations List
 |
View all Brother International PEDESIGN 8.0 manuals
Add to My Manuals
Save this manual to your list of manuals |
Page 123 highlights
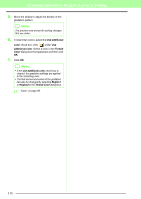
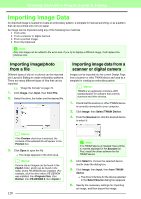
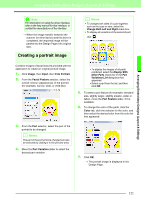
Arranging Embroidery Designs (Layout & Editing) Arranging Embroidery Designs (Layout & Editing) a Note: For information on using the driver interface, refer to the help manual for that interface, or contact the manufacturer of the interface. → When the image transfer between the scanner (or other device) and the driver is completed, the imported image will be pasted into the Design Page at its original size. Creating a portrait image b Memo: • To change both sides of a part together, such as the eyes or ears, select the Change Both Left and Right check box. • To display all variations of the selected part, click . Combine images of facial features provided with the application to create an original portrait image. 1. Click Image, then Input, then from Portrait. 2. From the Facial Feature selector, select the overall contour (appearance) of the portrait (for example, narrow, wide, or child-like). • To display the images of all parts combined, select the Display With Other Parts check box in the Part Variations List dialog box that appeared. • Select a part from the list, and then click OK. 5. To select a part feature (for example, standard size, slightly larger, slightly smaller, wider or taller), move the Part Feature slider, if it is available. 6. To change the color of the parts, click the Color tab, click the selector for the color, and then select the desired color from the color list that appeared. 3. From the Part selector, select the part of the portrait to be changed. b Memo: The part of the portrait to be changed can also be selected by clicking it in the preview area. 4. Move the Part Variation slider to select the desired part variation. 7. Click OK. → The portrait image is displayed in the Design Page. 121
-
 1
1 -
2
-
3
-
4
-
5
-
6
-
7
-
8
-
9
-
10
-
11
-
12
-
13
-
14
-
15
-
16
-
17
-
18
-
19
-
20
-
21
-
22
-
23
-
24
-
25
-
26
-
27
-
28
-
29
-
30
-
31
-
32
-
33
-
34
-
35
-
36
-
37
-
38
-
39
-
40
-
41
-
42
-
43
-
44
-
45
-
46
-
47
-
48
-
49
-
50
-
51
-
52
-
53
-
54
-
55
-
56
-
57
-
58
-
59
-
60
-
61
-
62
-
63
-
64
-
65
-
66
-
67
-
68
-
69
-
70
-
71
-
72
-
73
-
74
-
75
-
76
-
77
-
78
-
79
-
80
-
81
-
82
-
83
-
84
-
85
-
86
-
87
-
88
-
89
-
90
-
91
-
92
-
93
-
94
-
95
-
96
-
97
-
98
-
99
-
100
-
101
-
102
-
103
-
104
-
105
-
106
-
107
-
108
-
109
-
110
-
111
-
112
-
113
-
114
-
115
-
116
-
117
-
 118
118 -
 119
119 -
 120
120 -
 121
121 -
 122
122 -
 123
123 -
 124
124 -
 125
125 -
 126
126 -
 127
127 -
 128
128 -
129
-
130
-
131
-
132
-
133
-
134
-
135
-
136
-
137
-
138
-
139
-
140
-
141
-
142
-
143
-
144
-
145
-
146
-
147
-
148
-
149
-
150
-
151
-
152
-
153
-
154
-
155
-
156
-
157
-
158
-
159
-
160
-
161
-
162
-
163
-
164
-
165
-
166
-
167
-
168
-
169
-
170
-
171
-
172
-
173
-
174
-
175
-
176
-
177
-
178
-
179
-
180
-
181
-
182
-
183
-
184
-
185
-
186
-
187
-
188
-
189
-
190
-
191
-
192
-
193
-
194
-
195
-
196
-
197
-
198
-
199
-
200
-
201
-
202
-
203
-
204
-
205
-
206
-
207
-
208
-
209
-
210
-
211
-
212
-
213
-
214
-
215
-
216
-
217
-
218
-
219
-
220
-
221
-
222
-
223
-
224
-
225
-
226
-
227
-
228
-
229
-
230
-
231
-
232
-
233
-
234
-
235
-
236
-
237
-
238
-
239
-
240
-
241
-
242
-
243
-
244
-
245
-
246
-
247
-
248
-
249
-
250
-
251
-
252
-
253
-
254
-
255
-
256
-
257
-
258
-
259
-
260
-
261
-
262
-
263
-
264
-
265
-
266
-
267
-
268
-
269
 |
 |
