Brother International PEDESIGN 8.0 Users Manual - English - Page 206
Saving the created motif, stitch pattern, Using the edited motif stitch
 |
View all Brother International PEDESIGN 8.0 manuals
Add to My Manuals
Save this manual to your list of manuals |
Page 206 highlights
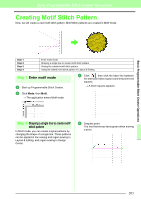
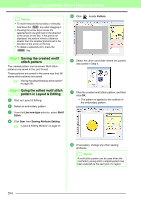
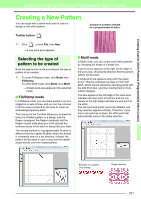
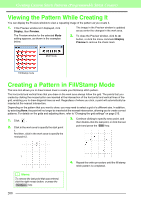
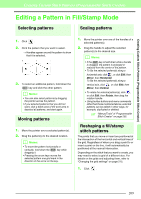
Basic Programmable Stitch Creator Operations b Memo: • To move the point horizontally or vertically, hold down the Shift key while dragging it. • Pressing the arrow keys moves the selected point one grid mark in the direction of the arrow on the key. If the grid is not displayed, the pattern moves a distance smaller than the smallest grid interval in the direction of the arrow on the key. • To delete a selected point, press the Delete key. Step 3 Saving the created motif stitch pattern The created pattern can be saved. Motif stitch patterns are saved in the .pmf format. These patterns are saved in the same way that fill/ stamp stitch patterns are saved. c "Saving the edited fill/stamp stitch pattern" on page 201. Step 4 Using the edited motif stitch pattern in Layout & Editing 1 Start up Layout & Editing. 2 Select an embroidery pattern. 3 From the Line sew type selector, select Motif Stitch. 4 Click Sew, then Sewing Attribute Setting. c "Layout & Editing Window" on page 47. 5 Click beside Pattern. 6 Select the drive and folder where the pattern was saved in Step 4. 7 Click the created motif stitch pattern, and then click OK. → The pattern is applied to the outlines of the embroidery pattern. 8 If necessary, change any other sewing attributes. b Memo: A motif stitch pattern can be used when the motif stitch, piping stitch or stippling stitch has been selected as the sew type of a region. 204
-
 1
1 -
2
-
3
-
4
-
5
-
6
-
7
-
8
-
9
-
10
-
11
-
12
-
13
-
14
-
15
-
16
-
17
-
18
-
19
-
20
-
21
-
22
-
23
-
24
-
25
-
26
-
27
-
28
-
29
-
30
-
31
-
32
-
33
-
34
-
35
-
36
-
37
-
38
-
39
-
40
-
41
-
42
-
43
-
44
-
45
-
46
-
47
-
48
-
49
-
50
-
51
-
52
-
53
-
54
-
55
-
56
-
57
-
58
-
59
-
60
-
61
-
62
-
63
-
64
-
65
-
66
-
67
-
68
-
69
-
70
-
71
-
72
-
73
-
74
-
75
-
76
-
77
-
78
-
79
-
80
-
81
-
82
-
83
-
84
-
85
-
86
-
87
-
88
-
89
-
90
-
91
-
92
-
93
-
94
-
95
-
96
-
97
-
98
-
99
-
100
-
101
-
102
-
103
-
104
-
105
-
106
-
107
-
108
-
109
-
110
-
111
-
112
-
113
-
114
-
115
-
116
-
117
-
118
-
119
-
120
-
121
-
122
-
123
-
124
-
125
-
126
-
127
-
128
-
129
-
130
-
131
-
132
-
133
-
134
-
135
-
136
-
137
-
138
-
139
-
140
-
141
-
142
-
143
-
144
-
145
-
146
-
147
-
148
-
149
-
150
-
151
-
152
-
153
-
154
-
155
-
156
-
157
-
158
-
159
-
160
-
161
-
162
-
163
-
164
-
165
-
166
-
167
-
168
-
169
-
170
-
171
-
172
-
173
-
174
-
175
-
176
-
177
-
178
-
179
-
180
-
181
-
182
-
183
-
184
-
185
-
186
-
187
-
188
-
189
-
190
-
191
-
192
-
193
-
194
-
195
-
196
-
197
-
198
-
199
-
200
-
 201
201 -
 202
202 -
 203
203 -
 204
204 -
 205
205 -
 206
206 -
 207
207 -
 208
208 -
 209
209 -
 210
210 -
 211
211 -
212
-
213
-
214
-
215
-
216
-
217
-
218
-
219
-
220
-
221
-
222
-
223
-
224
-
225
-
226
-
227
-
228
-
229
-
230
-
231
-
232
-
233
-
234
-
235
-
236
-
237
-
238
-
239
-
240
-
241
-
242
-
243
-
244
-
245
-
246
-
247
-
248
-
249
-
250
-
251
-
252
-
253
-
254
-
255
-
256
-
257
-
258
-
259
-
260
-
261
-
262
-
263
-
264
-
265
-
266
-
267
-
268
-
269
 |
 |
