Brother International PEDESIGN 8.0 Users Manual - English - Page 34
Applying a pattern to, stitching, Step 4
 |
View all Brother International PEDESIGN 8.0 manuals
Add to My Manuals
Save this manual to your list of manuals |
Page 34 highlights
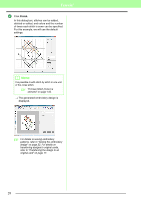
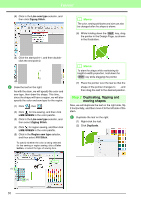
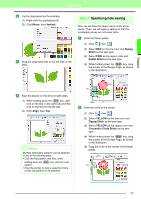
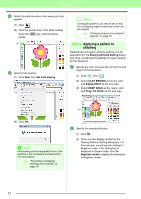
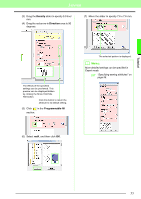
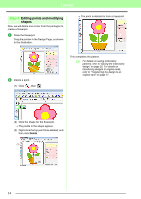
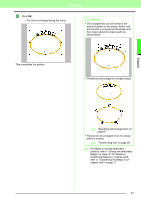
Tutorial 3 Select the patterns where hole sewing is to be applied. (1) Click . (2) Click the yellow circle, then while holding down the Ctrl key, click the flower petals. (1) 1 (2) 4 Specify hole sewing. (1) Click Sew, then Set hole sewing. b Memo: Overlapped patterns can also be set so that the overlapping region is removed or they can be merged. c "Changing shapes of overlapped patterns" on page 75. Step 4 Applying a pattern to stitching Detailed line and region attribute settings can be specified from the Sewing Attribute Setting dialog box. Now, we will specify settings for region sewing for the flowerpot. 1 Specify the color and sew type for the line and region of the flowerpot. (1) Click , then . (2) Select CLAY BROWN as the line color and Zigzag Stitch as the sew type. (3) Select DEEP GOLD as the region color and Prog. Fill Stitch as the sew type. (2) (3) (1) (1) (2) (3) (2) Click OK. a Note: Hole sewing cannot be applied if one of the patterns is not completely enclosed within the other pattern. c "Preventing overlapping stitching (hole sewing)" on page 75. 2 Specify the sewing attributes. (1) Click . (2) There are two display modes for the Sewing Attribute Setting dialog box. For this example, we will specify settings in Beginner mode. If the dialog box is displayed in Expert mode, click To Beginner mode to display the dialog box in Beginner mode. 32
-
 1
1 -
2
-
3
-
4
-
5
-
6
-
7
-
8
-
9
-
10
-
11
-
12
-
13
-
14
-
15
-
16
-
17
-
18
-
19
-
20
-
21
-
22
-
23
-
24
-
25
-
26
-
27
-
28
-
 29
29 -
 30
30 -
 31
31 -
 32
32 -
 33
33 -
 34
34 -
 35
35 -
 36
36 -
 37
37 -
 38
38 -
 39
39 -
40
-
41
-
42
-
43
-
44
-
45
-
46
-
47
-
48
-
49
-
50
-
51
-
52
-
53
-
54
-
55
-
56
-
57
-
58
-
59
-
60
-
61
-
62
-
63
-
64
-
65
-
66
-
67
-
68
-
69
-
70
-
71
-
72
-
73
-
74
-
75
-
76
-
77
-
78
-
79
-
80
-
81
-
82
-
83
-
84
-
85
-
86
-
87
-
88
-
89
-
90
-
91
-
92
-
93
-
94
-
95
-
96
-
97
-
98
-
99
-
100
-
101
-
102
-
103
-
104
-
105
-
106
-
107
-
108
-
109
-
110
-
111
-
112
-
113
-
114
-
115
-
116
-
117
-
118
-
119
-
120
-
121
-
122
-
123
-
124
-
125
-
126
-
127
-
128
-
129
-
130
-
131
-
132
-
133
-
134
-
135
-
136
-
137
-
138
-
139
-
140
-
141
-
142
-
143
-
144
-
145
-
146
-
147
-
148
-
149
-
150
-
151
-
152
-
153
-
154
-
155
-
156
-
157
-
158
-
159
-
160
-
161
-
162
-
163
-
164
-
165
-
166
-
167
-
168
-
169
-
170
-
171
-
172
-
173
-
174
-
175
-
176
-
177
-
178
-
179
-
180
-
181
-
182
-
183
-
184
-
185
-
186
-
187
-
188
-
189
-
190
-
191
-
192
-
193
-
194
-
195
-
196
-
197
-
198
-
199
-
200
-
201
-
202
-
203
-
204
-
205
-
206
-
207
-
208
-
209
-
210
-
211
-
212
-
213
-
214
-
215
-
216
-
217
-
218
-
219
-
220
-
221
-
222
-
223
-
224
-
225
-
226
-
227
-
228
-
229
-
230
-
231
-
232
-
233
-
234
-
235
-
236
-
237
-
238
-
239
-
240
-
241
-
242
-
243
-
244
-
245
-
246
-
247
-
248
-
249
-
250
-
251
-
252
-
253
-
254
-
255
-
256
-
257
-
258
-
259
-
260
-
261
-
262
-
263
-
264
-
265
-
266
-
267
-
268
-
269
 |
 |
