Brother International PEDESIGN 8.0 Users Manual - English - Page 141
Writing an embroidery design to, an original card, Arranging Embroidery Designs Layout & Editing
 |
View all Brother International PEDESIGN 8.0 manuals
Add to My Manuals
Save this manual to your list of manuals |
Page 141 highlights
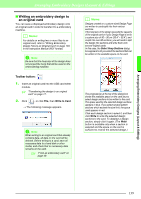
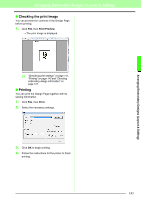
Arranging Embroidery Designs (Layout & Editing) Arranging Embroidery Designs (Layout & Editing) ■ Writing an embroidery design to an original card You can save a displayed embroidery design onto an original card in order to transfer it to a embroidery machine. b Memo: For details on writing two or more files to an original card, refer to "Writing Embroidery Design Files to an Original Card" on page 194 in the Instruction Manual (PDF format). a Note: Be sure that the hoop size of the design does not exceed the hoop that will be used on the embroidering machine. Toolbar button: 1. Insert an original card into the USB card writer module. c "Transferring the design to an original card" on page 17. 2. Click , or click File, then Write to Card. → The following message appears. a Note: When writing to an original card that already contains data, all data on the card will be deleted. Before writing to a card, save all necessary data to a hard disk or other media, and check that no necessary data remains on the card. c "From an embroidery card" on page 49. b Memo: Designs created on a custom-sized Design Page are written to cards split into their various sections. If the total size of the design exceeds the capacity of the original card or if your Design Page is set to a custom size of 90 × 90 cm (35.4" × 35.4"), and is split into over 80 sections, you will need to split the design into sections and write them onto several original cards. In this case, the Select Hoop Sections dialog box appears to let you select the sections that can be written in the available space on the card. The progress bar at the top of the dialog box shows the available space on the card as you select design sections to be written to the card. The space used by the selected design sections appears in blue. If you select several pattern sections which exceed the size limit, the space used appears in red. Click each design section to select it, and then click Write to write the selected design sections to the card. To deselect a design section, simply click it again. (The Write button is available only when a section is selected and the space on the card is sufficient to receive the selected design.) 139
-
 1
1 -
2
-
3
-
4
-
5
-
6
-
7
-
8
-
9
-
10
-
11
-
12
-
13
-
14
-
15
-
16
-
17
-
18
-
19
-
20
-
21
-
22
-
23
-
24
-
25
-
26
-
27
-
28
-
29
-
30
-
31
-
32
-
33
-
34
-
35
-
36
-
37
-
38
-
39
-
40
-
41
-
42
-
43
-
44
-
45
-
46
-
47
-
48
-
49
-
50
-
51
-
52
-
53
-
54
-
55
-
56
-
57
-
58
-
59
-
60
-
61
-
62
-
63
-
64
-
65
-
66
-
67
-
68
-
69
-
70
-
71
-
72
-
73
-
74
-
75
-
76
-
77
-
78
-
79
-
80
-
81
-
82
-
83
-
84
-
85
-
86
-
87
-
88
-
89
-
90
-
91
-
92
-
93
-
94
-
95
-
96
-
97
-
98
-
99
-
100
-
101
-
102
-
103
-
104
-
105
-
106
-
107
-
108
-
109
-
110
-
111
-
112
-
113
-
114
-
115
-
116
-
117
-
118
-
119
-
120
-
121
-
122
-
123
-
124
-
125
-
126
-
127
-
128
-
129
-
130
-
131
-
132
-
133
-
134
-
135
-
 136
136 -
 137
137 -
 138
138 -
 139
139 -
 140
140 -
 141
141 -
 142
142 -
 143
143 -
 144
144 -
 145
145 -
 146
146 -
147
-
148
-
149
-
150
-
151
-
152
-
153
-
154
-
155
-
156
-
157
-
158
-
159
-
160
-
161
-
162
-
163
-
164
-
165
-
166
-
167
-
168
-
169
-
170
-
171
-
172
-
173
-
174
-
175
-
176
-
177
-
178
-
179
-
180
-
181
-
182
-
183
-
184
-
185
-
186
-
187
-
188
-
189
-
190
-
191
-
192
-
193
-
194
-
195
-
196
-
197
-
198
-
199
-
200
-
201
-
202
-
203
-
204
-
205
-
206
-
207
-
208
-
209
-
210
-
211
-
212
-
213
-
214
-
215
-
216
-
217
-
218
-
219
-
220
-
221
-
222
-
223
-
224
-
225
-
226
-
227
-
228
-
229
-
230
-
231
-
232
-
233
-
234
-
235
-
236
-
237
-
238
-
239
-
240
-
241
-
242
-
243
-
244
-
245
-
246
-
247
-
248
-
249
-
250
-
251
-
252
-
253
-
254
-
255
-
256
-
257
-
258
-
259
-
260
-
261
-
262
-
263
-
264
-
265
-
266
-
267
-
268
-
269
 |
 |
