Brother International PEDESIGN 8.0 Users Manual - English - Page 169
Saving frequently used, sewing attributes, Applying effects to concentric, circle and radial stitches
 |
View all Brother International PEDESIGN 8.0 manuals
Add to My Manuals
Save this manual to your list of manuals |
Page 169 highlights
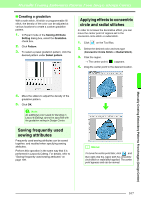
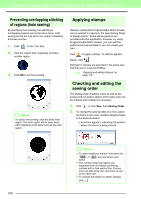
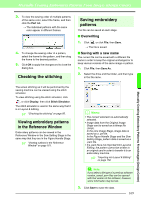
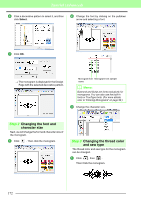
Manually Creating Embroidery Patterns From Images (Design Center) ■ Creating a gradation With a satin stitch, fill stitch or programmable fill stitch, the density of the color can be adjusted at various locations to create a custom gradation pattern. 1. In Expert mode of the Sewing Attribute Setting dialog box, select the Gradation check box. 2. Click Pattern. 3. To select a preset gradation pattern, click the desired pattern under Select pattern. Applying effects to concentric circle and radial stitches In order to increase the decorative effect, you can move the center point of regions set to the concentric circle stitch or radial stitch. 1. Click on the Tool Box. 2. Select the desired color and sew type (Concentric Circle Stitch or Radial Stitch). 3. Click the region. → The center point ( ) appears. 4. Drag the center point to the desired location. 4. Move the sliders to adjust the density of the gradation pattern. 5. Click OK. a Note: An additional color (used for blending in Layout & Editing) cannot be specified with the gradation setting in Design Center. Saving frequently used sewing attributes Frequently used sewing attributes can be saved together, and recalled when specifying sewing attributes. Perform this operation in the same way that it is performed in Layout & Editing. For details, refer to "Saving frequently used sewing attributes" on page 109. b Memo: To move the center point later, click , and then right click the region with the concentric circle stitch or radial stitch applied. The center point appears and can be moved. Manually Creating Embroidery Patterns From Images (Design Center) 167
-
 1
1 -
2
-
3
-
4
-
5
-
6
-
7
-
8
-
9
-
10
-
11
-
12
-
13
-
14
-
15
-
16
-
17
-
18
-
19
-
20
-
21
-
22
-
23
-
24
-
25
-
26
-
27
-
28
-
29
-
30
-
31
-
32
-
33
-
34
-
35
-
36
-
37
-
38
-
39
-
40
-
41
-
42
-
43
-
44
-
45
-
46
-
47
-
48
-
49
-
50
-
51
-
52
-
53
-
54
-
55
-
56
-
57
-
58
-
59
-
60
-
61
-
62
-
63
-
64
-
65
-
66
-
67
-
68
-
69
-
70
-
71
-
72
-
73
-
74
-
75
-
76
-
77
-
78
-
79
-
80
-
81
-
82
-
83
-
84
-
85
-
86
-
87
-
88
-
89
-
90
-
91
-
92
-
93
-
94
-
95
-
96
-
97
-
98
-
99
-
100
-
101
-
102
-
103
-
104
-
105
-
106
-
107
-
108
-
109
-
110
-
111
-
112
-
113
-
114
-
115
-
116
-
117
-
118
-
119
-
120
-
121
-
122
-
123
-
124
-
125
-
126
-
127
-
128
-
129
-
130
-
131
-
132
-
133
-
134
-
135
-
136
-
137
-
138
-
139
-
140
-
141
-
142
-
143
-
144
-
145
-
146
-
147
-
148
-
149
-
150
-
151
-
152
-
153
-
154
-
155
-
156
-
157
-
158
-
159
-
160
-
161
-
162
-
163
-
 164
164 -
 165
165 -
 166
166 -
 167
167 -
 168
168 -
 169
169 -
 170
170 -
 171
171 -
 172
172 -
 173
173 -
 174
174 -
175
-
176
-
177
-
178
-
179
-
180
-
181
-
182
-
183
-
184
-
185
-
186
-
187
-
188
-
189
-
190
-
191
-
192
-
193
-
194
-
195
-
196
-
197
-
198
-
199
-
200
-
201
-
202
-
203
-
204
-
205
-
206
-
207
-
208
-
209
-
210
-
211
-
212
-
213
-
214
-
215
-
216
-
217
-
218
-
219
-
220
-
221
-
222
-
223
-
224
-
225
-
226
-
227
-
228
-
229
-
230
-
231
-
232
-
233
-
234
-
235
-
236
-
237
-
238
-
239
-
240
-
241
-
242
-
243
-
244
-
245
-
246
-
247
-
248
-
249
-
250
-
251
-
252
-
253
-
254
-
255
-
256
-
257
-
258
-
259
-
260
-
261
-
262
-
263
-
264
-
265
-
266
-
267
-
268
-
269
 |
 |
