Brother International PEDESIGN 8.0 Users Manual - English - Page 202
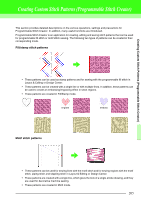
Opening a fill/stamp stitch, pattern, Drawing lines to edit the fill, stamp stitch pattern
 |
View all Brother International PEDESIGN 8.0 manuals
Add to My Manuals
Save this manual to your list of manuals |
Page 202 highlights
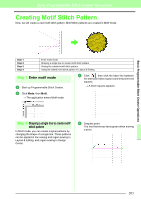
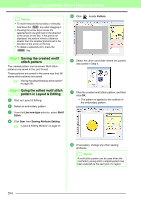
Basic Programmable Stitch Creator Operations Step 1 Opening a fill/stamp stitch pattern First, we will open the fill/stamp stitch pattern to be edited. In this example, we will use pattern wave1.pas. 1 Click , then select All Programs, then PE-DESIGN 8, then Tools, then Programmable Stitch Creator. 2 Click File, then Open. 3 Select the pattern file wave1.pas in the Pattern folder where PE-DESIGN was installed. (For example, clicking the drive where PE-DESIGN was installed, then Program Files, then Brother, then PE-DESIGN 8, then Pattern) Click Open, or double-click the files icon. b Memo: • The horizontal and vertical lines that you draw on the work area always follow the grid. The points that you create by clicking are inserted at the intersection of the horizontal and vertical grid lines, enabling you to draw diagonal lines as well. Therefore, regardless of where you click, a point will automatically be inserted at the nearest intersection. • To remove the last point that was entered, click the right mouse button. c "Creating a Pattern in Fill/Stamp Mode" on page 208. 3 Double-click the Design Page to specify point 5 (end point). 5 Step 2 Drawing lines to edit the fill/ stamp stitch pattern Now, we are going to draw lines between the displayed ones using the Line tool of the Tool Box. b Memo: For this example, we will use the grid setting Medium with which the pattern was saved. For more information on the grid settings, refer to "Changing the grid settings" on page 215. 1 Click . 2 Click in the Design Page to specify points 1 through 4. 1 4 Repeat the previous operations to add another wave between the first and second waves on the right side. 2 3 4 200
-
 1
1 -
2
-
3
-
4
-
5
-
6
-
7
-
8
-
9
-
10
-
11
-
12
-
13
-
14
-
15
-
16
-
17
-
18
-
19
-
20
-
21
-
22
-
23
-
24
-
25
-
26
-
27
-
28
-
29
-
30
-
31
-
32
-
33
-
34
-
35
-
36
-
37
-
38
-
39
-
40
-
41
-
42
-
43
-
44
-
45
-
46
-
47
-
48
-
49
-
50
-
51
-
52
-
53
-
54
-
55
-
56
-
57
-
58
-
59
-
60
-
61
-
62
-
63
-
64
-
65
-
66
-
67
-
68
-
69
-
70
-
71
-
72
-
73
-
74
-
75
-
76
-
77
-
78
-
79
-
80
-
81
-
82
-
83
-
84
-
85
-
86
-
87
-
88
-
89
-
90
-
91
-
92
-
93
-
94
-
95
-
96
-
97
-
98
-
99
-
100
-
101
-
102
-
103
-
104
-
105
-
106
-
107
-
108
-
109
-
110
-
111
-
112
-
113
-
114
-
115
-
116
-
117
-
118
-
119
-
120
-
121
-
122
-
123
-
124
-
125
-
126
-
127
-
128
-
129
-
130
-
131
-
132
-
133
-
134
-
135
-
136
-
137
-
138
-
139
-
140
-
141
-
142
-
143
-
144
-
145
-
146
-
147
-
148
-
149
-
150
-
151
-
152
-
153
-
154
-
155
-
156
-
157
-
158
-
159
-
160
-
161
-
162
-
163
-
164
-
165
-
166
-
167
-
168
-
169
-
170
-
171
-
172
-
173
-
174
-
175
-
176
-
177
-
178
-
179
-
180
-
181
-
182
-
183
-
184
-
185
-
186
-
187
-
188
-
189
-
190
-
191
-
192
-
193
-
194
-
195
-
196
-
 197
197 -
 198
198 -
 199
199 -
 200
200 -
 201
201 -
 202
202 -
 203
203 -
 204
204 -
 205
205 -
 206
206 -
 207
207 -
208
-
209
-
210
-
211
-
212
-
213
-
214
-
215
-
216
-
217
-
218
-
219
-
220
-
221
-
222
-
223
-
224
-
225
-
226
-
227
-
228
-
229
-
230
-
231
-
232
-
233
-
234
-
235
-
236
-
237
-
238
-
239
-
240
-
241
-
242
-
243
-
244
-
245
-
246
-
247
-
248
-
249
-
250
-
251
-
252
-
253
-
254
-
255
-
256
-
257
-
258
-
259
-
260
-
261
-
262
-
263
-
264
-
265
-
266
-
267
-
268
-
269
 |
 |
