Brother International PEDESIGN 8.0 Users Manual - English - Page 133
Arranging Embroidery Designs Layout & Editing, Sewing Option, Color Option, Color/Sepia/Mono
 |
View all Brother International PEDESIGN 8.0 manuals
Add to My Manuals
Save this manual to your list of manuals |
Page 133 highlights
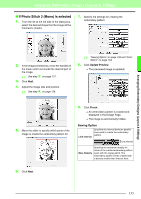
Arranging Embroidery Designs (Layout & Editing) Arranging Embroidery Designs (Layout & Editing) Sewing Option Detail Run Pitch Sew Page Color (Available only with Color and Sepia) Conversion Priority Image Type Specifies how detailed the created embroidery pattern will be. Selecting a setting closer to Fine creates more details in the pattern and increases the number of stitches. (The stitches will overlap) Sets the sewing pitch. The pattern is created with this setting value as the minimum length. When the value is lowered, the sewing pitch will be shortened, resulting in finer stitching. If this check box is selected, the data for the parts of the pattern that are the same color as the Design Page will be created. Clear the check box to keep the fabric the same color as the Design Page. Default: Selected Select what parameter is given priority when converting to embroidery pattern. Stitch Quality: Creates a pattern while giving priority to the stitching quality. However, many jump stitches will result. Jump Stitch Reduction: Creates a pattern while giving priority to reducing the number of jump stitches in order to reduce complications during embroidering. However, the stitching quality will be slightly reduced. If Photo is selected, the thread colors will be mixed together, which will result in a more natural look. If Cartoon is selected, the thread colors will not be mixed together, which will result in a more simply colored look. Select Photo for image data from a photograph, etc. Select Cartoon for image data from an illustration, etc. Color Option Color/Sepia Auto Select Select this check box to automatically select the thread colors. As a default, this check box is selected. If this check box is cleared, select the thread colors manually. Manual Select Appears when the Auto Select check box is cleared. Click this button to open the Manual Select dialog box, which lets you manually set the thread colors to be used when creating the pattern (see below). Selects the thread chart for selecting the thread color with the Auto Select function. Thread Chart The most appropriate thread colors from the selected thread chart are selected. A user thread chart can also be selected. Max. Number Sets the number of colors selected by of Colors the Auto Select function. Mono Change Color Click on the Change Color button to open the Thread Color dialog box if you wish to change the color of the photo stitching. You can also change the brand of thread you wish to sew with. Select the color and click OK to make the color change. Color/Sepia/Mono Brightness / Contrast The top slider is used to adjust the brightness. Move the slider to the right to increase the brightness or to the left to decrease the brightness. The bottom slider is used to adjust the contrast. Move the slider to the right to increase the contrast or to the left to decrease the contrast. Click on Update Preview to see changes made. Select from Candidates Click this button to open the Select from Candidates dialog box. Variations of the image with different degrees of brightness and contrast are displayed. Click one of the variations, and then click OK to apply the settings and display a preview of the image. Update Preview Click this button to update the previewed image after settings have been changed. 131
-
 1
1 -
2
-
3
-
4
-
5
-
6
-
7
-
8
-
9
-
10
-
11
-
12
-
13
-
14
-
15
-
16
-
17
-
18
-
19
-
20
-
21
-
22
-
23
-
24
-
25
-
26
-
27
-
28
-
29
-
30
-
31
-
32
-
33
-
34
-
35
-
36
-
37
-
38
-
39
-
40
-
41
-
42
-
43
-
44
-
45
-
46
-
47
-
48
-
49
-
50
-
51
-
52
-
53
-
54
-
55
-
56
-
57
-
58
-
59
-
60
-
61
-
62
-
63
-
64
-
65
-
66
-
67
-
68
-
69
-
70
-
71
-
72
-
73
-
74
-
75
-
76
-
77
-
78
-
79
-
80
-
81
-
82
-
83
-
84
-
85
-
86
-
87
-
88
-
89
-
90
-
91
-
92
-
93
-
94
-
95
-
96
-
97
-
98
-
99
-
100
-
101
-
102
-
103
-
104
-
105
-
106
-
107
-
108
-
109
-
110
-
111
-
112
-
113
-
114
-
115
-
116
-
117
-
118
-
119
-
120
-
121
-
122
-
123
-
124
-
125
-
126
-
127
-
 128
128 -
 129
129 -
 130
130 -
 131
131 -
 132
132 -
 133
133 -
 134
134 -
 135
135 -
 136
136 -
 137
137 -
 138
138 -
139
-
140
-
141
-
142
-
143
-
144
-
145
-
146
-
147
-
148
-
149
-
150
-
151
-
152
-
153
-
154
-
155
-
156
-
157
-
158
-
159
-
160
-
161
-
162
-
163
-
164
-
165
-
166
-
167
-
168
-
169
-
170
-
171
-
172
-
173
-
174
-
175
-
176
-
177
-
178
-
179
-
180
-
181
-
182
-
183
-
184
-
185
-
186
-
187
-
188
-
189
-
190
-
191
-
192
-
193
-
194
-
195
-
196
-
197
-
198
-
199
-
200
-
201
-
202
-
203
-
204
-
205
-
206
-
207
-
208
-
209
-
210
-
211
-
212
-
213
-
214
-
215
-
216
-
217
-
218
-
219
-
220
-
221
-
222
-
223
-
224
-
225
-
226
-
227
-
228
-
229
-
230
-
231
-
232
-
233
-
234
-
235
-
236
-
237
-
238
-
239
-
240
-
241
-
242
-
243
-
244
-
245
-
246
-
247
-
248
-
249
-
250
-
251
-
252
-
253
-
254
-
255
-
256
-
257
-
258
-
259
-
260
-
261
-
262
-
263
-
264
-
265
-
266
-
267
-
268
-
269
 |
 |
