Samsung i750 User Guide - Page 148
OK/Confirm, Pictures, Cancel, Storage Card.
 |
View all Samsung i750 manuals
Add to My Manuals
Save this manual to your list of manuals |
Page 148 highlights
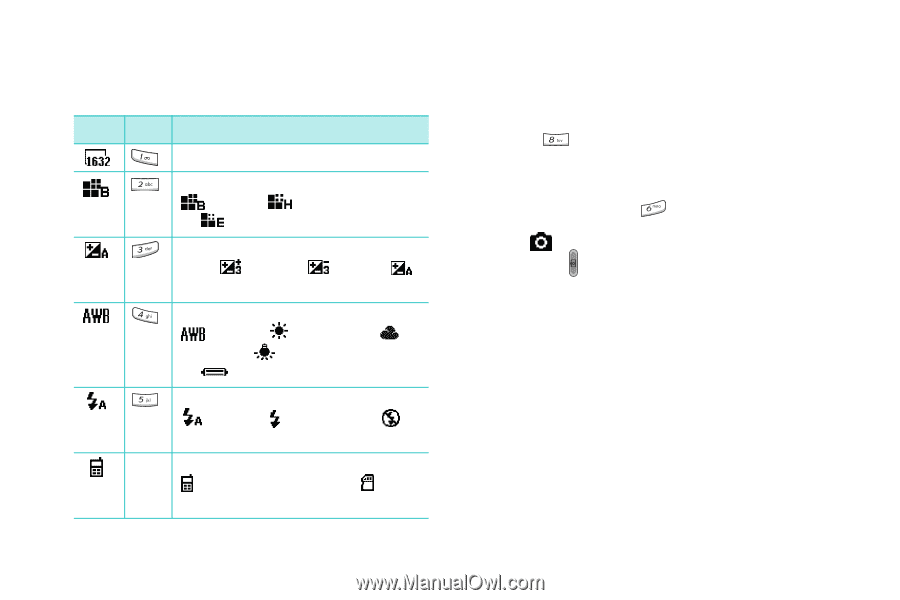
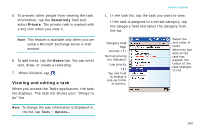
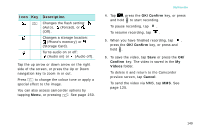
Multimedia 2. Adjust the camera settings using the following onscreen icons or using the keypad. Icon Key Description Selects an image resolution. Selects an image quality setting: (Best), (High), or (Economy). Adjusts the image brightness: from (+3) to (-3) or (Auto). Adjusts the white balance: (Auto), (Daylight), (Cloudy), (Tungsten), or (Fluorescent). Changes the flash setting: (Auto), (Forced), or (Off). Changes a storage location: (Phone's memory) or (Storage Card). 146 Tap the up arrow or down arrow on the right side of the screen, or press the Up or Down navigation key to zoom in or out. Press to change the colour tone or apply a special effect to the image. You can also access camera options by tapping Menu, or pressing . See page 147. 3. Tap , press the OK/Confirm key, or press and hold to take a photo. The taken photo displays on the preview screen. 4. To save the photo, tap Save or press the OK/ Confirm key. The photo is saved in the My Pictures folder. To delete it and return to the Camera preview screen, tap Cancel. To send the photo via MMS, tap MMS. See page 125.
-
 1
1 -
2
-
3
-
4
-
5
-
6
-
7
-
8
-
9
-
10
-
11
-
12
-
13
-
14
-
15
-
16
-
17
-
18
-
19
-
20
-
21
-
22
-
23
-
24
-
25
-
26
-
27
-
28
-
29
-
30
-
31
-
32
-
33
-
34
-
35
-
36
-
37
-
38
-
39
-
40
-
41
-
42
-
43
-
44
-
45
-
46
-
47
-
48
-
49
-
50
-
51
-
52
-
53
-
54
-
55
-
56
-
57
-
58
-
59
-
60
-
61
-
62
-
63
-
64
-
65
-
66
-
67
-
68
-
69
-
70
-
71
-
72
-
73
-
74
-
75
-
76
-
77
-
78
-
79
-
80
-
81
-
82
-
83
-
84
-
85
-
86
-
87
-
88
-
89
-
90
-
91
-
92
-
93
-
94
-
95
-
96
-
97
-
98
-
99
-
100
-
101
-
102
-
103
-
104
-
105
-
106
-
107
-
108
-
109
-
110
-
111
-
112
-
113
-
114
-
115
-
116
-
117
-
118
-
119
-
120
-
121
-
122
-
123
-
124
-
125
-
126
-
127
-
128
-
129
-
130
-
131
-
132
-
133
-
134
-
135
-
136
-
137
-
138
-
139
-
140
-
141
-
142
-
 143
143 -
 144
144 -
 145
145 -
 146
146 -
 147
147 -
 148
148 -
 149
149 -
 150
150 -
 151
151 -
 152
152 -
 153
153 -
154
-
155
-
156
-
157
-
158
-
159
-
160
-
161
-
162
-
163
-
164
-
165
-
166
-
167
-
168
-
169
-
170
-
171
-
172
-
173
-
174
-
175
-
176
-
177
-
178
-
179
-
180
-
181
-
182
-
183
-
184
-
185
-
186
-
187
-
188
-
189
-
190
-
191
-
192
-
193
-
194
-
195
-
196
-
197
-
198
-
199
-
200
-
201
-
202
-
203
-
204
-
205
-
206
-
207
-
208
-
209
-
210
-
211
-
212
-
213
-
214
-
215
-
216
-
217
-
218
-
219
-
220
-
221
-
222
-
223
-
224
-
225
-
226
-
227
-
228
-
229
 |
 |