Sony DCR TRV33E Operating Instructions - Page 208
DCR-TRV22E/TRV33E uniquement, Installing Image Transfer
 |
UPC - 072874309039
View all Sony DCR TRV33E manuals
Add to My Manuals
Save this manual to your list of manuals |
Page 208 highlights
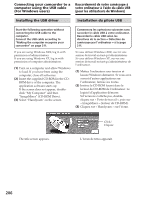
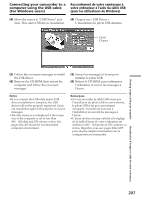
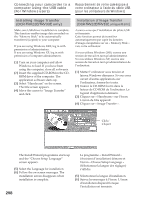
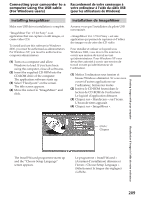
Connecting your camcorder to a Raccordement de votre caméscope à computer using the USB cable votre ordinateur à l'aide du câble USB (For Windows users) (pour les utilisateurs de Windows) Installing Image Transfer (DCR-TRV22E/TRV33E only) Make sure USB driver installation is complete. This function enables image data recorded on the "Memory Stick" to be automatically transferred (copied) to your computer. If you are using Windows 2000, log in with permission of administrators. If you are using Windows XP, log in with permission of computer administrators. (1) Turn on your computer and allow Windows to load. If you have been using the computer, close all softwares. (2) Insert the supplied CD-ROM in the CDROM drive of the computer. The application software starts up. (3) Select "Handycam" on the screen. The title screen appears. (4) Move the cursor to "Image Transfer" and click. Installation d'Image Transfer (DCR-TRV22E/TRV33E uniquement) Assurez-vous que l'installation du pilote USB est terminée. Cette fonction permet de transférer automatiquement par copie les données d'image enregistrées sur un « Memory Stick » vers votre ordinateur. Si vous utilisez Windows 2000, ouvrez une session de travail en tant qu'administrateur. Si vous utilisez Windows XP, ouvrez une session de travail en tant qu'administrateur de l'ordinateur. (1) Mettez l'ordinateur sous tension et laissez Windows démarrer. Si vous avez ouvert d'autres applications sur l'ordinateur, fermez-les toutes. (2) Insérez le CD-ROM fourni dans le lecteur de CD-ROM de l'ordinateur. Le logiciel d'application démarre. (3) Cliquez sur « Handycam » sur l'écran. L'écran de titre apparaît. (4) Cliquez sur « Image Transfer ». Click/ Cliquez The Install Wizard programme starts up and the "Choose Setup Language" screen appears. (5) Select the Language for installation. (6) Follow the on-screen messages. The installation screen disappears when installation is complete. 208 Le programme « Install Wizard » (Assistant d'installation) démarre et l'écran « Choose Setup Language » (Sélectionnez la langue des réglages) s'affiche. (5) Sélectionnez la langue d'installation. (6) Suivez les messages à l'écran. L'écran d'installation disparaît lorsque l'installation est terminée.
-
 1
1 -
2
-
3
-
4
-
5
-
6
-
7
-
8
-
9
-
10
-
11
-
12
-
13
-
14
-
15
-
16
-
17
-
18
-
19
-
20
-
21
-
22
-
23
-
24
-
25
-
26
-
27
-
28
-
29
-
30
-
31
-
32
-
33
-
34
-
35
-
36
-
37
-
38
-
39
-
40
-
41
-
42
-
43
-
44
-
45
-
46
-
47
-
48
-
49
-
50
-
51
-
52
-
53
-
54
-
55
-
56
-
57
-
58
-
59
-
60
-
61
-
62
-
63
-
64
-
65
-
66
-
67
-
68
-
69
-
70
-
71
-
72
-
73
-
74
-
75
-
76
-
77
-
78
-
79
-
80
-
81
-
82
-
83
-
84
-
85
-
86
-
87
-
88
-
89
-
90
-
91
-
92
-
93
-
94
-
95
-
96
-
97
-
98
-
99
-
100
-
101
-
102
-
103
-
104
-
105
-
106
-
107
-
108
-
109
-
110
-
111
-
112
-
113
-
114
-
115
-
116
-
117
-
118
-
119
-
120
-
121
-
122
-
123
-
124
-
125
-
126
-
127
-
128
-
129
-
130
-
131
-
132
-
133
-
134
-
135
-
136
-
137
-
138
-
139
-
140
-
141
-
142
-
143
-
144
-
145
-
146
-
147
-
148
-
149
-
150
-
151
-
152
-
153
-
154
-
155
-
156
-
157
-
158
-
159
-
160
-
161
-
162
-
163
-
164
-
165
-
166
-
167
-
168
-
169
-
170
-
171
-
172
-
173
-
174
-
175
-
176
-
177
-
178
-
179
-
180
-
181
-
182
-
183
-
184
-
185
-
186
-
187
-
188
-
189
-
190
-
191
-
192
-
193
-
194
-
195
-
196
-
197
-
198
-
199
-
200
-
201
-
202
-
 203
203 -
 204
204 -
 205
205 -
 206
206 -
 207
207 -
 208
208 -
 209
209 -
 210
210 -
 211
211 -
 212
212 -
 213
213 -
214
-
215
-
216
-
217
-
218
-
219
-
220
-
221
-
222
-
223
-
224
-
225
-
226
-
227
-
228
-
229
-
230
-
231
-
232
-
233
-
234
-
235
-
236
-
237
-
238
-
239
-
240
-
241
-
242
-
243
-
244
-
245
-
246
-
247
-
248
-
249
-
250
-
251
-
252
-
253
-
254
-
255
-
256
-
257
-
258
-
259
-
260
-
261
-
262
-
263
-
264
-
265
-
266
-
267
-
268
-
269
-
270
-
271
-
272
-
273
-
274
-
275
-
276
-
277
-
278
-
279
-
280
-
281
-
282
-
283
-
284
-
285
-
286
-
287
-
288
-
289
-
290
-
291
-
292
-
293
-
294
-
295
-
296
-
297
-
298
-
299
-
300
-
301
-
302
-
303
-
304
-
305
-
306
-
307
-
308
-
309
-
310
-
311
-
312
-
313
-
314
-
315
-
316
-
317
-
318
-
319
-
320
 |
 |
