Sony DCR TRV33E Operating Instructions - Page 217
Viewing pictures recorded on tape on a computer – USB Streaming (For Windows users)
 |
UPC - 072874309039
View all Sony DCR TRV33E manuals
Add to My Manuals
Save this manual to your list of manuals |
Page 217 highlights
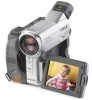
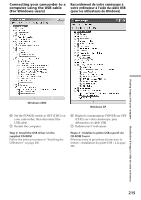
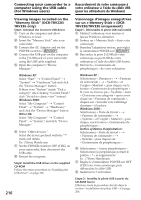
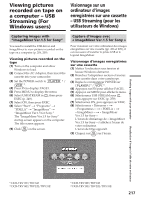
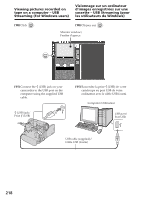
Viewing pictures recorded on tape on a computer - USB Streaming (For Windows users) Visionnage sur un ordinateur d'images enregistrées sur une cassette - USB Streaming (pour les utilisateurs de Windows) Capturing images with "ImageMixer Ver.1.5 for Sony" You need to install the USB driver and ImageMixer to view pictures recorded on the tape on a computer (p. 206, 209). Viewing pictures recorded on the tape (1) Turn on the computer and allow Windows to load. (2) Connect the AC Adaptor, then insert the cassette into your camcorder. (3) Set the POWER switch to 1) / 2). (4) Press FN to display PAGE1. (5) Press MENU to display the menu. (6) Select USB STREAM in , then press EXEC (p. 249). (7) Select ON, then press EXEC. (8) Select "Start" t "Programs" t "PIXELA" t "ImageMixer" t "ImageMixer Ver.1.5 for Sony." The "ImageMixer Ver.1.5 for Sony" startup screen appears on the computer. The title screen appears. (9) Click on the screen. Capture d'images avec « ImageMixer Ver.1.5 for Sony » Pour visionner sur votre ordinateur des images enregistrées sur une cassette (pp. 206 et 209), il est nécessaire d'installer le pilote USB et le logiciel ImageMixer. Visionnage d'images enregistrées sur une cassette (1) Mettez l'ordinateur sous tension et laissez Windows démarrer. (2) Branchez l'adaptateur secteur et insérez une cassette dans votre caméscope. (3) Réglez le commutateur POWER sur 1) / 2). (4) Appuyez sur FN pour afficher PAGE1. (5) Appuyez sur MENU pour afficher le menu. (6) Sélectionnez USB STREAM sous , puis appuyez sur EXEC (p. 259). (7) Sélectionnez ON, puis appuyez sur EXEC. (8) Sélectionnez « Démarrer » t « Programmes » t « PIXELA » t « ImageMixer » t « ImageMixer Ver.1.5 for Sony ». L'écran de démarrage de « ImageMixer Ver.1.5 for Sony » s'affiche à l'écran de votre ordinateur. L'écran de titres apparaît. (9) Cliquez sur sur l'écran. Viewing images with your computer Visualisation d'images à l'aide de votre ordinateur 1) DCR-TRV12E/TRV14E 2) DCR-TRV19E/TRV22E/TRV33E 1) DCR-TRV12E/TRV14E 2) DCR-TRV19E/TRV22E/TRV33E 217
-
 1
1 -
2
-
3
-
4
-
5
-
6
-
7
-
8
-
9
-
10
-
11
-
12
-
13
-
14
-
15
-
16
-
17
-
18
-
19
-
20
-
21
-
22
-
23
-
24
-
25
-
26
-
27
-
28
-
29
-
30
-
31
-
32
-
33
-
34
-
35
-
36
-
37
-
38
-
39
-
40
-
41
-
42
-
43
-
44
-
45
-
46
-
47
-
48
-
49
-
50
-
51
-
52
-
53
-
54
-
55
-
56
-
57
-
58
-
59
-
60
-
61
-
62
-
63
-
64
-
65
-
66
-
67
-
68
-
69
-
70
-
71
-
72
-
73
-
74
-
75
-
76
-
77
-
78
-
79
-
80
-
81
-
82
-
83
-
84
-
85
-
86
-
87
-
88
-
89
-
90
-
91
-
92
-
93
-
94
-
95
-
96
-
97
-
98
-
99
-
100
-
101
-
102
-
103
-
104
-
105
-
106
-
107
-
108
-
109
-
110
-
111
-
112
-
113
-
114
-
115
-
116
-
117
-
118
-
119
-
120
-
121
-
122
-
123
-
124
-
125
-
126
-
127
-
128
-
129
-
130
-
131
-
132
-
133
-
134
-
135
-
136
-
137
-
138
-
139
-
140
-
141
-
142
-
143
-
144
-
145
-
146
-
147
-
148
-
149
-
150
-
151
-
152
-
153
-
154
-
155
-
156
-
157
-
158
-
159
-
160
-
161
-
162
-
163
-
164
-
165
-
166
-
167
-
168
-
169
-
170
-
171
-
172
-
173
-
174
-
175
-
176
-
177
-
178
-
179
-
180
-
181
-
182
-
183
-
184
-
185
-
186
-
187
-
188
-
189
-
190
-
191
-
192
-
193
-
194
-
195
-
196
-
197
-
198
-
199
-
200
-
201
-
202
-
203
-
204
-
205
-
206
-
207
-
208
-
209
-
210
-
211
-
 212
212 -
 213
213 -
 214
214 -
 215
215 -
 216
216 -
 217
217 -
 218
218 -
 219
219 -
 220
220 -
 221
221 -
 222
222 -
223
-
224
-
225
-
226
-
227
-
228
-
229
-
230
-
231
-
232
-
233
-
234
-
235
-
236
-
237
-
238
-
239
-
240
-
241
-
242
-
243
-
244
-
245
-
246
-
247
-
248
-
249
-
250
-
251
-
252
-
253
-
254
-
255
-
256
-
257
-
258
-
259
-
260
-
261
-
262
-
263
-
264
-
265
-
266
-
267
-
268
-
269
-
270
-
271
-
272
-
273
-
274
-
275
-
276
-
277
-
278
-
279
-
280
-
281
-
282
-
283
-
284
-
285
-
286
-
287
-
288
-
289
-
290
-
291
-
292
-
293
-
294
-
295
-
296
-
297
-
298
-
299
-
300
-
301
-
302
-
303
-
304
-
305
-
306
-
307
-
308
-
309
-
310
-
311
-
312
-
313
-
314
-
315
-
316
-
317
-
318
-
319
-
320
 |
 |
