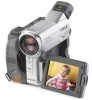
Sony DCR TRV33E Operating Instructions - Page 33
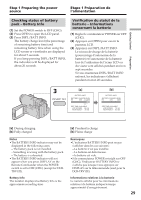
Step 3 Using the touch panel, To return to FN, To execute settings, Pour revenir à FN
 |
UPC - 072874309039
View all Sony DCR TRV33E manuals
Add to My Manuals
Save this manual to your list of manuals |
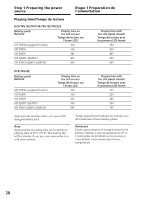
Page 33 highlights
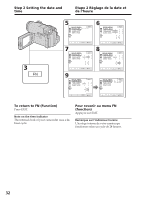
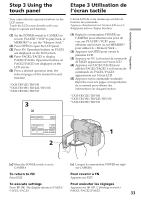
Getting Started Préparation Step 3 Using the touch panel Etape 3 Utilisation de l'écran tactile Your camcorder has operation buttons on the LCD screen. Touch the LCD screen directly with your finger to operate each function. (1) Set the POWER switch to CAMERA to record, PLAYER1)/VCR2) to play back, or MEMORY3) to use the "Memory Stick." (2) Press OPEN to open the LCD panel. (3) Press FN. Operation buttons on PAGE1 are displayed on the LCD screen. (4) Press PAGE2/PAGE3 to display PAGE2/PAGE3. Operation buttons on PAGE2/PAGE3 are displayed on the LCD screen. (5) Press a desired operation item. See relevant pages of this manual for each function. 1) DCR-TRV12E/TRV14E 2) DCR-TRV19E/TRV22E/TRV33E 3) DCR-TRV22E/TRV33E 3 [a] L'écran LCD de votre caméscope est doté de boutons de commande. Appuyez directement sur l'écran LCD avec le doigt pour activer chaque fonction. (1) Réglez le commutateur POWER sur CAMERA pour effectuer une prise de vue, sur PLAYER1)/VCR2) pour effectuer une lecture ou sur MEMORY3) pour utiliser le « Memory Stick ». (2) Appuyez sur OPEN pour ouvrir le panneau LCD. (3) Appuyez sur FN. Les boutons de commande de PAGE1 apparaissent sur l'écran LCD. (4) Appuyez sur PAGE2/PAGE3 pour afficher PAGE2/PAGE3. Les boutons de commande de PAGE2/PAGE3 apparaissent sur l'écran LCD. (5) Appuyez sur la commande souhaitée. Reportez-vous aux pages correspondantes de ce manuel pour obtenir des informations sur chaque fonction. 1) DCR-TRV12E/TRV14E 2) DCR-TRV19E/TRV22E/TRV33E 3) DCR-TRV22E/TRV33E PAGE1 PAGE2 EXIT SPOT FOCUS FOCUS SPOT METER MENU FADER END EXPOSCH SURE 1 2 [a] When the POWER switch is set to CAMERA To return to FN Press EXIT. To execute settings Press OK. The display returns to PAGE1/ PAGE2/PAGE3. [a] Lorsque le commutateur POWER est réglé sur CAMERA Pour revenir à FN Appuyez sur EXIT. Pour exécuter les réglages Appuyez sur OK. L'affichage revient à PAGE1/PAGE2/PAGE3. 33
-
 1
1 -
2
-
3
-
4
-
5
-
6
-
7
-
8
-
9
-
10
-
11
-
12
-
13
-
14
-
15
-
16
-
17
-
18
-
19
-
20
-
21
-
22
-
23
-
24
-
25
-
26
-
27
-
 28
28 -
 29
29 -
 30
30 -
 31
31 -
 32
32 -
 33
33 -
 34
34 -
 35
35 -
 36
36 -
 37
37 -
 38
38 -
39
-
40
-
41
-
42
-
43
-
44
-
45
-
46
-
47
-
48
-
49
-
50
-
51
-
52
-
53
-
54
-
55
-
56
-
57
-
58
-
59
-
60
-
61
-
62
-
63
-
64
-
65
-
66
-
67
-
68
-
69
-
70
-
71
-
72
-
73
-
74
-
75
-
76
-
77
-
78
-
79
-
80
-
81
-
82
-
83
-
84
-
85
-
86
-
87
-
88
-
89
-
90
-
91
-
92
-
93
-
94
-
95
-
96
-
97
-
98
-
99
-
100
-
101
-
102
-
103
-
104
-
105
-
106
-
107
-
108
-
109
-
110
-
111
-
112
-
113
-
114
-
115
-
116
-
117
-
118
-
119
-
120
-
121
-
122
-
123
-
124
-
125
-
126
-
127
-
128
-
129
-
130
-
131
-
132
-
133
-
134
-
135
-
136
-
137
-
138
-
139
-
140
-
141
-
142
-
143
-
144
-
145
-
146
-
147
-
148
-
149
-
150
-
151
-
152
-
153
-
154
-
155
-
156
-
157
-
158
-
159
-
160
-
161
-
162
-
163
-
164
-
165
-
166
-
167
-
168
-
169
-
170
-
171
-
172
-
173
-
174
-
175
-
176
-
177
-
178
-
179
-
180
-
181
-
182
-
183
-
184
-
185
-
186
-
187
-
188
-
189
-
190
-
191
-
192
-
193
-
194
-
195
-
196
-
197
-
198
-
199
-
200
-
201
-
202
-
203
-
204
-
205
-
206
-
207
-
208
-
209
-
210
-
211
-
212
-
213
-
214
-
215
-
216
-
217
-
218
-
219
-
220
-
221
-
222
-
223
-
224
-
225
-
226
-
227
-
228
-
229
-
230
-
231
-
232
-
233
-
234
-
235
-
236
-
237
-
238
-
239
-
240
-
241
-
242
-
243
-
244
-
245
-
246
-
247
-
248
-
249
-
250
-
251
-
252
-
253
-
254
-
255
-
256
-
257
-
258
-
259
-
260
-
261
-
262
-
263
-
264
-
265
-
266
-
267
-
268
-
269
-
270
-
271
-
272
-
273
-
274
-
275
-
276
-
277
-
278
-
279
-
280
-
281
-
282
-
283
-
284
-
285
-
286
-
287
-
288
-
289
-
290
-
291
-
292
-
293
-
294
-
295
-
296
-
297
-
298
-
299
-
300
-
301
-
302
-
303
-
304
-
305
-
306
-
307
-
308
-
309
-
310
-
311
-
312
-
313
-
314
-
315
-
316
-
317
-
318
-
319
-
320
 |
 |
