Sony DCR TRV33E Operating Instructions - Page 312
Touche OPEN ouvrir, Camera recording lamp
 |
UPC - 072874309039
View all Sony DCR TRV33E manuals
Add to My Manuals
Save this manual to your list of manuals |
Page 312 highlights
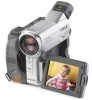
Identifying parts and controls Identification des composants et des commandes wd wf wg wh wj wk wl wd Intelligent accessory shoe/shoe cover (p. 128) wf Lens wg Camera recording lamp (p. 36) wh Microphone (p. 36) wj Remote sensor (except for DCR- TRV12E) wk Infrared rays emitter (p. 47, 112) wl OPEN button (p. 33) Notes on the intelligent accessory shoe •The intelligent accessory shoe supplies power to optional accessories such as a video light or microphone. •The intelligent accessory shoe is linked to the POWER switch, allowing you to turn the power supplied by the shoe on and off. Refer to the operating instructions of the accessory for details. •The intelligent accessory shoe has a safety device for fixing the installed accessory securely. To connect an accessory, press down and push it to the end, and then tighten the screw. •To remove an accessory, loosen the screw, and then press down and pull out the accessory. 312 wd Griffe porte-accessoires intelligente/ Protège-griffe (p. 128) wf Objectif wg Voyant de tournage du caméscope (p. 36) wh Micro (p. 36) wj Capteur de télécommande (sauf pour le DCR-TRV12E) wk Emetteur de rayons infrarouges (pp. 47 et 112) wl Touche OPEN (ouvrir) (p. 33) Remarques sur la griffe porte-accessoires intelligente •La griffe porte-accessoires intelligente alimente les accessoires en option, tels que la lampe vidéo ou le micro. •La griffe porte-accessoires intelligente est reliée au commutateur POWER, ce qui vous permet d'activer ou de désactiver l'alimentation fournie par la griffe porteaccessoires intelligente. Reportez-vous au mode d'emploi de l'accessoire utilisé pour de plus amples informations. •La griffe porte-accessoires intelligente est équipée d'un dispositif de sécurité permettant de bien fixer les accessoires. Pour raccorder un accessoire, insérez-le, appuyez dessus et poussez-le jusqu'au bout, puis serrez la vis. •Pour retirer un accessoire, desserrez la vis, puis appuyez sur l'accessoire et retirez-le.
-
 1
1 -
2
-
3
-
4
-
5
-
6
-
7
-
8
-
9
-
10
-
11
-
12
-
13
-
14
-
15
-
16
-
17
-
18
-
19
-
20
-
21
-
22
-
23
-
24
-
25
-
26
-
27
-
28
-
29
-
30
-
31
-
32
-
33
-
34
-
35
-
36
-
37
-
38
-
39
-
40
-
41
-
42
-
43
-
44
-
45
-
46
-
47
-
48
-
49
-
50
-
51
-
52
-
53
-
54
-
55
-
56
-
57
-
58
-
59
-
60
-
61
-
62
-
63
-
64
-
65
-
66
-
67
-
68
-
69
-
70
-
71
-
72
-
73
-
74
-
75
-
76
-
77
-
78
-
79
-
80
-
81
-
82
-
83
-
84
-
85
-
86
-
87
-
88
-
89
-
90
-
91
-
92
-
93
-
94
-
95
-
96
-
97
-
98
-
99
-
100
-
101
-
102
-
103
-
104
-
105
-
106
-
107
-
108
-
109
-
110
-
111
-
112
-
113
-
114
-
115
-
116
-
117
-
118
-
119
-
120
-
121
-
122
-
123
-
124
-
125
-
126
-
127
-
128
-
129
-
130
-
131
-
132
-
133
-
134
-
135
-
136
-
137
-
138
-
139
-
140
-
141
-
142
-
143
-
144
-
145
-
146
-
147
-
148
-
149
-
150
-
151
-
152
-
153
-
154
-
155
-
156
-
157
-
158
-
159
-
160
-
161
-
162
-
163
-
164
-
165
-
166
-
167
-
168
-
169
-
170
-
171
-
172
-
173
-
174
-
175
-
176
-
177
-
178
-
179
-
180
-
181
-
182
-
183
-
184
-
185
-
186
-
187
-
188
-
189
-
190
-
191
-
192
-
193
-
194
-
195
-
196
-
197
-
198
-
199
-
200
-
201
-
202
-
203
-
204
-
205
-
206
-
207
-
208
-
209
-
210
-
211
-
212
-
213
-
214
-
215
-
216
-
217
-
218
-
219
-
220
-
221
-
222
-
223
-
224
-
225
-
226
-
227
-
228
-
229
-
230
-
231
-
232
-
233
-
234
-
235
-
236
-
237
-
238
-
239
-
240
-
241
-
242
-
243
-
244
-
245
-
246
-
247
-
248
-
249
-
250
-
251
-
252
-
253
-
254
-
255
-
256
-
257
-
258
-
259
-
260
-
261
-
262
-
263
-
264
-
265
-
266
-
267
-
268
-
269
-
270
-
271
-
272
-
273
-
274
-
275
-
276
-
277
-
278
-
279
-
280
-
281
-
282
-
283
-
284
-
285
-
286
-
287
-
288
-
289
-
290
-
291
-
292
-
293
-
294
-
295
-
296
-
297
-
298
-
299
-
300
-
301
-
302
-
303
-
304
-
305
-
306
-
 307
307 -
 308
308 -
 309
309 -
 310
310 -
 311
311 -
 312
312 -
 313
313 -
 314
314 -
 315
315 -
 316
316 -
 317
317 -
318
-
319
-
320
 |
 |
