Netgear GS752TS GS7xxTS-TPS Software Admin Manual - Page 200
Max Number of Retransmits, Timeout Duration, Accounting Mode, Cancel, Apply, menu
 |
View all Netgear GS752TS manuals
Add to My Manuals
Save this manual to your list of manuals |
Page 200 highlights
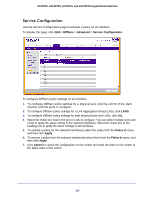
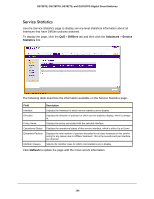
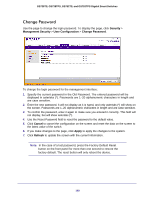
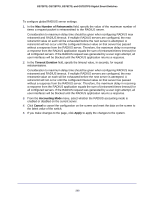
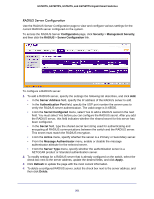
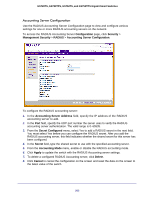
GS728TS, GS728TPS, GS752TS, and GS752TPS Gigabit Smart Switches To configure global RADIUS server settings: 1. In the Max Number of Retransmits field, specify the value of the maximum number of times a request packet is retransmitted to the RADIUS server. Consideration to maximum delay time should be given when configuring RADIUS max retransmit and RADIUS timeout. If multiple RADIUS servers are configured, the max retransmit value on each will be exhausted before the next server is attempted. A retransmit will not occur until the configured timeout value on that server has passed without a response from the RADIUS server. Therefore, the maximum delay in receiving a response from the RADIUS application equals the sum of (retransmit times timeout) for all configured servers. If the RADIUS request was generated by a user login attempt, all user interfaces will be blocked until the RADIUS application returns a response. 2. In the Timeout Duration field, specify the timeout value, in seconds, for request retransmissions. Consideration to maximum delay time should be given when configuring RADIUS max retransmit and RADIUS timeout. If multiple RADIUS servers are configured, the max retransmit value on each will be exhausted before the next server is attempted. A retransmit will not occur until the configured timeout value on that server has passed without a response from the RADIUS server. Therefore, the maximum delay in receiving a response from the RADIUS application equals the sum of (retransmit times timeout) for all configured servers. If the RADIUS request was generated by a user login attempt, all user interfaces will be blocked until the RADIUS application returns a response. 3. From the Accounting Mode menu, select whether the RADIUS accounting mode is enabled or disabled on the current server. 4. Click Cancel to cancel the configuration on the screen and reset the data on the screen to the latest value of the switch. 5. If you make changes to the page, click Apply to apply the changes to the system. 200
-
 1
1 -
2
-
3
-
4
-
5
-
6
-
7
-
8
-
9
-
10
-
11
-
12
-
13
-
14
-
15
-
16
-
17
-
18
-
19
-
20
-
21
-
22
-
23
-
24
-
25
-
26
-
27
-
28
-
29
-
30
-
31
-
32
-
33
-
34
-
35
-
36
-
37
-
38
-
39
-
40
-
41
-
42
-
43
-
44
-
45
-
46
-
47
-
48
-
49
-
50
-
51
-
52
-
53
-
54
-
55
-
56
-
57
-
58
-
59
-
60
-
61
-
62
-
63
-
64
-
65
-
66
-
67
-
68
-
69
-
70
-
71
-
72
-
73
-
74
-
75
-
76
-
77
-
78
-
79
-
80
-
81
-
82
-
83
-
84
-
85
-
86
-
87
-
88
-
89
-
90
-
91
-
92
-
93
-
94
-
95
-
96
-
97
-
98
-
99
-
100
-
101
-
102
-
103
-
104
-
105
-
106
-
107
-
108
-
109
-
110
-
111
-
112
-
113
-
114
-
115
-
116
-
117
-
118
-
119
-
120
-
121
-
122
-
123
-
124
-
125
-
126
-
127
-
128
-
129
-
130
-
131
-
132
-
133
-
134
-
135
-
136
-
137
-
138
-
139
-
140
-
141
-
142
-
143
-
144
-
145
-
146
-
147
-
148
-
149
-
150
-
151
-
152
-
153
-
154
-
155
-
156
-
157
-
158
-
159
-
160
-
161
-
162
-
163
-
164
-
165
-
166
-
167
-
168
-
169
-
170
-
171
-
172
-
173
-
174
-
175
-
176
-
177
-
178
-
179
-
180
-
181
-
182
-
183
-
184
-
185
-
186
-
187
-
188
-
189
-
190
-
191
-
192
-
193
-
194
-
 195
195 -
 196
196 -
 197
197 -
 198
198 -
 199
199 -
 200
200 -
 201
201 -
 202
202 -
 203
203 -
 204
204 -
 205
205 -
206
-
207
-
208
-
209
-
210
-
211
-
212
-
213
-
214
-
215
-
216
-
217
-
218
-
219
-
220
-
221
-
222
-
223
-
224
-
225
-
226
-
227
-
228
-
229
-
230
-
231
-
232
-
233
-
234
-
235
-
236
-
237
-
238
-
239
-
240
-
241
-
242
-
243
-
244
-
245
-
246
-
247
-
248
-
249
-
250
-
251
-
252
-
253
-
254
-
255
-
256
-
257
-
258
-
259
-
260
-
261
-
262
-
263
-
264
-
265
-
266
-
267
-
268
-
269
-
270
-
271
-
272
-
273
-
274
-
275
-
276
-
277
-
278
-
279
-
280
-
281
-
282
-
283
-
284
-
285
-
286
-
287
-
288
-
289
-
290
-
291
-
292
-
293
-
294
-
295
-
296
-
297
-
298
-
299
-
300
-
301
-
302
-
303
-
304
-
305
-
306
-
307
-
308
-
309
-
310
-
311
-
312
-
313
-
314
-
315
-
316
-
317
-
318
-
319
-
320
-
321
-
322
-
323
-
324
-
325
-
326
-
327
-
328
-
329
 |
 |