Netgear GS752TS GS7xxTS-TPS Software Admin Manual - Page 201
RADIUS Server Configuration, Secret Con d
 |
View all Netgear GS752TS manuals
Add to My Manuals
Save this manual to your list of manuals |
Page 201 highlights
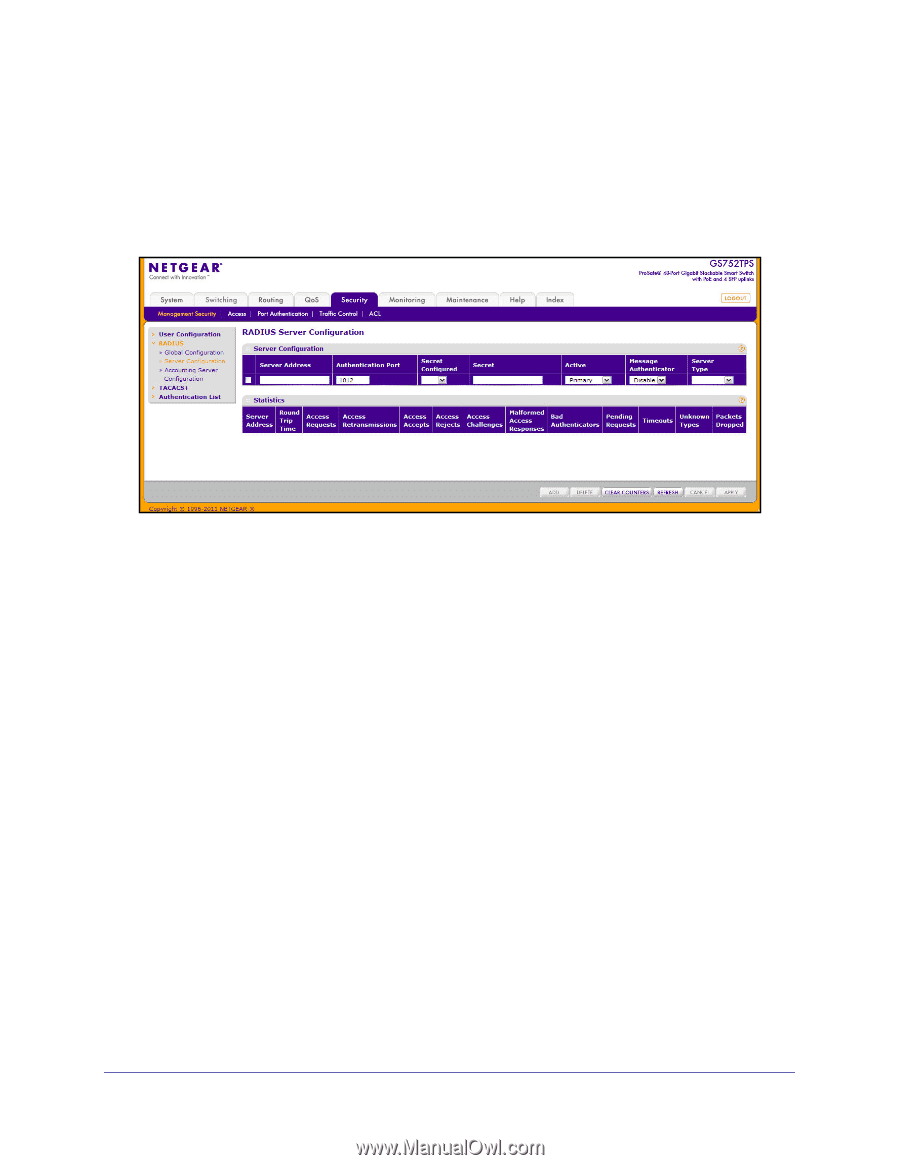
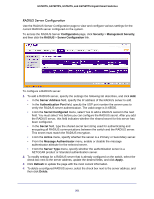
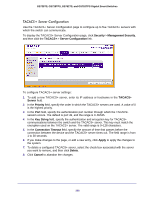
GS728TS, GS728TPS, GS752TS, and GS752TPS Gigabit Smart Switches RADIUS Server Configuration Use the RADIUS Server Configuration page to view and configure various settings for the current RADIUS server configured on the system. To access the RADIUS Server Configuration page, click Security > Management Security, and then click the RADIUS > Server Configuration link. To configure a RADIUS server: 1. To add a RADIUS server, specify the settings the following list describes, and click Add. • In the Server Address field, specify the IP address of the RADIUS server to add. • In the Authentication Port field, specify the UDP port number the server uses to verify the RADIUS server authentication. The valid range is 0-65535. • From the Secret Configured menu, select Yes to add a RADIUS secret in the next field. You must select Yes before you can configure the RADIUS secret. After you add the RADIUS server, this field indicates whether the shared secret for this server has been configured. • In the Secret field, type the shared secret text string used for authenticating and encrypting all RADIUS communications between the switch and the RADIUS server. This secret must match the RADIUS encryption. • From the Active menu, specify whether the server is a Primary or Secondary server. • From the Message Authenticator menu, enable or disable the message authenticator attribute for the selected server. • From the Server Type menu, specify whether the authentication server is a NETGEAR product or Standard authentication server. 2. To modify settings for a RADIUS server that is already configured on the switch, select the check box next to the server address, update the desired fields, and click Apply. 3. Click Refresh to update the page with the most current information. 4. To delete a configured RADIUS server, select the check box next to the server address, and then click Delete. 201
-
 1
1 -
2
-
3
-
4
-
5
-
6
-
7
-
8
-
9
-
10
-
11
-
12
-
13
-
14
-
15
-
16
-
17
-
18
-
19
-
20
-
21
-
22
-
23
-
24
-
25
-
26
-
27
-
28
-
29
-
30
-
31
-
32
-
33
-
34
-
35
-
36
-
37
-
38
-
39
-
40
-
41
-
42
-
43
-
44
-
45
-
46
-
47
-
48
-
49
-
50
-
51
-
52
-
53
-
54
-
55
-
56
-
57
-
58
-
59
-
60
-
61
-
62
-
63
-
64
-
65
-
66
-
67
-
68
-
69
-
70
-
71
-
72
-
73
-
74
-
75
-
76
-
77
-
78
-
79
-
80
-
81
-
82
-
83
-
84
-
85
-
86
-
87
-
88
-
89
-
90
-
91
-
92
-
93
-
94
-
95
-
96
-
97
-
98
-
99
-
100
-
101
-
102
-
103
-
104
-
105
-
106
-
107
-
108
-
109
-
110
-
111
-
112
-
113
-
114
-
115
-
116
-
117
-
118
-
119
-
120
-
121
-
122
-
123
-
124
-
125
-
126
-
127
-
128
-
129
-
130
-
131
-
132
-
133
-
134
-
135
-
136
-
137
-
138
-
139
-
140
-
141
-
142
-
143
-
144
-
145
-
146
-
147
-
148
-
149
-
150
-
151
-
152
-
153
-
154
-
155
-
156
-
157
-
158
-
159
-
160
-
161
-
162
-
163
-
164
-
165
-
166
-
167
-
168
-
169
-
170
-
171
-
172
-
173
-
174
-
175
-
176
-
177
-
178
-
179
-
180
-
181
-
182
-
183
-
184
-
185
-
186
-
187
-
188
-
189
-
190
-
191
-
192
-
193
-
194
-
195
-
 196
196 -
 197
197 -
 198
198 -
 199
199 -
 200
200 -
 201
201 -
 202
202 -
 203
203 -
 204
204 -
 205
205 -
 206
206 -
207
-
208
-
209
-
210
-
211
-
212
-
213
-
214
-
215
-
216
-
217
-
218
-
219
-
220
-
221
-
222
-
223
-
224
-
225
-
226
-
227
-
228
-
229
-
230
-
231
-
232
-
233
-
234
-
235
-
236
-
237
-
238
-
239
-
240
-
241
-
242
-
243
-
244
-
245
-
246
-
247
-
248
-
249
-
250
-
251
-
252
-
253
-
254
-
255
-
256
-
257
-
258
-
259
-
260
-
261
-
262
-
263
-
264
-
265
-
266
-
267
-
268
-
269
-
270
-
271
-
272
-
273
-
274
-
275
-
276
-
277
-
278
-
279
-
280
-
281
-
282
-
283
-
284
-
285
-
286
-
287
-
288
-
289
-
290
-
291
-
292
-
293
-
294
-
295
-
296
-
297
-
298
-
299
-
300
-
301
-
302
-
303
-
304
-
305
-
306
-
307
-
308
-
309
-
310
-
311
-
312
-
313
-
314
-
315
-
316
-
317
-
318
-
319
-
320
-
321
-
322
-
323
-
324
-
325
-
326
-
327
-
328
-
329
 |
 |