Dell 5130 Color Laser User's Guide (PDF) - Page 135
Text String Added to User Name, Verify Remote Server Certificate
 |
View all Dell 5130 Color Laser manuals
Add to My Manuals
Save this manual to your list of manuals |
Page 135 highlights
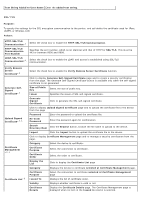
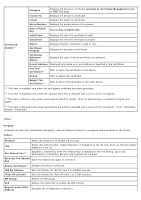
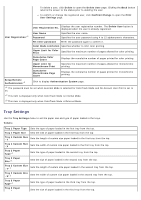
Text String Added to User Name Enter the added text string. SSL/TLS Purpose: To specify the settings for the SSL encryption communication to the printer, and set/delete the certificate used for IPsec, LDAPS, or Wireless LAN. Values: HTTP-SSL/TLS Communication*1 Select the check box to enable the HTTP-SSL/TLS Communication. HTTP-SSL/TLS Communication Port Number Specifies the port number, which is not identical with that of HTTP for SSL/TLS. This must be 443 or between 8000 and 9999. LDAP-SSL/TLS Communication*1, 2 Select the check box to enable the LDAP, and access is established using SSL/TLS communication. Verify Remote Server Certificate*2 Select the check box to enable the Verify Remote Server Certificate function. Click to display Generate Self-Signed Certificate page and to create a security certification from the page. The Generate Self-Signed Certificate button is available only when the self-signed certificate is not generated. Generate SelfSigned Certificate*3 Size of Public Key Issuer Select the size of public key. Specifies the issuer of SSL self-signed certificate. Generate Signed Certificate Click to generate the SSL self-signed certificate. Click to display Upload Signed Certificate page and to upload the certificate file to the device from the page. Upload Signed Certificate*3, 4 Password Enter the password to upload the certificate file. Re-enter Password Enter the password again for confirmation. Search Directory Root Click the Browse button, browse the file name to upload to the device. Import Click the Import button to upload the certificate file to the device. Click to display Certificate Management page and to manage a security certification from the page. Certificate Management *3, 4 Category Certificate Purpose Certificate Order Select the device to certificate. Select the connection to certificate. Select the order to certificate. Display the List Click to display the Certificate List page. Category Displays the device to certificate selected at Certificate Management page. Certificate List*3 Certificate Purpose Issued To Validity Select the connection to certificate selected at Certificate Management page. Displays the list of certificate order. Displays whether certificate is valid or not. Certificate Details Display the Certificate Details page. The Certificate Management page is displayed when no item in the Issued to column is selected.
-
 1
1 -
2
-
3
-
4
-
5
-
6
-
7
-
8
-
9
-
10
-
11
-
12
-
13
-
14
-
15
-
16
-
17
-
18
-
19
-
20
-
21
-
22
-
23
-
24
-
25
-
26
-
27
-
28
-
29
-
30
-
31
-
32
-
33
-
34
-
35
-
36
-
37
-
38
-
39
-
40
-
41
-
42
-
43
-
44
-
45
-
46
-
47
-
48
-
49
-
50
-
51
-
52
-
53
-
54
-
55
-
56
-
57
-
58
-
59
-
60
-
61
-
62
-
63
-
64
-
65
-
66
-
67
-
68
-
69
-
70
-
71
-
72
-
73
-
74
-
75
-
76
-
77
-
78
-
79
-
80
-
81
-
82
-
83
-
84
-
85
-
86
-
87
-
88
-
89
-
90
-
91
-
92
-
93
-
94
-
95
-
96
-
97
-
98
-
99
-
100
-
101
-
102
-
103
-
104
-
105
-
106
-
107
-
108
-
109
-
110
-
111
-
112
-
113
-
114
-
115
-
116
-
117
-
118
-
119
-
120
-
121
-
122
-
123
-
124
-
125
-
126
-
127
-
128
-
129
-
 130
130 -
 131
131 -
 132
132 -
 133
133 -
 134
134 -
 135
135 -
 136
136 -
 137
137 -
 138
138 -
 139
139 -
 140
140 -
141
-
142
-
143
-
144
-
145
-
146
-
147
-
148
-
149
-
150
-
151
-
152
-
153
-
154
-
155
-
156
-
157
-
158
-
159
-
160
-
161
-
162
-
163
-
164
-
165
-
166
-
167
-
168
-
169
-
170
-
171
-
172
-
173
-
174
-
175
-
176
-
177
-
178
-
179
-
180
-
181
-
182
-
183
-
184
-
185
-
186
-
187
-
188
-
189
-
190
-
191
-
192
-
193
-
194
-
195
-
196
-
197
-
198
-
199
-
200
-
201
-
202
-
203
-
204
-
205
-
206
-
207
-
208
-
209
-
210
-
211
-
212
-
213
-
214
-
215
-
216
-
217
-
218
-
219
-
220
-
221
-
222
-
223
-
224
-
225
-
226
-
227
-
228
-
229
-
230
-
231
-
232
-
233
-
234
-
235
-
236
-
237
-
238
-
239
-
240
-
241
-
242
-
243
-
244
-
245
-
246
-
247
-
248
-
249
-
250
-
251
-
252
-
253
-
254
-
255
-
256
-
257
-
258
-
259
-
260
-
261
-
262
-
263
-
264
-
265
-
266
-
267
-
268
-
269
-
270
-
271
-
272
-
273
-
274
-
275
-
276
-
277
-
278
-
279
-
280
-
281
-
282
-
283
-
284
-
285
-
286
-
287
-
288
-
289
-
290
-
291
-
292
-
293
-
294
-
295
-
296
-
297
-
298
-
299
-
300
-
301
-
302
-
303
-
304
-
305
-
306
-
307
-
308
-
309
-
310
-
311
-
312
-
313
-
314
-
315
-
316
-
317
-
318
-
319
-
320
-
321
-
322
-
323
-
324
-
325
-
326
-
327
-
328
-
329
-
330
-
331
-
332
-
333
-
334
-
335
-
336
-
337
-
338
-
339
-
340
-
341
-
342
-
343
-
344
-
345
-
346
-
347
-
348
-
349
-
350
-
351
-
352
-
353
-
354
-
355
-
356
-
357
-
358
-
359
-
360
-
361
-
362
-
363
-
364
-
365
-
366
-
367
-
368
-
369
-
370
-
371
-
372
-
373
-
374
-
375
-
376
-
377
-
378
-
379
-
380
-
381
-
382
-
383
-
384
-
385
-
386
-
387
-
388
-
389
-
390
-
391
-
392
-
393
-
394
-
395
-
396
-
397
-
398
-
399
-
400
-
401
-
402
-
403
-
404
-
405
-
406
-
407
-
408
-
409
-
410
-
411
-
412
 |
 |
