Dell 5130 Color Laser User's Guide (PDF) - Page 409
Problems with Installed Optional Accessories, Compile Exit SNR ON Jam
 |
View all Dell 5130 Color Laser manuals
Add to My Manuals
Save this manual to your list of manuals |
Page 409 highlights
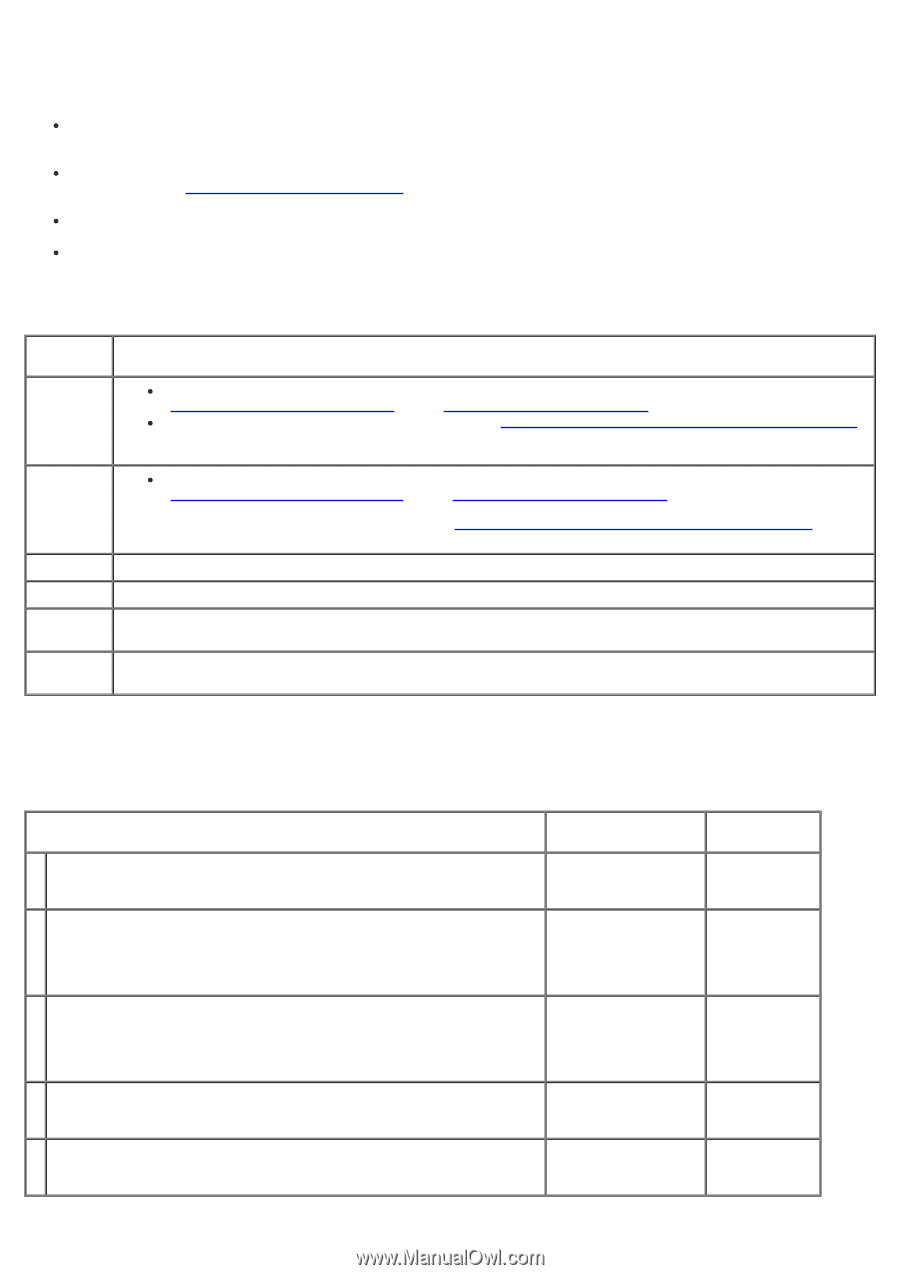
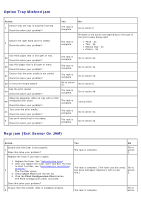
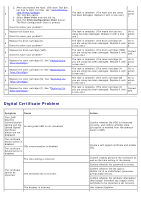
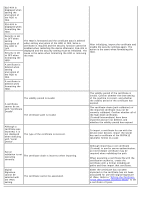
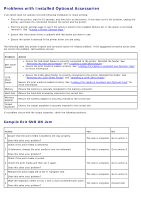
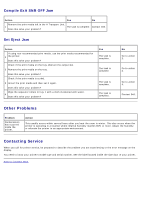
Problems with Installed Optional Accessories If an option does not operate correctly following installation or stops working: Turn off the printer, wait for 10 seconds, and then turn on the printer. If this does not fix the problem, unplug the printer, and check the connection between the option and the printer. Print the printer settings page to see if the option is listed in the Installed Options list. If the option is not listed, reinstall it. See "Printing a Printer Settings Page." Ensure that the printer driver is updated with the option you want to use. Ensure the option is selected in the printer driver you are using. The following table lists printer's option and corrective action for related problem. If the suggested corrective action does not correct the problem, call customer service. Problem Action 550-sheet feeder Ensure the 550-sheet feeder is correctly connected to the printer. Reinstall the feeder. See "Removing the 550-Sheet Feeder" and "Installing a 550-Sheet Feeder." Ensure the print media is loaded correctly. See "Loading Print Media in Standard and Optional Trays" for more information. 1100sheet feeder Memory Hard disk Wireless adapter Output expander Ensure the 1100-sheet feeder is correctly connected to the printer. Reinstall the feeder. See "Removing the 1100-Sheet Feeder" and "Installing a 1100-Sheet Feeder." Ensure the print media is loaded correctly. See "Loading Print Media in Standard and Optional Trays" for more information. Ensure the memory is securely connected to the memory connector. Ensure the hard disk is securely inserted to the correct slot. Ensure the wireless adapter is securely inserted to the correct slot. Ensure the output expander is securely inserted to the correct slot. If a problem occurs with the output expander, check the following solutions: Compile Exit SNR ON Jam Action Yes No Ensure that the print media is loaded in the tray properly. 1 Does this solve your problem? The task is complete. Go to action 2. Check if the print media is deformed. 2 If deformed, change the print media to one not deformed. The task is complete. Go to action 3. Does this solve your problem? Check if the print media is curled. 3 Uncurl the print media and then set it again. The task is complete. Go to action 4. Does this solve your problem? Remove the print media left in the H Transport Unit. 4 Does this solve your problem? The task is complete. Go to action 5. Wipe the separator rollers in tray 1 with a cloth moistened with water. 5 The task is complete. Contact Dell. Does this solve your problem?
-
 1
1 -
2
-
3
-
4
-
5
-
6
-
7
-
8
-
9
-
10
-
11
-
12
-
13
-
14
-
15
-
16
-
17
-
18
-
19
-
20
-
21
-
22
-
23
-
24
-
25
-
26
-
27
-
28
-
29
-
30
-
31
-
32
-
33
-
34
-
35
-
36
-
37
-
38
-
39
-
40
-
41
-
42
-
43
-
44
-
45
-
46
-
47
-
48
-
49
-
50
-
51
-
52
-
53
-
54
-
55
-
56
-
57
-
58
-
59
-
60
-
61
-
62
-
63
-
64
-
65
-
66
-
67
-
68
-
69
-
70
-
71
-
72
-
73
-
74
-
75
-
76
-
77
-
78
-
79
-
80
-
81
-
82
-
83
-
84
-
85
-
86
-
87
-
88
-
89
-
90
-
91
-
92
-
93
-
94
-
95
-
96
-
97
-
98
-
99
-
100
-
101
-
102
-
103
-
104
-
105
-
106
-
107
-
108
-
109
-
110
-
111
-
112
-
113
-
114
-
115
-
116
-
117
-
118
-
119
-
120
-
121
-
122
-
123
-
124
-
125
-
126
-
127
-
128
-
129
-
130
-
131
-
132
-
133
-
134
-
135
-
136
-
137
-
138
-
139
-
140
-
141
-
142
-
143
-
144
-
145
-
146
-
147
-
148
-
149
-
150
-
151
-
152
-
153
-
154
-
155
-
156
-
157
-
158
-
159
-
160
-
161
-
162
-
163
-
164
-
165
-
166
-
167
-
168
-
169
-
170
-
171
-
172
-
173
-
174
-
175
-
176
-
177
-
178
-
179
-
180
-
181
-
182
-
183
-
184
-
185
-
186
-
187
-
188
-
189
-
190
-
191
-
192
-
193
-
194
-
195
-
196
-
197
-
198
-
199
-
200
-
201
-
202
-
203
-
204
-
205
-
206
-
207
-
208
-
209
-
210
-
211
-
212
-
213
-
214
-
215
-
216
-
217
-
218
-
219
-
220
-
221
-
222
-
223
-
224
-
225
-
226
-
227
-
228
-
229
-
230
-
231
-
232
-
233
-
234
-
235
-
236
-
237
-
238
-
239
-
240
-
241
-
242
-
243
-
244
-
245
-
246
-
247
-
248
-
249
-
250
-
251
-
252
-
253
-
254
-
255
-
256
-
257
-
258
-
259
-
260
-
261
-
262
-
263
-
264
-
265
-
266
-
267
-
268
-
269
-
270
-
271
-
272
-
273
-
274
-
275
-
276
-
277
-
278
-
279
-
280
-
281
-
282
-
283
-
284
-
285
-
286
-
287
-
288
-
289
-
290
-
291
-
292
-
293
-
294
-
295
-
296
-
297
-
298
-
299
-
300
-
301
-
302
-
303
-
304
-
305
-
306
-
307
-
308
-
309
-
310
-
311
-
312
-
313
-
314
-
315
-
316
-
317
-
318
-
319
-
320
-
321
-
322
-
323
-
324
-
325
-
326
-
327
-
328
-
329
-
330
-
331
-
332
-
333
-
334
-
335
-
336
-
337
-
338
-
339
-
340
-
341
-
342
-
343
-
344
-
345
-
346
-
347
-
348
-
349
-
350
-
351
-
352
-
353
-
354
-
355
-
356
-
357
-
358
-
359
-
360
-
361
-
362
-
363
-
364
-
365
-
366
-
367
-
368
-
369
-
370
-
371
-
372
-
373
-
374
-
375
-
376
-
377
-
378
-
379
-
380
-
381
-
382
-
383
-
384
-
385
-
386
-
387
-
388
-
389
-
390
-
391
-
392
-
393
-
394
-
395
-
396
-
397
-
398
-
399
-
400
-
401
-
402
-
403
-
 404
404 -
 405
405 -
 406
406 -
 407
407 -
 408
408 -
 409
409 -
 410
410 -
 411
411 -
 412
412
 |
 |