Dell 5130 Color Laser User's Guide (PDF) - Page 42
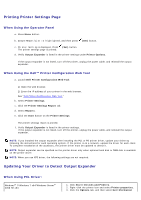
Printing Printer Settings Updating Your Driver to Detect Output Expander
 |
View all Dell 5130 Color Laser manuals
Add to My Manuals
Save this manual to your list of manuals |
Page 42 highlights
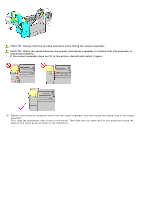
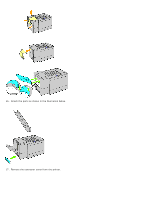
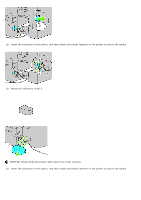
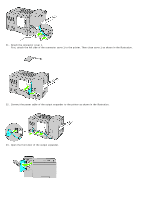
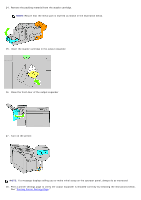
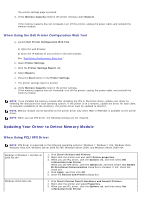
Printing Printer Settings Page When Using the Operator Panel a. Press Menu button. b. Ensure Report/List is highlighted, and then press (Set) button. c. Printer Setting is displayed. Press The printer settings page is printed. (Set) button. d. Verify Output Expander is listed in the printer settings under Printer Options. If the output expander is not listed, turn off the printer, unplug the power cable, and reinstall the output expander. When Using the Dell™ Printer Configuration Web Tool a. Launch Dell Printer Configuration Web Tool. 1) Open the web browser. 2) Enter the IP address of your printer in the web browser. See "Dell Printer Configuration Web Tool." b. Select Printer Settings. c. Click the Printer Settings Report tab. d. Select Reports. e. Click the Start button on the Printer Settings. The printer settings report is printed. f. Verify Output Expander is listed in the printer settings. If the output expander is not listed, turn off the printer, unplug the power cable, and reinstall the output expander. NOTE: If you installed the output expander after installing the PCL or PS printer driver, update your driver by following the instructions for each operating system. If the printer is on a network, update the driver for each client. To complete installation of the accessory, the printer driver must be updated to detect it. NOTE: Output expander can be specified on the printer driver only when optional hard disk or RAM disk is available on the printer driver. NOTE: When you use XPS driver, the following settings are not required. Updating Your Driver to Detect Output Expander When Using PCL Driver: Windows® 7/Windows 7 x64/Windows Server® 2008 R2 x64 1. Click Start® Devices and Printers. 2. Right-click the printer icon and select Printer properties. 3. Click the Options tab, and then select Get Information
-
 1
1 -
2
-
3
-
4
-
5
-
6
-
7
-
8
-
9
-
10
-
11
-
12
-
13
-
14
-
15
-
16
-
17
-
18
-
19
-
20
-
21
-
22
-
23
-
24
-
25
-
26
-
27
-
28
-
29
-
30
-
31
-
32
-
33
-
34
-
35
-
36
-
 37
37 -
 38
38 -
 39
39 -
 40
40 -
 41
41 -
 42
42 -
 43
43 -
 44
44 -
 45
45 -
 46
46 -
 47
47 -
48
-
49
-
50
-
51
-
52
-
53
-
54
-
55
-
56
-
57
-
58
-
59
-
60
-
61
-
62
-
63
-
64
-
65
-
66
-
67
-
68
-
69
-
70
-
71
-
72
-
73
-
74
-
75
-
76
-
77
-
78
-
79
-
80
-
81
-
82
-
83
-
84
-
85
-
86
-
87
-
88
-
89
-
90
-
91
-
92
-
93
-
94
-
95
-
96
-
97
-
98
-
99
-
100
-
101
-
102
-
103
-
104
-
105
-
106
-
107
-
108
-
109
-
110
-
111
-
112
-
113
-
114
-
115
-
116
-
117
-
118
-
119
-
120
-
121
-
122
-
123
-
124
-
125
-
126
-
127
-
128
-
129
-
130
-
131
-
132
-
133
-
134
-
135
-
136
-
137
-
138
-
139
-
140
-
141
-
142
-
143
-
144
-
145
-
146
-
147
-
148
-
149
-
150
-
151
-
152
-
153
-
154
-
155
-
156
-
157
-
158
-
159
-
160
-
161
-
162
-
163
-
164
-
165
-
166
-
167
-
168
-
169
-
170
-
171
-
172
-
173
-
174
-
175
-
176
-
177
-
178
-
179
-
180
-
181
-
182
-
183
-
184
-
185
-
186
-
187
-
188
-
189
-
190
-
191
-
192
-
193
-
194
-
195
-
196
-
197
-
198
-
199
-
200
-
201
-
202
-
203
-
204
-
205
-
206
-
207
-
208
-
209
-
210
-
211
-
212
-
213
-
214
-
215
-
216
-
217
-
218
-
219
-
220
-
221
-
222
-
223
-
224
-
225
-
226
-
227
-
228
-
229
-
230
-
231
-
232
-
233
-
234
-
235
-
236
-
237
-
238
-
239
-
240
-
241
-
242
-
243
-
244
-
245
-
246
-
247
-
248
-
249
-
250
-
251
-
252
-
253
-
254
-
255
-
256
-
257
-
258
-
259
-
260
-
261
-
262
-
263
-
264
-
265
-
266
-
267
-
268
-
269
-
270
-
271
-
272
-
273
-
274
-
275
-
276
-
277
-
278
-
279
-
280
-
281
-
282
-
283
-
284
-
285
-
286
-
287
-
288
-
289
-
290
-
291
-
292
-
293
-
294
-
295
-
296
-
297
-
298
-
299
-
300
-
301
-
302
-
303
-
304
-
305
-
306
-
307
-
308
-
309
-
310
-
311
-
312
-
313
-
314
-
315
-
316
-
317
-
318
-
319
-
320
-
321
-
322
-
323
-
324
-
325
-
326
-
327
-
328
-
329
-
330
-
331
-
332
-
333
-
334
-
335
-
336
-
337
-
338
-
339
-
340
-
341
-
342
-
343
-
344
-
345
-
346
-
347
-
348
-
349
-
350
-
351
-
352
-
353
-
354
-
355
-
356
-
357
-
358
-
359
-
360
-
361
-
362
-
363
-
364
-
365
-
366
-
367
-
368
-
369
-
370
-
371
-
372
-
373
-
374
-
375
-
376
-
377
-
378
-
379
-
380
-
381
-
382
-
383
-
384
-
385
-
386
-
387
-
388
-
389
-
390
-
391
-
392
-
393
-
394
-
395
-
396
-
397
-
398
-
399
-
400
-
401
-
402
-
403
-
404
-
405
-
406
-
407
-
408
-
409
-
410
-
411
-
412
 |
 |