Dell 5130 Color Laser User's Guide (PDF) - Page 96
Con Settings, When Using IP Printing, When Using Rendezvous, Mac OS X 10.5 or Later Versions - 5130cdn color laser driver
 |
View all Dell 5130 Color Laser manuals
Add to My Manuals
Save this manual to your list of manuals |
Page 96 highlights
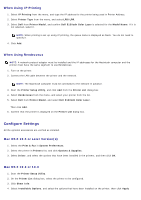
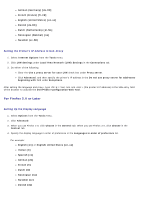
When Using IP Printing 1. Select IP Printing from the menu, and type the IP address for the printer being used in Printer Address. 2. Select Printer Type from the menu, and select LPD/LPR. 3. Select Dell from Printer Model, and confirm Dell 5130cdn Color Laser is selected for the Model Name. If it is not selected, select it. NOTE: When printing is set up using IP printing, the queue name is displayed as blank. You do not need to specify it. 4. Click Add. When Using Rendezvous NOTE: A network protocol adapter must be installed and the IP addresses for the Macintosh computer and the printer must have the same segment to use Rendezvous. 1. Turn on the printer. 2. Connect the LAN cable between the printer and the network. NOTE: The Macintosh computer must be connected to the network in advance. 3. Start the Printer Setup Utility, and click Add from the Printer List dialog box. 4. Select Rendezvous from the menu, and select your printer from the list. 5. Select Dell from Printer Model, and select Dell 5130cdn Color Laser. Then click Add. 6. Confirm that the printer is displayed on the Printer List dialog box. Configure Settings All the optional accessories are verified as installed. Mac OS X 10.5 or Later Version(s) 1. Select the Print & Fax in System Preferences. 2. Select the printer in Printers list, and click Options & Supplies. 3. Select Driver, and select the options that have been installed in the printers, and then click OK. Mac OS X 10.3 or 10.4 1. Start the Printer Setup Utility. 2. On the Printer List dialog box, select the printer to be configured. 3. Click Show Info. 4. Select Installable Options, and select the options that have been installed on the printer, then click Apply
-
 1
1 -
2
-
3
-
4
-
5
-
6
-
7
-
8
-
9
-
10
-
11
-
12
-
13
-
14
-
15
-
16
-
17
-
18
-
19
-
20
-
21
-
22
-
23
-
24
-
25
-
26
-
27
-
28
-
29
-
30
-
31
-
32
-
33
-
34
-
35
-
36
-
37
-
38
-
39
-
40
-
41
-
42
-
43
-
44
-
45
-
46
-
47
-
48
-
49
-
50
-
51
-
52
-
53
-
54
-
55
-
56
-
57
-
58
-
59
-
60
-
61
-
62
-
63
-
64
-
65
-
66
-
67
-
68
-
69
-
70
-
71
-
72
-
73
-
74
-
75
-
76
-
77
-
78
-
79
-
80
-
81
-
82
-
83
-
84
-
85
-
86
-
87
-
88
-
89
-
90
-
 91
91 -
 92
92 -
 93
93 -
 94
94 -
 95
95 -
 96
96 -
 97
97 -
 98
98 -
 99
99 -
 100
100 -
 101
101 -
102
-
103
-
104
-
105
-
106
-
107
-
108
-
109
-
110
-
111
-
112
-
113
-
114
-
115
-
116
-
117
-
118
-
119
-
120
-
121
-
122
-
123
-
124
-
125
-
126
-
127
-
128
-
129
-
130
-
131
-
132
-
133
-
134
-
135
-
136
-
137
-
138
-
139
-
140
-
141
-
142
-
143
-
144
-
145
-
146
-
147
-
148
-
149
-
150
-
151
-
152
-
153
-
154
-
155
-
156
-
157
-
158
-
159
-
160
-
161
-
162
-
163
-
164
-
165
-
166
-
167
-
168
-
169
-
170
-
171
-
172
-
173
-
174
-
175
-
176
-
177
-
178
-
179
-
180
-
181
-
182
-
183
-
184
-
185
-
186
-
187
-
188
-
189
-
190
-
191
-
192
-
193
-
194
-
195
-
196
-
197
-
198
-
199
-
200
-
201
-
202
-
203
-
204
-
205
-
206
-
207
-
208
-
209
-
210
-
211
-
212
-
213
-
214
-
215
-
216
-
217
-
218
-
219
-
220
-
221
-
222
-
223
-
224
-
225
-
226
-
227
-
228
-
229
-
230
-
231
-
232
-
233
-
234
-
235
-
236
-
237
-
238
-
239
-
240
-
241
-
242
-
243
-
244
-
245
-
246
-
247
-
248
-
249
-
250
-
251
-
252
-
253
-
254
-
255
-
256
-
257
-
258
-
259
-
260
-
261
-
262
-
263
-
264
-
265
-
266
-
267
-
268
-
269
-
270
-
271
-
272
-
273
-
274
-
275
-
276
-
277
-
278
-
279
-
280
-
281
-
282
-
283
-
284
-
285
-
286
-
287
-
288
-
289
-
290
-
291
-
292
-
293
-
294
-
295
-
296
-
297
-
298
-
299
-
300
-
301
-
302
-
303
-
304
-
305
-
306
-
307
-
308
-
309
-
310
-
311
-
312
-
313
-
314
-
315
-
316
-
317
-
318
-
319
-
320
-
321
-
322
-
323
-
324
-
325
-
326
-
327
-
328
-
329
-
330
-
331
-
332
-
333
-
334
-
335
-
336
-
337
-
338
-
339
-
340
-
341
-
342
-
343
-
344
-
345
-
346
-
347
-
348
-
349
-
350
-
351
-
352
-
353
-
354
-
355
-
356
-
357
-
358
-
359
-
360
-
361
-
362
-
363
-
364
-
365
-
366
-
367
-
368
-
369
-
370
-
371
-
372
-
373
-
374
-
375
-
376
-
377
-
378
-
379
-
380
-
381
-
382
-
383
-
384
-
385
-
386
-
387
-
388
-
389
-
390
-
391
-
392
-
393
-
394
-
395
-
396
-
397
-
398
-
399
-
400
-
401
-
402
-
403
-
404
-
405
-
406
-
407
-
408
-
409
-
410
-
411
-
412
 |
 |