Dell 5130 Color Laser User's Guide (PDF) - Page 138
Print Volume, Copy Printer Settings Report, Dell ColorTrack
 |
View all Dell 5130 Color Laser manuals
Add to My Manuals
Save this manual to your list of manuals |
Page 138 highlights
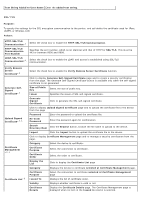
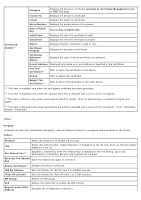
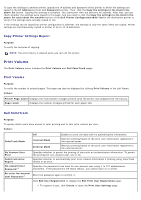
To copy the settings to another printer, specify the IP address and password of the printer to which the settings are copied in the IP Address text box and Password text box. Then, click the Copy the settings to the Host in the above list button. Copying the settings is complete. The connection time-out period is 60 seconds. After that, you can check whether the settings were copied to this page. And you need to click the Copy the settings to the Host in the above list and reboot the machine button of the Dell Printer Configuration Web Tool in the destination printer to verify if the settings were actually copied or not. If the settings can be copied but printer configuration is different, the settings of only the same items are copied. Printer settings are simultaneously copied to printer of up to 10 IP addresses. Copy Printer Settings Report Purpose: To verify the histories of copying. NOTE: The print history is cleared when you turn off the printer. Print Volume The Print Volume menu includes the Print Volume and Dell ColorTrack pages. Print Volume Purpose: To verify the number of printed pages. This page can also be displayed by clicking Print Volume in the Left Frame. Values: Printer Page Count Displays the total number of pages printed since the printer was shipped from the factory. Paper Used Displays the number of pages printed for each paper size. Dell ColorTrack Purpose: To specify which users have access to color printing and to limit print volume per user. Values: Off Enables to print the data with no authentication information. ColorTrack Mode Internal Mode Restricts printing based on the print user information registered in the internal server. External Mode Restricts printing based on the print user information registered in the external server. No Account User Print Specifies whether to permit the printing of data with no authentication information. To permit the printing for non-account user, set to On. ColorTrack Error Report Specifies whether to automatically print error-related information if printing using ColorTrack results in an error. No-account User Password*1 Specifies the password to be used for non-account user using 1 to 127 alphanumeric characters. If the password is left blank (NULL), you cannot log in to a server. Re-enter No-account User Password*1 Enter the password again to confirm it. Click Edit User Registration to display the Edit Print User Registration page. To register a user, click Create to open the Print User Settings page.
-
 1
1 -
2
-
3
-
4
-
5
-
6
-
7
-
8
-
9
-
10
-
11
-
12
-
13
-
14
-
15
-
16
-
17
-
18
-
19
-
20
-
21
-
22
-
23
-
24
-
25
-
26
-
27
-
28
-
29
-
30
-
31
-
32
-
33
-
34
-
35
-
36
-
37
-
38
-
39
-
40
-
41
-
42
-
43
-
44
-
45
-
46
-
47
-
48
-
49
-
50
-
51
-
52
-
53
-
54
-
55
-
56
-
57
-
58
-
59
-
60
-
61
-
62
-
63
-
64
-
65
-
66
-
67
-
68
-
69
-
70
-
71
-
72
-
73
-
74
-
75
-
76
-
77
-
78
-
79
-
80
-
81
-
82
-
83
-
84
-
85
-
86
-
87
-
88
-
89
-
90
-
91
-
92
-
93
-
94
-
95
-
96
-
97
-
98
-
99
-
100
-
101
-
102
-
103
-
104
-
105
-
106
-
107
-
108
-
109
-
110
-
111
-
112
-
113
-
114
-
115
-
116
-
117
-
118
-
119
-
120
-
121
-
122
-
123
-
124
-
125
-
126
-
127
-
128
-
129
-
130
-
131
-
132
-
 133
133 -
 134
134 -
 135
135 -
 136
136 -
 137
137 -
 138
138 -
 139
139 -
 140
140 -
 141
141 -
 142
142 -
 143
143 -
144
-
145
-
146
-
147
-
148
-
149
-
150
-
151
-
152
-
153
-
154
-
155
-
156
-
157
-
158
-
159
-
160
-
161
-
162
-
163
-
164
-
165
-
166
-
167
-
168
-
169
-
170
-
171
-
172
-
173
-
174
-
175
-
176
-
177
-
178
-
179
-
180
-
181
-
182
-
183
-
184
-
185
-
186
-
187
-
188
-
189
-
190
-
191
-
192
-
193
-
194
-
195
-
196
-
197
-
198
-
199
-
200
-
201
-
202
-
203
-
204
-
205
-
206
-
207
-
208
-
209
-
210
-
211
-
212
-
213
-
214
-
215
-
216
-
217
-
218
-
219
-
220
-
221
-
222
-
223
-
224
-
225
-
226
-
227
-
228
-
229
-
230
-
231
-
232
-
233
-
234
-
235
-
236
-
237
-
238
-
239
-
240
-
241
-
242
-
243
-
244
-
245
-
246
-
247
-
248
-
249
-
250
-
251
-
252
-
253
-
254
-
255
-
256
-
257
-
258
-
259
-
260
-
261
-
262
-
263
-
264
-
265
-
266
-
267
-
268
-
269
-
270
-
271
-
272
-
273
-
274
-
275
-
276
-
277
-
278
-
279
-
280
-
281
-
282
-
283
-
284
-
285
-
286
-
287
-
288
-
289
-
290
-
291
-
292
-
293
-
294
-
295
-
296
-
297
-
298
-
299
-
300
-
301
-
302
-
303
-
304
-
305
-
306
-
307
-
308
-
309
-
310
-
311
-
312
-
313
-
314
-
315
-
316
-
317
-
318
-
319
-
320
-
321
-
322
-
323
-
324
-
325
-
326
-
327
-
328
-
329
-
330
-
331
-
332
-
333
-
334
-
335
-
336
-
337
-
338
-
339
-
340
-
341
-
342
-
343
-
344
-
345
-
346
-
347
-
348
-
349
-
350
-
351
-
352
-
353
-
354
-
355
-
356
-
357
-
358
-
359
-
360
-
361
-
362
-
363
-
364
-
365
-
366
-
367
-
368
-
369
-
370
-
371
-
372
-
373
-
374
-
375
-
376
-
377
-
378
-
379
-
380
-
381
-
382
-
383
-
384
-
385
-
386
-
387
-
388
-
389
-
390
-
391
-
392
-
393
-
394
-
395
-
396
-
397
-
398
-
399
-
400
-
401
-
402
-
403
-
404
-
405
-
406
-
407
-
408
-
409
-
410
-
411
-
412
 |
 |