Dell 5130 Color Laser User's Guide (PDF) - Page 27
Installing both 550-Sheet Feeders and 1100-Sheet Feeder, Printers and Faxes
 |
View all Dell 5130 Color Laser manuals
Add to My Manuals
Save this manual to your list of manuals |
Page 27 highlights
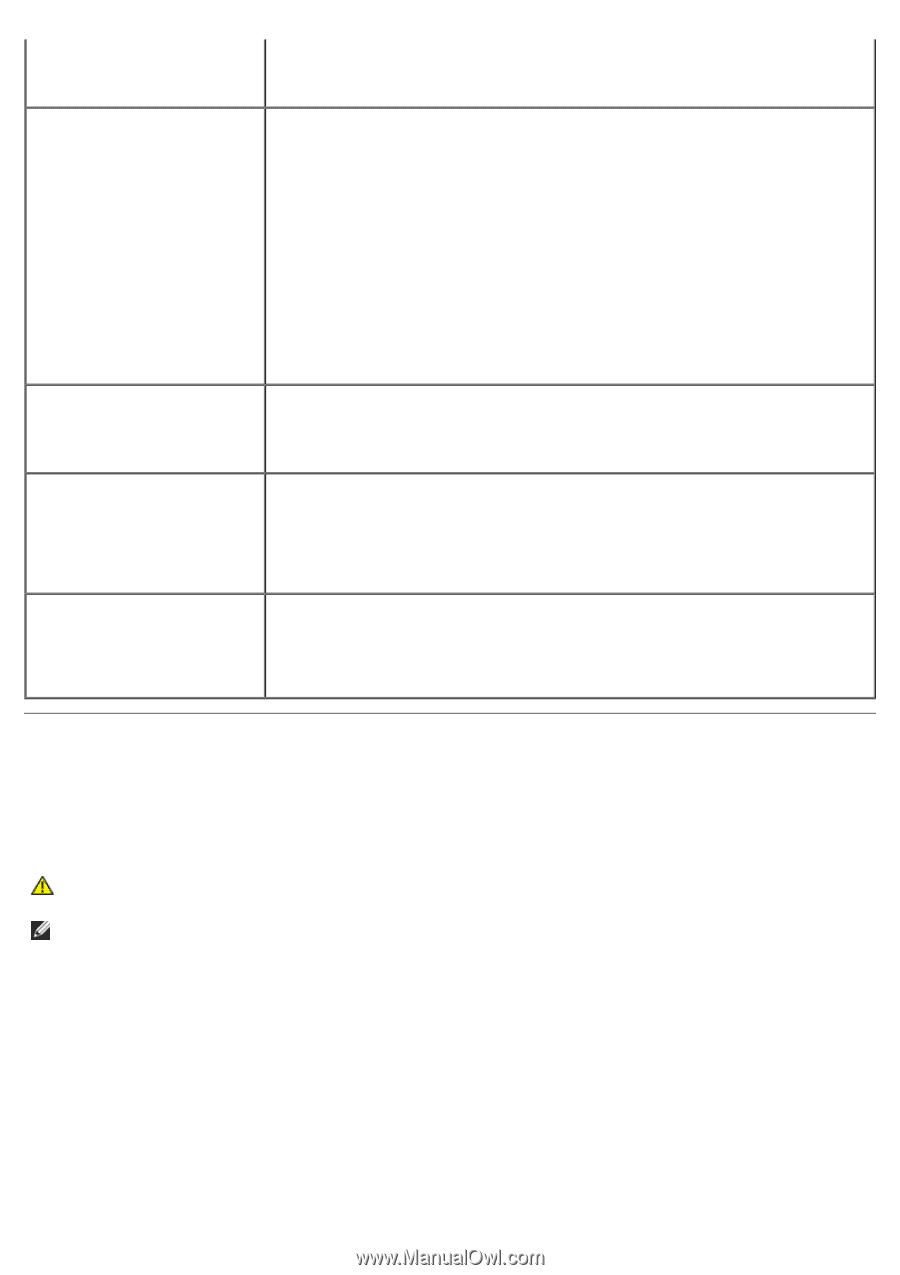
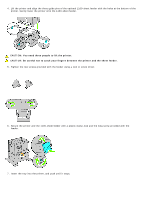
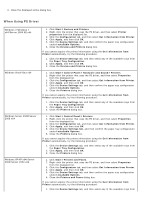
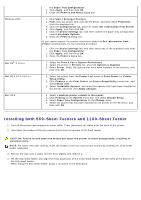
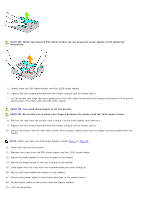
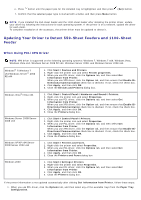
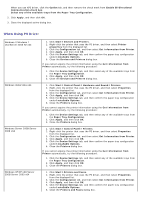
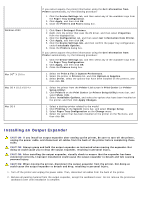
Windows 2000 Mac OS® X 10.5.x Mac OS X 10.3.x/10.4.x Mac OS 9 the Paper Tray Configuration. 2. Click Apply, and then click OK. 3. Close the Printers and Faxes dialog box. 1. Click Start® Settings® Printers. 2. Right-click the printer that uses the PS driver, and then select Properties from the displayed list. 3. Click the Configuration tab, and then select Get Information from Printer. 4. Click Apply, and then click OK. 5. Click the Device Settings tab, and then confirm the paper tray configuration under Installable Options. 6. Close the Printers dialog box. If you cannot acquire the printer information using the Get Information from Printer automatically, try the following procedure: 1. Click the Device Settings tab, and then select any of the available trays from the Paper Tray Configuration. 2. Click Apply, and then click OK. 3. Close the Printers dialog box. 1. Select the Print & Fax in System Preferences. 2. Select the printer in Printers list, and click Options & Supplies. 3. Select Driver, select the options that have been installed on the printers, and then click OK. 1. Select the printer from the Printer List screen in Print Center (or Printer Setup Utility). 2. Click Printers on the Print Center (or Printer Setup Utility) menu bar, and select Show Info. 3. Select Installable Options, and select the options that have been installed on the printer, and then click Apply Changes. 1. Select a desktop printer related to the model. 2. Click Printing on the System menu bar, and select Change Setup. 3. Select Paper Tray Configuration on the Change menu. 4. Select the option that has been installed on the printer on the To menu, and then click OK. Installing both 550-Sheet Feeders and 1100-Sheet Feeder 1. Turn off the printer and unplug the power cable. Then, disconnect all cables from the back of the printer. 2. Lock down the brakes of the two casters at the front of optional 1100-sheet feeder. CAUTION: Failure to lock down the brakes can cause the printer to move unexpectedly, resulting in personal injury. NOTE: For easier and safer locking, make the brakes of the two casters face forward by pushing the 1100-sheet feeder backward. 3. Pull out the tray until it stops. Lift the front slightly and remove it. 4. Lift the 550-sheet feeder and align the three guide pins of the 1100-sheet feeder with the holes at the bottom of the 550-sheet feeder. When lifting the 550-sheet feeder, grasp it as shown in the illustration.
-
 1
1 -
2
-
3
-
4
-
5
-
6
-
7
-
8
-
9
-
10
-
11
-
12
-
13
-
14
-
15
-
16
-
17
-
18
-
19
-
20
-
21
-
 22
22 -
 23
23 -
 24
24 -
 25
25 -
 26
26 -
 27
27 -
 28
28 -
 29
29 -
 30
30 -
 31
31 -
 32
32 -
33
-
34
-
35
-
36
-
37
-
38
-
39
-
40
-
41
-
42
-
43
-
44
-
45
-
46
-
47
-
48
-
49
-
50
-
51
-
52
-
53
-
54
-
55
-
56
-
57
-
58
-
59
-
60
-
61
-
62
-
63
-
64
-
65
-
66
-
67
-
68
-
69
-
70
-
71
-
72
-
73
-
74
-
75
-
76
-
77
-
78
-
79
-
80
-
81
-
82
-
83
-
84
-
85
-
86
-
87
-
88
-
89
-
90
-
91
-
92
-
93
-
94
-
95
-
96
-
97
-
98
-
99
-
100
-
101
-
102
-
103
-
104
-
105
-
106
-
107
-
108
-
109
-
110
-
111
-
112
-
113
-
114
-
115
-
116
-
117
-
118
-
119
-
120
-
121
-
122
-
123
-
124
-
125
-
126
-
127
-
128
-
129
-
130
-
131
-
132
-
133
-
134
-
135
-
136
-
137
-
138
-
139
-
140
-
141
-
142
-
143
-
144
-
145
-
146
-
147
-
148
-
149
-
150
-
151
-
152
-
153
-
154
-
155
-
156
-
157
-
158
-
159
-
160
-
161
-
162
-
163
-
164
-
165
-
166
-
167
-
168
-
169
-
170
-
171
-
172
-
173
-
174
-
175
-
176
-
177
-
178
-
179
-
180
-
181
-
182
-
183
-
184
-
185
-
186
-
187
-
188
-
189
-
190
-
191
-
192
-
193
-
194
-
195
-
196
-
197
-
198
-
199
-
200
-
201
-
202
-
203
-
204
-
205
-
206
-
207
-
208
-
209
-
210
-
211
-
212
-
213
-
214
-
215
-
216
-
217
-
218
-
219
-
220
-
221
-
222
-
223
-
224
-
225
-
226
-
227
-
228
-
229
-
230
-
231
-
232
-
233
-
234
-
235
-
236
-
237
-
238
-
239
-
240
-
241
-
242
-
243
-
244
-
245
-
246
-
247
-
248
-
249
-
250
-
251
-
252
-
253
-
254
-
255
-
256
-
257
-
258
-
259
-
260
-
261
-
262
-
263
-
264
-
265
-
266
-
267
-
268
-
269
-
270
-
271
-
272
-
273
-
274
-
275
-
276
-
277
-
278
-
279
-
280
-
281
-
282
-
283
-
284
-
285
-
286
-
287
-
288
-
289
-
290
-
291
-
292
-
293
-
294
-
295
-
296
-
297
-
298
-
299
-
300
-
301
-
302
-
303
-
304
-
305
-
306
-
307
-
308
-
309
-
310
-
311
-
312
-
313
-
314
-
315
-
316
-
317
-
318
-
319
-
320
-
321
-
322
-
323
-
324
-
325
-
326
-
327
-
328
-
329
-
330
-
331
-
332
-
333
-
334
-
335
-
336
-
337
-
338
-
339
-
340
-
341
-
342
-
343
-
344
-
345
-
346
-
347
-
348
-
349
-
350
-
351
-
352
-
353
-
354
-
355
-
356
-
357
-
358
-
359
-
360
-
361
-
362
-
363
-
364
-
365
-
366
-
367
-
368
-
369
-
370
-
371
-
372
-
373
-
374
-
375
-
376
-
377
-
378
-
379
-
380
-
381
-
382
-
383
-
384
-
385
-
386
-
387
-
388
-
389
-
390
-
391
-
392
-
393
-
394
-
395
-
396
-
397
-
398
-
399
-
400
-
401
-
402
-
403
-
404
-
405
-
406
-
407
-
408
-
409
-
410
-
411
-
412
 |
 |