Dell 5130 Color Laser User's Guide (PDF) - Page 407
Digital Certificate Problem, Chart Print, Pitch Configuration Chart, Symptom, Cause, Action
 |
View all Dell 5130 Color Laser manuals
Add to My Manuals
Save this manual to your list of manuals |
Page 407 highlights
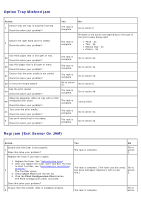
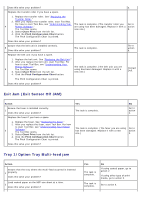
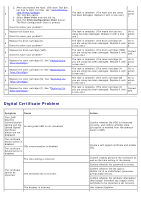
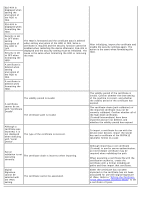
2. After you replace the fuser, click start Tool Box. For how to start Tool Box, see "Understanding 3 Your Printer Software." The Tool Box opens. 3. Select Chart Print from the left list. 4. Click the Pitch Configuration Chart button. The Pitch Configuration Chart is printed. Does this solve your problem? Replace the waste box. 4 Does this solve your problem? Replace the drum cartridge (K). 5 Does this solve your problem? Replace the drum cartridge (YMC). 6 Does this solve your problem? 7 Replace the toner cartridge (K). See "Replacing the Toner Cartridges." 8 Replace the toner cartridge (Y). See "Replacing the Toner Cartridges." 9 Replace the toner cartridge (M). See "Replacing the Toner Cartridges." 10 Replace the toner cartridge (C). See "Replacing the Toner Cartridges." The task is complete. (The fuser you are using has been damaged. Replace it with a new one.) Go to action 7 The task is complete. (The waste box you are using has been damaged. Replace it with a new one.) Go to action 5. The task is complete. (The drum cartridge (K) Go to you are using has been damaged. Replace it with action a new one.) 6. The task is complete. (The drum cartridge (YMC) you are using has been damaged. Replace it with a new one.) Contact Dell. The task is complete. (The toner cartridge (K) Go to you are using has been damaged. Replace it with action a new one.) 8. The task is complete. (The toner cartridge (Y) Go to you are using has been damaged. Replace it with action a new one.) 9. The task is complete. (The toner cartridge (M) Go to you are using has been damaged. Replace it with action a new one.) 10. The task is complete. (The toner cartridge (C) you are using has been damaged. Replace it with a new one.) Contact Dell. Digital Certificate Problem Symptom Cause The LDAPSSL/TLS Communication setting and the Upload Signed Certificate button are not displayed An encrypted HDD is not connected. The certificate import button is disabled. The certificate SSL communication is disabled. details button is disabled. The time setting is incorrect. The certificate cannot be imported. The certificate file is incorrect. The browser is incorrect. Action Confirm whether the HDD is connected correctly, and confirm whether Data Encryption is enabled from the operator panel or EWS. Create a self-signed certificate and enable SSL. Confirm validity period of the certificate as well as the time setting of the device. Confirm whether the password is correct. Confirm whether the file type is PKCS#7/#12 or x509CACert (extension: p7b/p12/pfx/cer/crt). Confirm whether the attribute information (key Usage/ Extended key usage) of the certificate to be imported is set correctly. Use Internet Explorer.
-
 1
1 -
2
-
3
-
4
-
5
-
6
-
7
-
8
-
9
-
10
-
11
-
12
-
13
-
14
-
15
-
16
-
17
-
18
-
19
-
20
-
21
-
22
-
23
-
24
-
25
-
26
-
27
-
28
-
29
-
30
-
31
-
32
-
33
-
34
-
35
-
36
-
37
-
38
-
39
-
40
-
41
-
42
-
43
-
44
-
45
-
46
-
47
-
48
-
49
-
50
-
51
-
52
-
53
-
54
-
55
-
56
-
57
-
58
-
59
-
60
-
61
-
62
-
63
-
64
-
65
-
66
-
67
-
68
-
69
-
70
-
71
-
72
-
73
-
74
-
75
-
76
-
77
-
78
-
79
-
80
-
81
-
82
-
83
-
84
-
85
-
86
-
87
-
88
-
89
-
90
-
91
-
92
-
93
-
94
-
95
-
96
-
97
-
98
-
99
-
100
-
101
-
102
-
103
-
104
-
105
-
106
-
107
-
108
-
109
-
110
-
111
-
112
-
113
-
114
-
115
-
116
-
117
-
118
-
119
-
120
-
121
-
122
-
123
-
124
-
125
-
126
-
127
-
128
-
129
-
130
-
131
-
132
-
133
-
134
-
135
-
136
-
137
-
138
-
139
-
140
-
141
-
142
-
143
-
144
-
145
-
146
-
147
-
148
-
149
-
150
-
151
-
152
-
153
-
154
-
155
-
156
-
157
-
158
-
159
-
160
-
161
-
162
-
163
-
164
-
165
-
166
-
167
-
168
-
169
-
170
-
171
-
172
-
173
-
174
-
175
-
176
-
177
-
178
-
179
-
180
-
181
-
182
-
183
-
184
-
185
-
186
-
187
-
188
-
189
-
190
-
191
-
192
-
193
-
194
-
195
-
196
-
197
-
198
-
199
-
200
-
201
-
202
-
203
-
204
-
205
-
206
-
207
-
208
-
209
-
210
-
211
-
212
-
213
-
214
-
215
-
216
-
217
-
218
-
219
-
220
-
221
-
222
-
223
-
224
-
225
-
226
-
227
-
228
-
229
-
230
-
231
-
232
-
233
-
234
-
235
-
236
-
237
-
238
-
239
-
240
-
241
-
242
-
243
-
244
-
245
-
246
-
247
-
248
-
249
-
250
-
251
-
252
-
253
-
254
-
255
-
256
-
257
-
258
-
259
-
260
-
261
-
262
-
263
-
264
-
265
-
266
-
267
-
268
-
269
-
270
-
271
-
272
-
273
-
274
-
275
-
276
-
277
-
278
-
279
-
280
-
281
-
282
-
283
-
284
-
285
-
286
-
287
-
288
-
289
-
290
-
291
-
292
-
293
-
294
-
295
-
296
-
297
-
298
-
299
-
300
-
301
-
302
-
303
-
304
-
305
-
306
-
307
-
308
-
309
-
310
-
311
-
312
-
313
-
314
-
315
-
316
-
317
-
318
-
319
-
320
-
321
-
322
-
323
-
324
-
325
-
326
-
327
-
328
-
329
-
330
-
331
-
332
-
333
-
334
-
335
-
336
-
337
-
338
-
339
-
340
-
341
-
342
-
343
-
344
-
345
-
346
-
347
-
348
-
349
-
350
-
351
-
352
-
353
-
354
-
355
-
356
-
357
-
358
-
359
-
360
-
361
-
362
-
363
-
364
-
365
-
366
-
367
-
368
-
369
-
370
-
371
-
372
-
373
-
374
-
375
-
376
-
377
-
378
-
379
-
380
-
381
-
382
-
383
-
384
-
385
-
386
-
387
-
388
-
389
-
390
-
391
-
392
-
393
-
394
-
395
-
396
-
397
-
398
-
399
-
400
-
401
-
 402
402 -
 403
403 -
 404
404 -
 405
405 -
 406
406 -
 407
407 -
 408
408 -
 409
409 -
 410
410 -
 411
411 -
 412
412
 |
 |
