Dell 5130 Color Laser User's Guide (PDF) - Page 353
Determining Values, Admin Menu, Maintenance, Color Reg Adj, Enter Number, Color Regi Chart
 |
View all Dell 5130 Color Laser manuals
Add to My Manuals
Save this manual to your list of manuals |
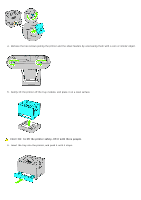
Page 353 highlights
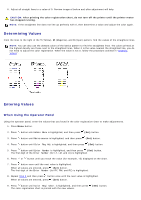
6. Adjust all straight lines to a value of 0. Preview image of before and after adjustment will help. CAUTION: After printing the color registration chart, do not turn off the printer until the printer motor has stopped running. NOTE: If the straightest line does not line up perfectly with 0, then determine a value and adjust the color again. Determining Values From the lines to the right of the Y (Yellow), M (Magenta), and C (Cyan) pattern, find the values of the straightest lines. NOTE: You can also use the densest colors of the lattice pattern to find the straightest lines. The colors printed at the highest density are those next to the straightest lines. When 0 is the value nearest the straightest line, you do not need to adjust the color registration. When the value is not 0, follow the procedure outlined in "Entering Values". Entering Values When Using the Operator Panel Using the operator panel, enter the values that you found in the color registration chart to make adjustments. 1. Press Menu button. 2. Press button until Admin Menu is highlighted, and then press (Set) button. 3. Press button until Maintenance is highlighted, and then press (Set) button. 4. Press button until Color Reg Adj is highlighted, and then press (Set) button. 5. Press button until Enter Number is highlighted, and then press (Set) button. The first digit of the Enter Number (for LY, LM, and LC) is highlighted. 6. Press or button until you reach the value (for example, +3) displayed on the chart. 7. Press button once until the next value is highlighted. When all values are entered, press (Set) button. The first digit of the Enter Number (for RY, RM, and RC) is highlighted. 8. Repeat Step 6 and then press button once until the next value is highlighted. When all values are entered, press (Set) button. 9. Press button until Color Regi Chart is highlighted, and then press (Set) button. The color registration chart is printed with the new values.
-
 1
1 -
2
-
3
-
4
-
5
-
6
-
7
-
8
-
9
-
10
-
11
-
12
-
13
-
14
-
15
-
16
-
17
-
18
-
19
-
20
-
21
-
22
-
23
-
24
-
25
-
26
-
27
-
28
-
29
-
30
-
31
-
32
-
33
-
34
-
35
-
36
-
37
-
38
-
39
-
40
-
41
-
42
-
43
-
44
-
45
-
46
-
47
-
48
-
49
-
50
-
51
-
52
-
53
-
54
-
55
-
56
-
57
-
58
-
59
-
60
-
61
-
62
-
63
-
64
-
65
-
66
-
67
-
68
-
69
-
70
-
71
-
72
-
73
-
74
-
75
-
76
-
77
-
78
-
79
-
80
-
81
-
82
-
83
-
84
-
85
-
86
-
87
-
88
-
89
-
90
-
91
-
92
-
93
-
94
-
95
-
96
-
97
-
98
-
99
-
100
-
101
-
102
-
103
-
104
-
105
-
106
-
107
-
108
-
109
-
110
-
111
-
112
-
113
-
114
-
115
-
116
-
117
-
118
-
119
-
120
-
121
-
122
-
123
-
124
-
125
-
126
-
127
-
128
-
129
-
130
-
131
-
132
-
133
-
134
-
135
-
136
-
137
-
138
-
139
-
140
-
141
-
142
-
143
-
144
-
145
-
146
-
147
-
148
-
149
-
150
-
151
-
152
-
153
-
154
-
155
-
156
-
157
-
158
-
159
-
160
-
161
-
162
-
163
-
164
-
165
-
166
-
167
-
168
-
169
-
170
-
171
-
172
-
173
-
174
-
175
-
176
-
177
-
178
-
179
-
180
-
181
-
182
-
183
-
184
-
185
-
186
-
187
-
188
-
189
-
190
-
191
-
192
-
193
-
194
-
195
-
196
-
197
-
198
-
199
-
200
-
201
-
202
-
203
-
204
-
205
-
206
-
207
-
208
-
209
-
210
-
211
-
212
-
213
-
214
-
215
-
216
-
217
-
218
-
219
-
220
-
221
-
222
-
223
-
224
-
225
-
226
-
227
-
228
-
229
-
230
-
231
-
232
-
233
-
234
-
235
-
236
-
237
-
238
-
239
-
240
-
241
-
242
-
243
-
244
-
245
-
246
-
247
-
248
-
249
-
250
-
251
-
252
-
253
-
254
-
255
-
256
-
257
-
258
-
259
-
260
-
261
-
262
-
263
-
264
-
265
-
266
-
267
-
268
-
269
-
270
-
271
-
272
-
273
-
274
-
275
-
276
-
277
-
278
-
279
-
280
-
281
-
282
-
283
-
284
-
285
-
286
-
287
-
288
-
289
-
290
-
291
-
292
-
293
-
294
-
295
-
296
-
297
-
298
-
299
-
300
-
301
-
302
-
303
-
304
-
305
-
306
-
307
-
308
-
309
-
310
-
311
-
312
-
313
-
314
-
315
-
316
-
317
-
318
-
319
-
320
-
321
-
322
-
323
-
324
-
325
-
326
-
327
-
328
-
329
-
330
-
331
-
332
-
333
-
334
-
335
-
336
-
337
-
338
-
339
-
340
-
341
-
342
-
343
-
344
-
345
-
346
-
347
-
 348
348 -
 349
349 -
 350
350 -
 351
351 -
 352
352 -
 353
353 -
 354
354 -
 355
355 -
 356
356 -
 357
357 -
 358
358 -
359
-
360
-
361
-
362
-
363
-
364
-
365
-
366
-
367
-
368
-
369
-
370
-
371
-
372
-
373
-
374
-
375
-
376
-
377
-
378
-
379
-
380
-
381
-
382
-
383
-
384
-
385
-
386
-
387
-
388
-
389
-
390
-
391
-
392
-
393
-
394
-
395
-
396
-
397
-
398
-
399
-
400
-
401
-
402
-
403
-
404
-
405
-
406
-
407
-
408
-
409
-
410
-
411
-
412
 |
 |