Dell 5130 Color Laser User's Guide (PDF) - Page 404
Option Tray Misfeed jam, Regi jam Exit Sensor On JAM, Action, Chart Print, Pitch Configuration Chart
 |
View all Dell 5130 Color Laser manuals
Add to My Manuals
Save this manual to your list of manuals |
Page 404 highlights
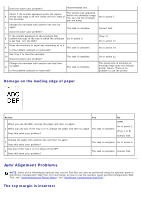
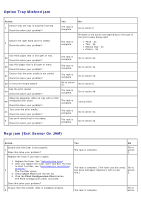
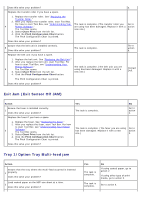
Option Tray Misfeed jam Action Ensure that the tray is properly inserted. 1 Does this solve your problem? Ensure the right hand cover is closed. 2 Does this solve your problem? Yes The task is complete. The task is complete. No Go to action 2. Proceed to the action corresponding to the type of the print media being used: Thick - 3a Thin - 3b Manual Dup - 3c Others - 3d Use thick paper that is 216 gsm or less. 3a Does this solve your problem? The task is complete. Use thin paper that is 60 gsm or more. 3b Does this solve your problem? The task is complete. Ensure that the print media is not curled. 3c Does this solve your problem? The task is complete. 3d Is the print media damp? Go to action 4c. Fan the print media. 4a Does this solve your problem? The task is complete. Wipe the separator rollers in tray with a cloth 4b moistened with water. Does this solve your problem? The task is complete. Turn over the print media. 4c Does this solve your problem? The task is complete. Use print media that is not damp. 5 Does this solve your problem? The task is complete. Go to action 4a. Go to action 4a. Go to action 4a. Go to action 5. Go to action 4b. Contact Dell. Go to action 4a. Go to action 4a. Regi jam (Exit Sensor On JAM) Action Yes No Ensure that the fuser is set properly. 1 Does this solve your problem? The task is complete. Go to action 2. Replace the fuser if you have a spare. 1. Replace the fuser. See "Replacing the Fuser." 2. After you replace the fuser, start Tool Box. For how 2 to start Tool Box, see "Understanding Your Printer Software." The Tool Box opens. 3. Select Chart Print from the left list. The task is complete. (The fuser you are using Go to has been damaged. Replace it with a new action one.) 3. 4. Click the Pitch Configuration Chart button. The Pitch Configuration Chart is printed. Does this solve your problem? Ensure that the transfer roller is installed correctly. 3 The task is complete. Go to action
-
 1
1 -
2
-
3
-
4
-
5
-
6
-
7
-
8
-
9
-
10
-
11
-
12
-
13
-
14
-
15
-
16
-
17
-
18
-
19
-
20
-
21
-
22
-
23
-
24
-
25
-
26
-
27
-
28
-
29
-
30
-
31
-
32
-
33
-
34
-
35
-
36
-
37
-
38
-
39
-
40
-
41
-
42
-
43
-
44
-
45
-
46
-
47
-
48
-
49
-
50
-
51
-
52
-
53
-
54
-
55
-
56
-
57
-
58
-
59
-
60
-
61
-
62
-
63
-
64
-
65
-
66
-
67
-
68
-
69
-
70
-
71
-
72
-
73
-
74
-
75
-
76
-
77
-
78
-
79
-
80
-
81
-
82
-
83
-
84
-
85
-
86
-
87
-
88
-
89
-
90
-
91
-
92
-
93
-
94
-
95
-
96
-
97
-
98
-
99
-
100
-
101
-
102
-
103
-
104
-
105
-
106
-
107
-
108
-
109
-
110
-
111
-
112
-
113
-
114
-
115
-
116
-
117
-
118
-
119
-
120
-
121
-
122
-
123
-
124
-
125
-
126
-
127
-
128
-
129
-
130
-
131
-
132
-
133
-
134
-
135
-
136
-
137
-
138
-
139
-
140
-
141
-
142
-
143
-
144
-
145
-
146
-
147
-
148
-
149
-
150
-
151
-
152
-
153
-
154
-
155
-
156
-
157
-
158
-
159
-
160
-
161
-
162
-
163
-
164
-
165
-
166
-
167
-
168
-
169
-
170
-
171
-
172
-
173
-
174
-
175
-
176
-
177
-
178
-
179
-
180
-
181
-
182
-
183
-
184
-
185
-
186
-
187
-
188
-
189
-
190
-
191
-
192
-
193
-
194
-
195
-
196
-
197
-
198
-
199
-
200
-
201
-
202
-
203
-
204
-
205
-
206
-
207
-
208
-
209
-
210
-
211
-
212
-
213
-
214
-
215
-
216
-
217
-
218
-
219
-
220
-
221
-
222
-
223
-
224
-
225
-
226
-
227
-
228
-
229
-
230
-
231
-
232
-
233
-
234
-
235
-
236
-
237
-
238
-
239
-
240
-
241
-
242
-
243
-
244
-
245
-
246
-
247
-
248
-
249
-
250
-
251
-
252
-
253
-
254
-
255
-
256
-
257
-
258
-
259
-
260
-
261
-
262
-
263
-
264
-
265
-
266
-
267
-
268
-
269
-
270
-
271
-
272
-
273
-
274
-
275
-
276
-
277
-
278
-
279
-
280
-
281
-
282
-
283
-
284
-
285
-
286
-
287
-
288
-
289
-
290
-
291
-
292
-
293
-
294
-
295
-
296
-
297
-
298
-
299
-
300
-
301
-
302
-
303
-
304
-
305
-
306
-
307
-
308
-
309
-
310
-
311
-
312
-
313
-
314
-
315
-
316
-
317
-
318
-
319
-
320
-
321
-
322
-
323
-
324
-
325
-
326
-
327
-
328
-
329
-
330
-
331
-
332
-
333
-
334
-
335
-
336
-
337
-
338
-
339
-
340
-
341
-
342
-
343
-
344
-
345
-
346
-
347
-
348
-
349
-
350
-
351
-
352
-
353
-
354
-
355
-
356
-
357
-
358
-
359
-
360
-
361
-
362
-
363
-
364
-
365
-
366
-
367
-
368
-
369
-
370
-
371
-
372
-
373
-
374
-
375
-
376
-
377
-
378
-
379
-
380
-
381
-
382
-
383
-
384
-
385
-
386
-
387
-
388
-
389
-
390
-
391
-
392
-
393
-
394
-
395
-
396
-
397
-
398
-
 399
399 -
 400
400 -
 401
401 -
 402
402 -
 403
403 -
 404
404 -
 405
405 -
 406
406 -
 407
407 -
 408
408 -
 409
409 -
410
-
411
-
412
 |
 |