Dell 5130 Color Laser User's Guide (PDF) - Page 32
Installing an Output Expander, Print & Fax
 |
View all Dell 5130 Color Laser manuals
Add to My Manuals
Save this manual to your list of manuals |
Page 32 highlights
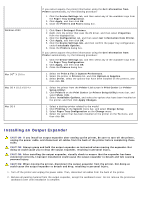
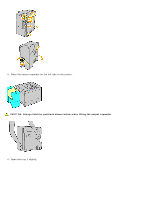
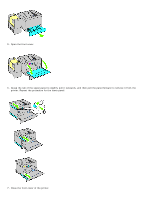
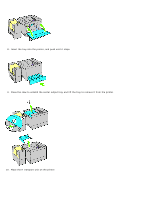
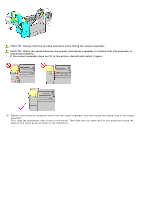
Windows 2000 Mac OS® X 10.5.x Mac OS X 10.3.x/10.4.x Mac OS 9 If you cannot acquire the printer information using the Get Information from Printer automatically, try the following procedure: 1. Click the Device Settings tab, and then select any of the available trays from the Paper Tray Configuration. 2. Click Apply, and then click OK. 3. Close the Printers and Faxes dialog box. 1. Click Start® Settings® Printers. 2. Right-click the printer that uses the PS driver, and then select Properties from the displayed list. 3. Click the Configuration tab, and then select Get Information from Printer. 4. Click Apply, and then click OK. 5. Click the Device Settings tab, and then confirm the paper tray configuration under Installable Options. 6. Close the Printers dialog box. If you cannot acquire the printer information using the Get Information from Printer automatically, try the following procedure: 1. Click the Device Settings tab, and then select any of the available trays from the Paper Tray Configuration. 2. Click Apply, and then click OK. 3. Close the Printers dialog box. 1. Select the Print & Fax in System Preferences. 2. Select the printer in Printers list, and click Options & Supplies. 3. Select Driver, select the options that have been installed on the printers, and then click OK. 1. Select the printer from the Printer List screen in Print Center (or Printer Setup Utility). 2. Click Printers on the Print Center (or Printer Setup Utility) menu bar, and select Show Info. 3. Select Installable Options, and select the options that have been installed on the printer, and then click Apply Changes. 1. Select a desktop printer related to the model. 2. Click Printing on the System menu bar, and select Change Setup. 3. Select Paper Tray Configuration on the Change menu. 4. Select the option that has been installed on the printer on the To menu, and then click OK. Installing an Output Expander CAUTION: If you install an output expander after setting up the printer, be sure to turn off the printer, unplug the power cable, and disconnect all cables from the back of the printer before completing these tasks. CAUTION: Always grasp and hold the output expander as instructed when moving the expander. Not doing so could cause you to drop the output expander, resulting in personal injury. CAUTION: After installing the output expander, visually check to ensure that the expander has been connected correctly. Improper installation could cause the output expander to detach and fall, causing personal injury. CAUTION: When moving the printer, disconnect the output expander from the printer. Not doing so could cause the output expander to detach and drop, resulting in personal injury. 1. Turn off the printer and unplug the power cable. Then, disconnect all cables from the back of the printer. 2. Remove all packing material from the output expander, except the cardboard cover. Do not remove the protective cardboard cover until installation is complete.
-
 1
1 -
2
-
3
-
4
-
5
-
6
-
7
-
8
-
9
-
10
-
11
-
12
-
13
-
14
-
15
-
16
-
17
-
18
-
19
-
20
-
21
-
22
-
23
-
24
-
25
-
26
-
 27
27 -
 28
28 -
 29
29 -
 30
30 -
 31
31 -
 32
32 -
 33
33 -
 34
34 -
 35
35 -
 36
36 -
 37
37 -
38
-
39
-
40
-
41
-
42
-
43
-
44
-
45
-
46
-
47
-
48
-
49
-
50
-
51
-
52
-
53
-
54
-
55
-
56
-
57
-
58
-
59
-
60
-
61
-
62
-
63
-
64
-
65
-
66
-
67
-
68
-
69
-
70
-
71
-
72
-
73
-
74
-
75
-
76
-
77
-
78
-
79
-
80
-
81
-
82
-
83
-
84
-
85
-
86
-
87
-
88
-
89
-
90
-
91
-
92
-
93
-
94
-
95
-
96
-
97
-
98
-
99
-
100
-
101
-
102
-
103
-
104
-
105
-
106
-
107
-
108
-
109
-
110
-
111
-
112
-
113
-
114
-
115
-
116
-
117
-
118
-
119
-
120
-
121
-
122
-
123
-
124
-
125
-
126
-
127
-
128
-
129
-
130
-
131
-
132
-
133
-
134
-
135
-
136
-
137
-
138
-
139
-
140
-
141
-
142
-
143
-
144
-
145
-
146
-
147
-
148
-
149
-
150
-
151
-
152
-
153
-
154
-
155
-
156
-
157
-
158
-
159
-
160
-
161
-
162
-
163
-
164
-
165
-
166
-
167
-
168
-
169
-
170
-
171
-
172
-
173
-
174
-
175
-
176
-
177
-
178
-
179
-
180
-
181
-
182
-
183
-
184
-
185
-
186
-
187
-
188
-
189
-
190
-
191
-
192
-
193
-
194
-
195
-
196
-
197
-
198
-
199
-
200
-
201
-
202
-
203
-
204
-
205
-
206
-
207
-
208
-
209
-
210
-
211
-
212
-
213
-
214
-
215
-
216
-
217
-
218
-
219
-
220
-
221
-
222
-
223
-
224
-
225
-
226
-
227
-
228
-
229
-
230
-
231
-
232
-
233
-
234
-
235
-
236
-
237
-
238
-
239
-
240
-
241
-
242
-
243
-
244
-
245
-
246
-
247
-
248
-
249
-
250
-
251
-
252
-
253
-
254
-
255
-
256
-
257
-
258
-
259
-
260
-
261
-
262
-
263
-
264
-
265
-
266
-
267
-
268
-
269
-
270
-
271
-
272
-
273
-
274
-
275
-
276
-
277
-
278
-
279
-
280
-
281
-
282
-
283
-
284
-
285
-
286
-
287
-
288
-
289
-
290
-
291
-
292
-
293
-
294
-
295
-
296
-
297
-
298
-
299
-
300
-
301
-
302
-
303
-
304
-
305
-
306
-
307
-
308
-
309
-
310
-
311
-
312
-
313
-
314
-
315
-
316
-
317
-
318
-
319
-
320
-
321
-
322
-
323
-
324
-
325
-
326
-
327
-
328
-
329
-
330
-
331
-
332
-
333
-
334
-
335
-
336
-
337
-
338
-
339
-
340
-
341
-
342
-
343
-
344
-
345
-
346
-
347
-
348
-
349
-
350
-
351
-
352
-
353
-
354
-
355
-
356
-
357
-
358
-
359
-
360
-
361
-
362
-
363
-
364
-
365
-
366
-
367
-
368
-
369
-
370
-
371
-
372
-
373
-
374
-
375
-
376
-
377
-
378
-
379
-
380
-
381
-
382
-
383
-
384
-
385
-
386
-
387
-
388
-
389
-
390
-
391
-
392
-
393
-
394
-
395
-
396
-
397
-
398
-
399
-
400
-
401
-
402
-
403
-
404
-
405
-
406
-
407
-
408
-
409
-
410
-
411
-
412
 |
 |