Dell 5130 Color Laser User's Guide (PDF) - Page 405
Exit Jam Exit Sensor Off JAM, Tray 1/Option Tray Multi-feed jam, Replacing the, Transfer Roller
 |
View all Dell 5130 Color Laser manuals
Add to My Manuals
Save this manual to your list of manuals |
Page 405 highlights
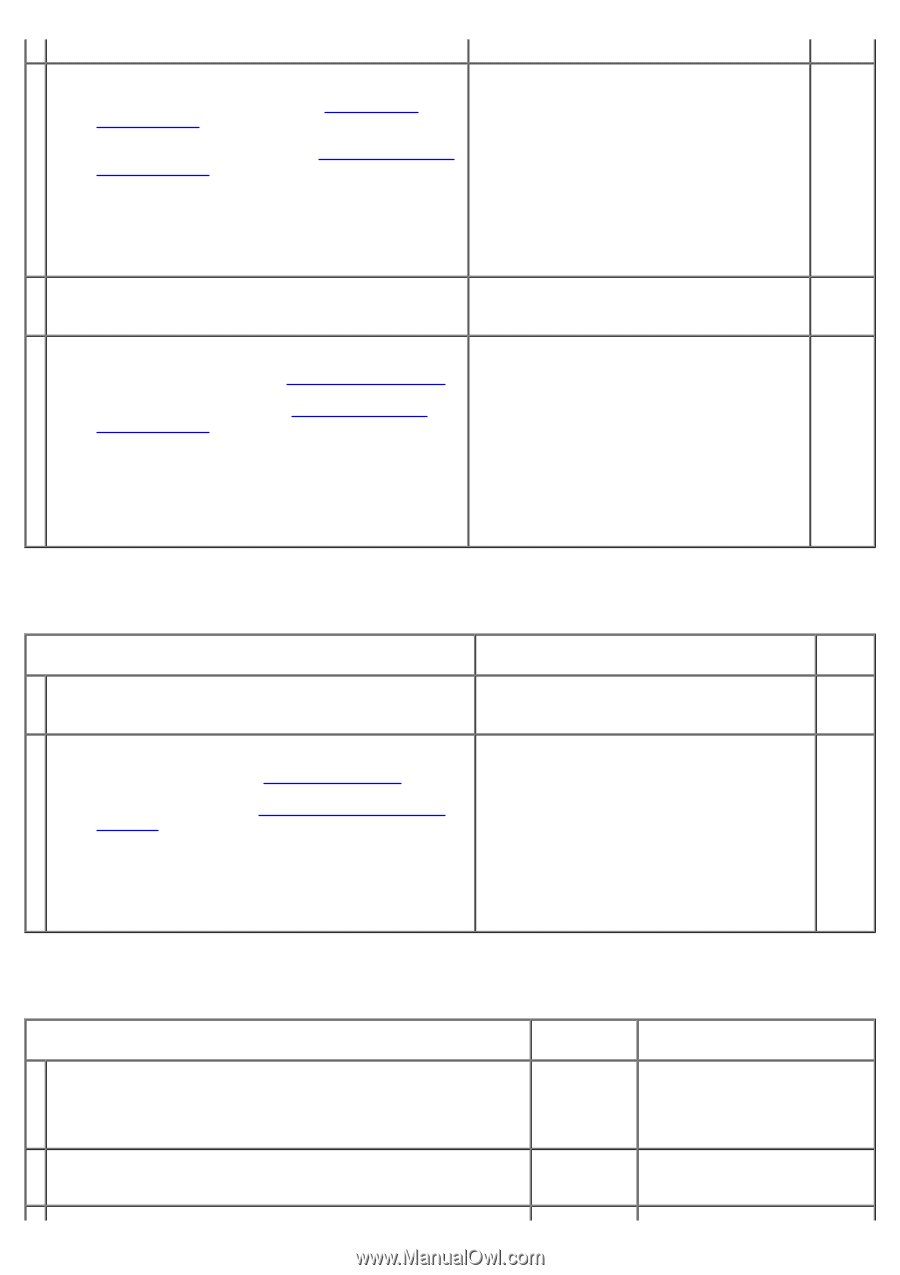
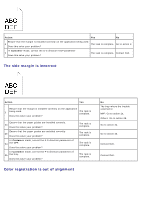
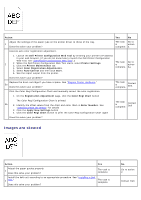
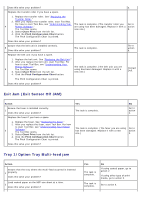
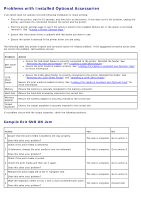
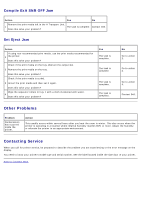
Does this solve your problem? 4. Replace the transfer roller if you have a spare. 1. Replace the transfer roller. See "Replacing the Transfer Roller." 2. After you replace the transfer roller, start Tool Box. For how to start Tool Box, see "Understanding Your The task is complete. (The transfer roller you Go to 4 Printer Software." are using has been damaged. Replace it with a action The Tool Box opens. new one.) 5. 3. Select Chart Print from the left list. 4. Click the Pitch Configuration Chart button. The Pitch Configuration Chart is printed. Does this solve your problem? Ensure that the belt unit is installed correctly. 5 Does this solve your problem? The task is complete. Go to action 6. Replace the belt unit if you have a spare. 1. Replace the belt unit. See "Replacing the Belt Unit." 2. After you replace the belt unit, start Tool Box. For how to start Tool Box, see "Understanding Your Printer Software." The task is complete. (The belt unit you are 6 The Tool Box opens. using has been damaged. Replace it with a 3. Select Chart Print from the left list. new one.) 4. Click the Pitch Configuration Chart button. Contact Dell. The Pitch Configuration Chart is printed. Does this solve your problem? Exit Jam (Exit Sensor Off JAM) Action Ensure the fuser is installed correctly. 1 Does this solve your problem? Replace the fuser if you have a spare. 1. Replace the fuser. See "Replacing the Fuser." 2. After you replace the fuser, start Tool Box. For how to start Tool Box, see "Understanding Your Printer 2 Software." The Tool Box opens. 3. Select Chart Print from the left list. 4. Click the Pitch Configuration Chart button. The Pitch Configuration Chart is printed. Does this solve your problem? Yes The task is complete. No Go to action 2. The task is complete. (The fuser you are using Go to has been damaged. Replace it with a new action one.) 3. Tray 1/Option Tray Multi-feed jam Action Ensure that the tray where the multi-feed occurred is inserted 1 properly. Does this solve your problem? Load coated paper on the MPF one sheet at a time. 2 Does this solve your problem? Yes The task is complete. The task is complete. No If using coated paper, go to action 2. If using other type of print media, go to action 3. Go to action 4.
-
 1
1 -
2
-
3
-
4
-
5
-
6
-
7
-
8
-
9
-
10
-
11
-
12
-
13
-
14
-
15
-
16
-
17
-
18
-
19
-
20
-
21
-
22
-
23
-
24
-
25
-
26
-
27
-
28
-
29
-
30
-
31
-
32
-
33
-
34
-
35
-
36
-
37
-
38
-
39
-
40
-
41
-
42
-
43
-
44
-
45
-
46
-
47
-
48
-
49
-
50
-
51
-
52
-
53
-
54
-
55
-
56
-
57
-
58
-
59
-
60
-
61
-
62
-
63
-
64
-
65
-
66
-
67
-
68
-
69
-
70
-
71
-
72
-
73
-
74
-
75
-
76
-
77
-
78
-
79
-
80
-
81
-
82
-
83
-
84
-
85
-
86
-
87
-
88
-
89
-
90
-
91
-
92
-
93
-
94
-
95
-
96
-
97
-
98
-
99
-
100
-
101
-
102
-
103
-
104
-
105
-
106
-
107
-
108
-
109
-
110
-
111
-
112
-
113
-
114
-
115
-
116
-
117
-
118
-
119
-
120
-
121
-
122
-
123
-
124
-
125
-
126
-
127
-
128
-
129
-
130
-
131
-
132
-
133
-
134
-
135
-
136
-
137
-
138
-
139
-
140
-
141
-
142
-
143
-
144
-
145
-
146
-
147
-
148
-
149
-
150
-
151
-
152
-
153
-
154
-
155
-
156
-
157
-
158
-
159
-
160
-
161
-
162
-
163
-
164
-
165
-
166
-
167
-
168
-
169
-
170
-
171
-
172
-
173
-
174
-
175
-
176
-
177
-
178
-
179
-
180
-
181
-
182
-
183
-
184
-
185
-
186
-
187
-
188
-
189
-
190
-
191
-
192
-
193
-
194
-
195
-
196
-
197
-
198
-
199
-
200
-
201
-
202
-
203
-
204
-
205
-
206
-
207
-
208
-
209
-
210
-
211
-
212
-
213
-
214
-
215
-
216
-
217
-
218
-
219
-
220
-
221
-
222
-
223
-
224
-
225
-
226
-
227
-
228
-
229
-
230
-
231
-
232
-
233
-
234
-
235
-
236
-
237
-
238
-
239
-
240
-
241
-
242
-
243
-
244
-
245
-
246
-
247
-
248
-
249
-
250
-
251
-
252
-
253
-
254
-
255
-
256
-
257
-
258
-
259
-
260
-
261
-
262
-
263
-
264
-
265
-
266
-
267
-
268
-
269
-
270
-
271
-
272
-
273
-
274
-
275
-
276
-
277
-
278
-
279
-
280
-
281
-
282
-
283
-
284
-
285
-
286
-
287
-
288
-
289
-
290
-
291
-
292
-
293
-
294
-
295
-
296
-
297
-
298
-
299
-
300
-
301
-
302
-
303
-
304
-
305
-
306
-
307
-
308
-
309
-
310
-
311
-
312
-
313
-
314
-
315
-
316
-
317
-
318
-
319
-
320
-
321
-
322
-
323
-
324
-
325
-
326
-
327
-
328
-
329
-
330
-
331
-
332
-
333
-
334
-
335
-
336
-
337
-
338
-
339
-
340
-
341
-
342
-
343
-
344
-
345
-
346
-
347
-
348
-
349
-
350
-
351
-
352
-
353
-
354
-
355
-
356
-
357
-
358
-
359
-
360
-
361
-
362
-
363
-
364
-
365
-
366
-
367
-
368
-
369
-
370
-
371
-
372
-
373
-
374
-
375
-
376
-
377
-
378
-
379
-
380
-
381
-
382
-
383
-
384
-
385
-
386
-
387
-
388
-
389
-
390
-
391
-
392
-
393
-
394
-
395
-
396
-
397
-
398
-
399
-
 400
400 -
 401
401 -
 402
402 -
 403
403 -
 404
404 -
 405
405 -
 406
406 -
 407
407 -
 408
408 -
 409
409 -
 410
410 -
411
-
412
 |
 |