Dell Powerconnect W-ClearPass Virtual Appliances W-ClearPass Guest 6.0 Deploym - Page 122
Configuring Mutual Authentication Settings, Configuring Trust Settings Automatically
 |
View all Dell Powerconnect W-ClearPass Virtual Appliances manuals
Add to My Manuals
Save this manual to your list of manuals |
Page 122 highlights
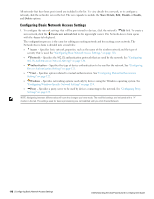
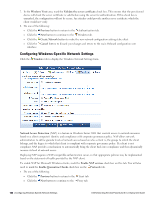
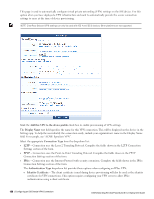
l Machine Only - Use computer-only credentials. l User Only - Use user-only credentials l Machine Or User - Use computer-only credentials or user-only credentials. When a user is logged on, the user's credentials are used for authentication. When no user is logged on, computer-only credentials are used for authentication. l Guest - Use guest-only credentials. 3. Do one of the following: l Click the Previous button to return to the Protocols tab. l Click the Next button to continue to the Trust tab. l Click the Create Network button to make the new network configuration settings take effect l Click the Cancel button to discard your changes and return to the main Onboard configuration user interface. Configuring Mutual Authentication Settings Click the Trust tab to display the Enterprise Trust form. Use this form to create the network settings that will be sent to a provisioned device. Configuring Trust Settings Automatically 1. When you open this tab, the default selection in the Configure Trust field is Automatically configure trust settings (recommended). With this option selected, Onboard automatically determines the appropriate certificate trust configuration for your deployment. 2. If the deployment is not using the built-in CA, you may use the Trusted Server Names text field to enter the certificate names to accept from the authentication server. Only certificates included in this list will be trusted. Enter each server name on a separate line. You can use wildcards. 3. Do one of the following: l Click the Previous button to return to the Authentication tab l Click the Next button to continue to the Windows tab l Click the Create Network button to make the new network configuration settings take effect l Click the Cancel button to discard your changes and return to the main Onboard configuration user interface 122 | Configuring Mutual Authentication Settings Dell Networking W-ClearPass Guest 6.0 | Deployment Guide
-
 1
1 -
2
-
3
-
4
-
5
-
6
-
7
-
8
-
9
-
10
-
11
-
12
-
13
-
14
-
15
-
16
-
17
-
18
-
19
-
20
-
21
-
22
-
23
-
24
-
25
-
26
-
27
-
28
-
29
-
30
-
31
-
32
-
33
-
34
-
35
-
36
-
37
-
38
-
39
-
40
-
41
-
42
-
43
-
44
-
45
-
46
-
47
-
48
-
49
-
50
-
51
-
52
-
53
-
54
-
55
-
56
-
57
-
58
-
59
-
60
-
61
-
62
-
63
-
64
-
65
-
66
-
67
-
68
-
69
-
70
-
71
-
72
-
73
-
74
-
75
-
76
-
77
-
78
-
79
-
80
-
81
-
82
-
83
-
84
-
85
-
86
-
87
-
88
-
89
-
90
-
91
-
92
-
93
-
94
-
95
-
96
-
97
-
98
-
99
-
100
-
101
-
102
-
103
-
104
-
105
-
106
-
107
-
108
-
109
-
110
-
111
-
112
-
113
-
114
-
115
-
116
-
 117
117 -
 118
118 -
 119
119 -
 120
120 -
 121
121 -
 122
122 -
 123
123 -
 124
124 -
 125
125 -
 126
126 -
 127
127 -
128
-
129
-
130
-
131
-
132
-
133
-
134
-
135
-
136
-
137
-
138
-
139
-
140
-
141
-
142
-
143
-
144
-
145
-
146
-
147
-
148
-
149
-
150
-
151
-
152
-
153
-
154
-
155
-
156
-
157
-
158
-
159
-
160
-
161
-
162
-
163
-
164
-
165
-
166
-
167
-
168
-
169
-
170
-
171
-
172
-
173
-
174
-
175
-
176
-
177
-
178
-
179
-
180
-
181
-
182
-
183
-
184
-
185
-
186
-
187
-
188
-
189
-
190
-
191
-
192
-
193
-
194
-
195
-
196
-
197
-
198
-
199
-
200
-
201
-
202
-
203
-
204
-
205
-
206
-
207
-
208
-
209
-
210
-
211
-
212
-
213
-
214
-
215
-
216
-
217
-
218
-
219
-
220
-
221
-
222
-
223
-
224
-
225
-
226
-
227
-
228
-
229
-
230
-
231
-
232
-
233
-
234
-
235
-
236
-
237
-
238
-
239
-
240
-
241
-
242
-
243
-
244
-
245
-
246
-
247
-
248
-
249
-
250
-
251
-
252
-
253
-
254
-
255
-
256
-
257
-
258
-
259
-
260
-
261
-
262
-
263
-
264
-
265
-
266
-
267
-
268
-
269
-
270
-
271
-
272
-
273
-
274
-
275
-
276
-
277
-
278
-
279
-
280
-
281
-
282
-
283
-
284
-
285
-
286
-
287
-
288
-
289
-
290
-
291
-
292
-
293
-
294
-
295
-
296
-
297
-
298
-
299
-
300
-
301
-
302
-
303
-
304
-
305
-
306
-
307
-
308
-
309
-
310
-
311
-
312
-
313
-
314
-
315
-
316
-
317
-
318
-
319
-
320
 |
 |