Dell Powerconnect W-ClearPass Virtual Appliances W-ClearPass Guest 6.0 Deploym - Page 135
Uploading Content, logo.jpg, Configuration > Content Manager, Browse, Description, Overwrite
 |
View all Dell Powerconnect W-ClearPass Virtual Appliances manuals
Add to My Manuals
Save this manual to your list of manuals |
Page 135 highlights
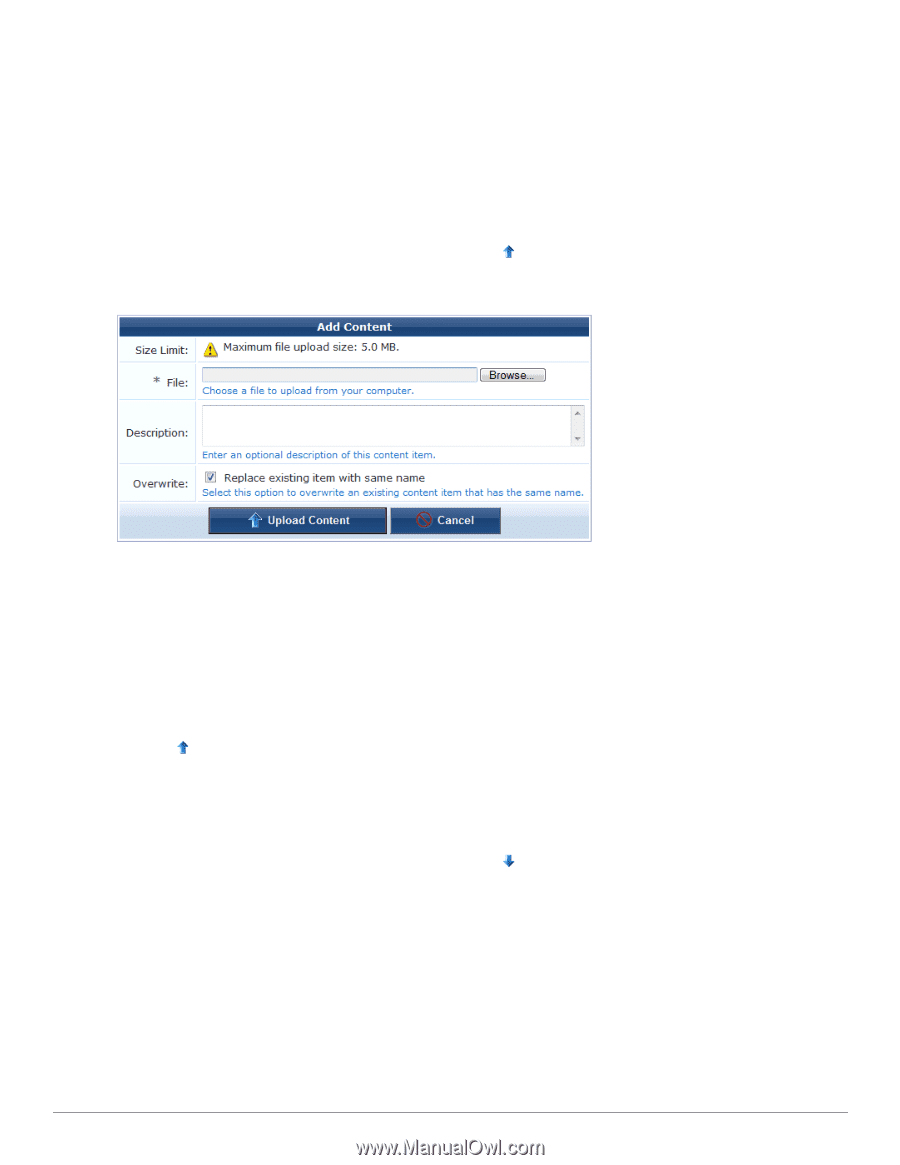
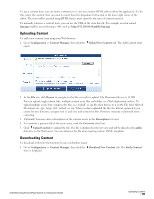
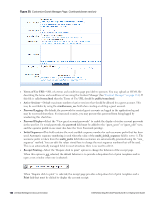
To use a content item, you can insert a reference to it into any custom HTML editor within the application. To do this, select the content item you want to insert from the drop-down list located in the lower right corner of the editor. The item will be inserted using HTML that is most suited to the type of content inserted. To manually reference a content item, you can use the URL of the item directly. For example, an item named logo.jpg could be accessed using a URL such as: http://192.168.88.88/public/logo.jpg. Uploading Content To add a new content item using your Web browser: 1. Go to Configuration > Content Manager, then click the opens. Upload New Content tab. The Add Content form 2. In the File row, click Browse to navigate to the file you wish to upload. The Maximum file size is 15 MB. You can upload single content files, multiple content asset files and folders, or a Web deployment archive. To upload multiple assets, first compress the files as a "tarball" or zip file, then browse to it in the File field. Allowed file formats are .tgz, .tar.gz, .tb2, .tar.bz2, or .zip. When you have uploaded the file, the Extract option lets you create the new directory, navigate into it, and view and extract the files. Directory structure is preserved when extracting. 3. (Optional) You may enter a description of the content assets in the Description text area. 4. To overwrite a previous file of the same name, mark the Overwrite check box. 5. Click Upload Content to upload the file. The file is displayed in the list view and will be placed in the public directory on the Web server. You can reference the file when creating custom HTML templates. Downloading Content To download a file from the Internet for use in ClearPass Guest: 1. Go to Configuration > Content Manager, then click the Download New Content tab. The Fetch Content form is displayed. Dell Networking W-ClearPass Guest 6.0 | Deployment Guide Uploading Content | 135
-
 1
1 -
2
-
3
-
4
-
5
-
6
-
7
-
8
-
9
-
10
-
11
-
12
-
13
-
14
-
15
-
16
-
17
-
18
-
19
-
20
-
21
-
22
-
23
-
24
-
25
-
26
-
27
-
28
-
29
-
30
-
31
-
32
-
33
-
34
-
35
-
36
-
37
-
38
-
39
-
40
-
41
-
42
-
43
-
44
-
45
-
46
-
47
-
48
-
49
-
50
-
51
-
52
-
53
-
54
-
55
-
56
-
57
-
58
-
59
-
60
-
61
-
62
-
63
-
64
-
65
-
66
-
67
-
68
-
69
-
70
-
71
-
72
-
73
-
74
-
75
-
76
-
77
-
78
-
79
-
80
-
81
-
82
-
83
-
84
-
85
-
86
-
87
-
88
-
89
-
90
-
91
-
92
-
93
-
94
-
95
-
96
-
97
-
98
-
99
-
100
-
101
-
102
-
103
-
104
-
105
-
106
-
107
-
108
-
109
-
110
-
111
-
112
-
113
-
114
-
115
-
116
-
117
-
118
-
119
-
120
-
121
-
122
-
123
-
124
-
125
-
126
-
127
-
128
-
129
-
 130
130 -
 131
131 -
 132
132 -
 133
133 -
 134
134 -
 135
135 -
 136
136 -
 137
137 -
 138
138 -
 139
139 -
 140
140 -
141
-
142
-
143
-
144
-
145
-
146
-
147
-
148
-
149
-
150
-
151
-
152
-
153
-
154
-
155
-
156
-
157
-
158
-
159
-
160
-
161
-
162
-
163
-
164
-
165
-
166
-
167
-
168
-
169
-
170
-
171
-
172
-
173
-
174
-
175
-
176
-
177
-
178
-
179
-
180
-
181
-
182
-
183
-
184
-
185
-
186
-
187
-
188
-
189
-
190
-
191
-
192
-
193
-
194
-
195
-
196
-
197
-
198
-
199
-
200
-
201
-
202
-
203
-
204
-
205
-
206
-
207
-
208
-
209
-
210
-
211
-
212
-
213
-
214
-
215
-
216
-
217
-
218
-
219
-
220
-
221
-
222
-
223
-
224
-
225
-
226
-
227
-
228
-
229
-
230
-
231
-
232
-
233
-
234
-
235
-
236
-
237
-
238
-
239
-
240
-
241
-
242
-
243
-
244
-
245
-
246
-
247
-
248
-
249
-
250
-
251
-
252
-
253
-
254
-
255
-
256
-
257
-
258
-
259
-
260
-
261
-
262
-
263
-
264
-
265
-
266
-
267
-
268
-
269
-
270
-
271
-
272
-
273
-
274
-
275
-
276
-
277
-
278
-
279
-
280
-
281
-
282
-
283
-
284
-
285
-
286
-
287
-
288
-
289
-
290
-
291
-
292
-
293
-
294
-
295
-
296
-
297
-
298
-
299
-
300
-
301
-
302
-
303
-
304
-
305
-
306
-
307
-
308
-
309
-
310
-
311
-
312
-
313
-
314
-
315
-
316
-
317
-
318
-
319
-
320
 |
 |