Dell Powerconnect W-ClearPass Virtual Appliances W-ClearPass Guest 6.0 Deploym - Page 196
Print Template Wizard, Modifying Wizard-Generated Templates, Insert After
 |
View all Dell Powerconnect W-ClearPass Virtual Appliances manuals
Add to My Manuals
Save this manual to your list of manuals |
Page 196 highlights
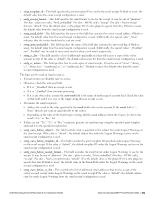
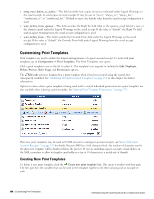
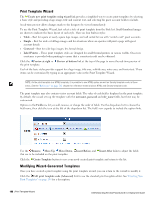
Print Template Wizard The Create new print template using wizard link provides a simplified way to create print templates by selecting a basic style and providing a logo image, title and content text, and selecting the guest account fields to include. A real-time preview allows changes made to the design to be viewed immediately. To use the Print Template Wizard, first select a style of print template from the Style list. Small thumbnail images are shown to indicate the basic layout of each style. There are four built-in styles: l Table - Best for square or nearly square logo images, and well suited for use with "scratch card" guest accounts. l Simple - Best for wide or tall logo images and for situations where an operator will print a page with guest account details. l Centered - Best for wide logo images; less formal design. l Label Printer - These print template styles are designed for small thermal printers in various widths. On-screen assistance is provided when printing to ensure that a consistent result can be obtained. Click the Preview at right or Preview at bottom link at the top of the page to move the real-time preview of the print template. Each of the basic styles provides support for a logo image, title area, subtitle area, notes area, and footer text. These items can be customized by typing in an appropriate value in the Print Template Wizard. NOTE: As the print template is a HTML template, it is possible to use HTML syntax as well as Smarty template code in these areas. See the "Reference" on page 261 chapter for reference material about HTML and Smarty template code. The print template may also contain visitor account fields. The value of each field is displayed in the print template. By default, the wizard sets up the template with the username, password and role_name fields, but these may be customized. Options in the Fields row let you add, remove, or change the order of fields. Use the drop-down list to choose the field name, then click the icon at the left of the drop-down list. The field's row expands to include the option links. Use the Remove, Move Up, Move Down, Insert Before, and Insert After links to adjust the fields that are to be included on the print template. Click the Create Template button to save your newly created print template and return to the list. Modifying Wizard-Generated Templates Once you have created a print template using the print template wizard, you can return to the wizard to modify it. Click the Edit print template code (Advanced) link to use the standard print template editor. See "Creating New Print Templates" on page 194 for a description. 196 | Print Template Wizard Dell Networking W-ClearPass Guest 6.0 | Deployment Guide
-
 1
1 -
2
-
3
-
4
-
5
-
6
-
7
-
8
-
9
-
10
-
11
-
12
-
13
-
14
-
15
-
16
-
17
-
18
-
19
-
20
-
21
-
22
-
23
-
24
-
25
-
26
-
27
-
28
-
29
-
30
-
31
-
32
-
33
-
34
-
35
-
36
-
37
-
38
-
39
-
40
-
41
-
42
-
43
-
44
-
45
-
46
-
47
-
48
-
49
-
50
-
51
-
52
-
53
-
54
-
55
-
56
-
57
-
58
-
59
-
60
-
61
-
62
-
63
-
64
-
65
-
66
-
67
-
68
-
69
-
70
-
71
-
72
-
73
-
74
-
75
-
76
-
77
-
78
-
79
-
80
-
81
-
82
-
83
-
84
-
85
-
86
-
87
-
88
-
89
-
90
-
91
-
92
-
93
-
94
-
95
-
96
-
97
-
98
-
99
-
100
-
101
-
102
-
103
-
104
-
105
-
106
-
107
-
108
-
109
-
110
-
111
-
112
-
113
-
114
-
115
-
116
-
117
-
118
-
119
-
120
-
121
-
122
-
123
-
124
-
125
-
126
-
127
-
128
-
129
-
130
-
131
-
132
-
133
-
134
-
135
-
136
-
137
-
138
-
139
-
140
-
141
-
142
-
143
-
144
-
145
-
146
-
147
-
148
-
149
-
150
-
151
-
152
-
153
-
154
-
155
-
156
-
157
-
158
-
159
-
160
-
161
-
162
-
163
-
164
-
165
-
166
-
167
-
168
-
169
-
170
-
171
-
172
-
173
-
174
-
175
-
176
-
177
-
178
-
179
-
180
-
181
-
182
-
183
-
184
-
185
-
186
-
187
-
188
-
189
-
190
-
 191
191 -
 192
192 -
 193
193 -
 194
194 -
 195
195 -
 196
196 -
 197
197 -
 198
198 -
 199
199 -
 200
200 -
 201
201 -
202
-
203
-
204
-
205
-
206
-
207
-
208
-
209
-
210
-
211
-
212
-
213
-
214
-
215
-
216
-
217
-
218
-
219
-
220
-
221
-
222
-
223
-
224
-
225
-
226
-
227
-
228
-
229
-
230
-
231
-
232
-
233
-
234
-
235
-
236
-
237
-
238
-
239
-
240
-
241
-
242
-
243
-
244
-
245
-
246
-
247
-
248
-
249
-
250
-
251
-
252
-
253
-
254
-
255
-
256
-
257
-
258
-
259
-
260
-
261
-
262
-
263
-
264
-
265
-
266
-
267
-
268
-
269
-
270
-
271
-
272
-
273
-
274
-
275
-
276
-
277
-
278
-
279
-
280
-
281
-
282
-
283
-
284
-
285
-
286
-
287
-
288
-
289
-
290
-
291
-
292
-
293
-
294
-
295
-
296
-
297
-
298
-
299
-
300
-
301
-
302
-
303
-
304
-
305
-
306
-
307
-
308
-
309
-
310
-
311
-
312
-
313
-
314
-
315
-
316
-
317
-
318
-
319
-
320
 |
 |