Dell Powerconnect W-ClearPass Virtual Appliances W-ClearPass Guest 6.0 Deploym - Page 148
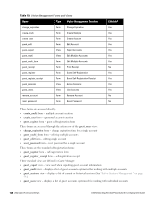
Default Form Display Properties, Configuration > Fields
 |
View all Dell Powerconnect W-ClearPass Virtual Appliances manuals
Add to My Manuals
Save this manual to your list of manuals |
Page 148 highlights
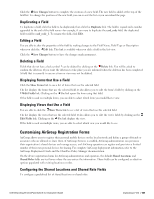
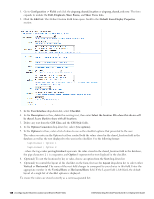
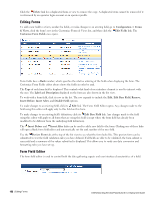
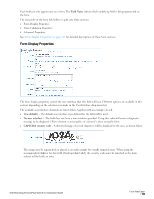
1. Go to Configuration > Fields and click the airgroup_shared_location or airgroup_shared_role row. The form expands to include the Edit, Duplicate, Show Forms, and Show Views links. 2. Click the Edit link. The Define Custom Field form opens. Scroll to the Default Form Display Properties section. 3. In the User Interface drop-down list, select Checklist. 4. In the Description text box, delete the existing text, then enter Select the location IDs where this device will be shared. Leave blank to share with all locations. 5. Delete any text from the CSS Class and the CSS Style fields. 6. In the Options Generator drop-down list, select (Use options). 7. In the Options text box, enter a list of values to use as the checklist options that presented to the user. The values you enter in the Options text box control both the values stored in the shared_location field in the database as well as the text displayed to the user in the checklist. Use the following format: tag1=value1 | Option 1 tag2=value2 | Option 2 ...where the tag=value pair tag1=value1 represents the value stored in the shared_location field in the database, the pipe character ( | ) is a separator, and Option 1 represents the text displayed in the checklist. 8. (Optional) To sort the locations by key or value, choose an option from the Sort drop-down list. 9. (Optional) To control the layout of the checklist on the form, first use the Layout drop-down list to select either Vertical or Horizontal. The name of the next field changes to correspond to your choice in this field. Enter the appropriate number in the Vertical Rows or Horizontal Rows field. If the Layout field is left blank, the default layout of a single list of checklist options is displayed. To ensure the values are stored correctly as a comma-separated list: 148 | Configuring the Shared Locations and Shared Role Fields Dell Networking W-ClearPass Guest 6.0 | Deployment Guide
-
 1
1 -
2
-
3
-
4
-
5
-
6
-
7
-
8
-
9
-
10
-
11
-
12
-
13
-
14
-
15
-
16
-
17
-
18
-
19
-
20
-
21
-
22
-
23
-
24
-
25
-
26
-
27
-
28
-
29
-
30
-
31
-
32
-
33
-
34
-
35
-
36
-
37
-
38
-
39
-
40
-
41
-
42
-
43
-
44
-
45
-
46
-
47
-
48
-
49
-
50
-
51
-
52
-
53
-
54
-
55
-
56
-
57
-
58
-
59
-
60
-
61
-
62
-
63
-
64
-
65
-
66
-
67
-
68
-
69
-
70
-
71
-
72
-
73
-
74
-
75
-
76
-
77
-
78
-
79
-
80
-
81
-
82
-
83
-
84
-
85
-
86
-
87
-
88
-
89
-
90
-
91
-
92
-
93
-
94
-
95
-
96
-
97
-
98
-
99
-
100
-
101
-
102
-
103
-
104
-
105
-
106
-
107
-
108
-
109
-
110
-
111
-
112
-
113
-
114
-
115
-
116
-
117
-
118
-
119
-
120
-
121
-
122
-
123
-
124
-
125
-
126
-
127
-
128
-
129
-
130
-
131
-
132
-
133
-
134
-
135
-
136
-
137
-
138
-
139
-
140
-
141
-
142
-
 143
143 -
 144
144 -
 145
145 -
 146
146 -
 147
147 -
 148
148 -
 149
149 -
 150
150 -
 151
151 -
 152
152 -
 153
153 -
154
-
155
-
156
-
157
-
158
-
159
-
160
-
161
-
162
-
163
-
164
-
165
-
166
-
167
-
168
-
169
-
170
-
171
-
172
-
173
-
174
-
175
-
176
-
177
-
178
-
179
-
180
-
181
-
182
-
183
-
184
-
185
-
186
-
187
-
188
-
189
-
190
-
191
-
192
-
193
-
194
-
195
-
196
-
197
-
198
-
199
-
200
-
201
-
202
-
203
-
204
-
205
-
206
-
207
-
208
-
209
-
210
-
211
-
212
-
213
-
214
-
215
-
216
-
217
-
218
-
219
-
220
-
221
-
222
-
223
-
224
-
225
-
226
-
227
-
228
-
229
-
230
-
231
-
232
-
233
-
234
-
235
-
236
-
237
-
238
-
239
-
240
-
241
-
242
-
243
-
244
-
245
-
246
-
247
-
248
-
249
-
250
-
251
-
252
-
253
-
254
-
255
-
256
-
257
-
258
-
259
-
260
-
261
-
262
-
263
-
264
-
265
-
266
-
267
-
268
-
269
-
270
-
271
-
272
-
273
-
274
-
275
-
276
-
277
-
278
-
279
-
280
-
281
-
282
-
283
-
284
-
285
-
286
-
287
-
288
-
289
-
290
-
291
-
292
-
293
-
294
-
295
-
296
-
297
-
298
-
299
-
300
-
301
-
302
-
303
-
304
-
305
-
306
-
307
-
308
-
309
-
310
-
311
-
312
-
313
-
314
-
315
-
316
-
317
-
318
-
319
-
320
 |
 |
