Dell Powerconnect W-ClearPass Virtual Appliances W-ClearPass Guest 6.0 Deploym - Page 88
Installing a Certificate Authority’s Certificate,
 |
View all Dell Powerconnect W-ClearPass Virtual Appliances manuals
Add to My Manuals
Save this manual to your list of manuals |
Page 88 highlights
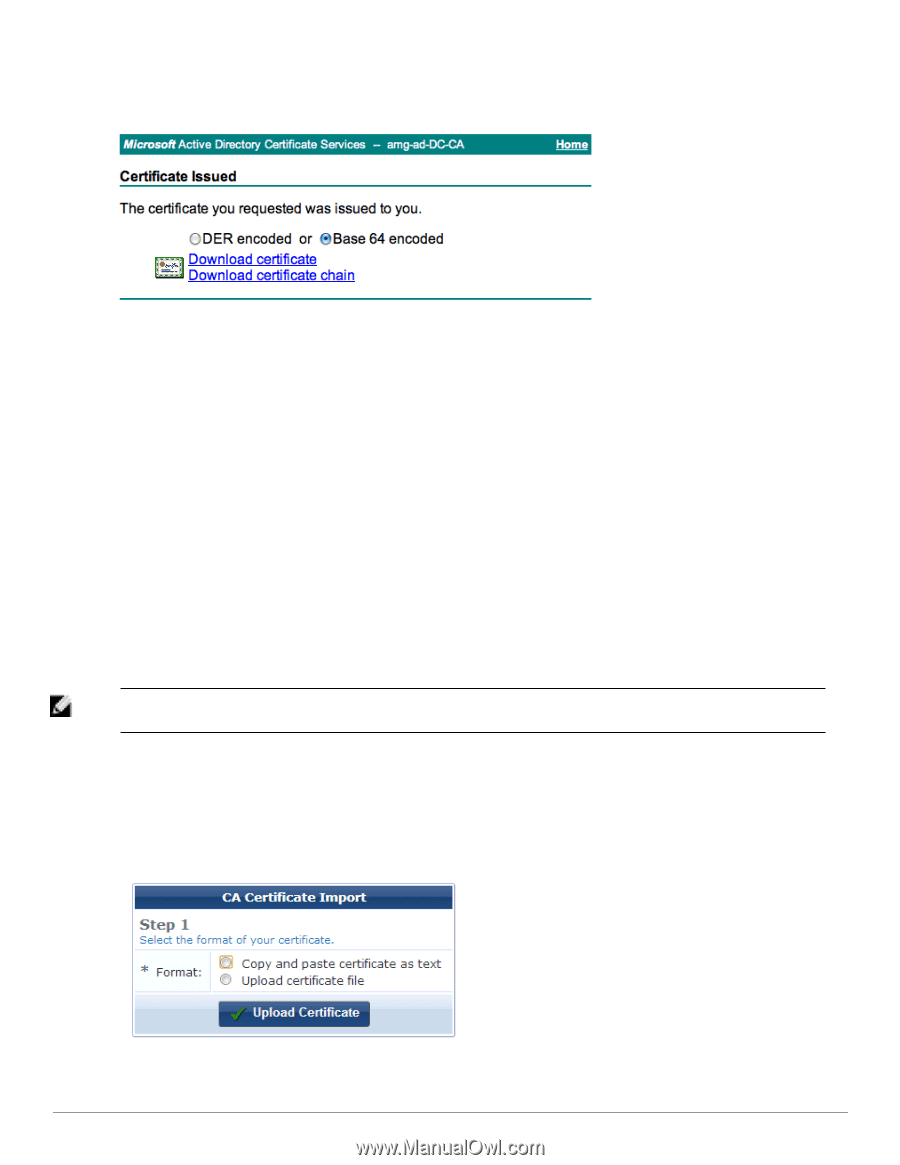
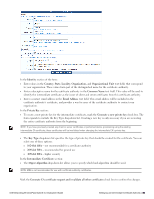
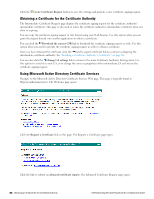
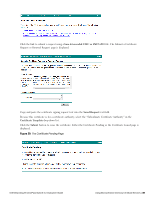
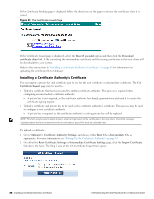
If the Certificate Pending page is displayed, follow the directions on the page to retrieve the certificate when it is issued. Figure 21: The Certificate Issued Page If the Certificate Issued page is displayed, select the Base 64 encoded option and then click the Download certificate chain link. A file containing the intermediate certificate and the issuing certificates in the trust chain will be downloaded to your system. Refer to the instructions in "Installing a Certificate Authority's Certificate " on page 88 for information on uploading the certificate file to Onboard. Installing a Certificate Authority's Certificate You can import a private key and certificate pair to use for the root certificate or intermediate certificate. The CA Certificate Import page may be used to: l Upload a certificate that has been issued by another certificate authority. This process is required when configuring an intermediate certificate authority. n A private key is not required, as the certificate authority has already generated one and used it to create the certificate signing request. l Upload a certificate and private key to be used as the certificate authority's certificate. This process may be used to configure a root certificate authority. n A private key is required, as the certificate authority's existing private key will be replaced. NOTE: This form may be used multiple times in order to import each of the certificates in the trust chain. Check the message displayed above the form to determine which certificate or type of file must be uploaded next. To upload a certificate: 1. Go to Onboard > Certificate Authority Settings, and choose either Root CA or Intermediate CA, as appropriate. For more information, see "Setting Up the Certificate Authority" on page 81. 2. On either the Root Certificate Settings or Intermediate Certificate Settings page, click the Import Certificate link above the form. The Step 1 area of the CA Certificate Import form opens. 88 | Installing a Certificate Authority's Certificate Dell Networking W-ClearPass Guest 6.0 | Deployment Guide
-
 1
1 -
2
-
3
-
4
-
5
-
6
-
7
-
8
-
9
-
10
-
11
-
12
-
13
-
14
-
15
-
16
-
17
-
18
-
19
-
20
-
21
-
22
-
23
-
24
-
25
-
26
-
27
-
28
-
29
-
30
-
31
-
32
-
33
-
34
-
35
-
36
-
37
-
38
-
39
-
40
-
41
-
42
-
43
-
44
-
45
-
46
-
47
-
48
-
49
-
50
-
51
-
52
-
53
-
54
-
55
-
56
-
57
-
58
-
59
-
60
-
61
-
62
-
63
-
64
-
65
-
66
-
67
-
68
-
69
-
70
-
71
-
72
-
73
-
74
-
75
-
76
-
77
-
78
-
79
-
80
-
81
-
82
-
 83
83 -
 84
84 -
 85
85 -
 86
86 -
 87
87 -
 88
88 -
 89
89 -
 90
90 -
 91
91 -
 92
92 -
 93
93 -
94
-
95
-
96
-
97
-
98
-
99
-
100
-
101
-
102
-
103
-
104
-
105
-
106
-
107
-
108
-
109
-
110
-
111
-
112
-
113
-
114
-
115
-
116
-
117
-
118
-
119
-
120
-
121
-
122
-
123
-
124
-
125
-
126
-
127
-
128
-
129
-
130
-
131
-
132
-
133
-
134
-
135
-
136
-
137
-
138
-
139
-
140
-
141
-
142
-
143
-
144
-
145
-
146
-
147
-
148
-
149
-
150
-
151
-
152
-
153
-
154
-
155
-
156
-
157
-
158
-
159
-
160
-
161
-
162
-
163
-
164
-
165
-
166
-
167
-
168
-
169
-
170
-
171
-
172
-
173
-
174
-
175
-
176
-
177
-
178
-
179
-
180
-
181
-
182
-
183
-
184
-
185
-
186
-
187
-
188
-
189
-
190
-
191
-
192
-
193
-
194
-
195
-
196
-
197
-
198
-
199
-
200
-
201
-
202
-
203
-
204
-
205
-
206
-
207
-
208
-
209
-
210
-
211
-
212
-
213
-
214
-
215
-
216
-
217
-
218
-
219
-
220
-
221
-
222
-
223
-
224
-
225
-
226
-
227
-
228
-
229
-
230
-
231
-
232
-
233
-
234
-
235
-
236
-
237
-
238
-
239
-
240
-
241
-
242
-
243
-
244
-
245
-
246
-
247
-
248
-
249
-
250
-
251
-
252
-
253
-
254
-
255
-
256
-
257
-
258
-
259
-
260
-
261
-
262
-
263
-
264
-
265
-
266
-
267
-
268
-
269
-
270
-
271
-
272
-
273
-
274
-
275
-
276
-
277
-
278
-
279
-
280
-
281
-
282
-
283
-
284
-
285
-
286
-
287
-
288
-
289
-
290
-
291
-
292
-
293
-
294
-
295
-
296
-
297
-
298
-
299
-
300
-
301
-
302
-
303
-
304
-
305
-
306
-
307
-
308
-
309
-
310
-
311
-
312
-
313
-
314
-
315
-
316
-
317
-
318
-
319
-
320
 |
 |