Dell Powerconnect W-ClearPass Virtual Appliances W-ClearPass Guest 6.0 Deploym - Page 255
Administration > Operator Logins > Translation Rules, Operator Profile
 |
View all Dell Powerconnect W-ClearPass Virtual Appliances manuals
Add to My Manuals
Save this manual to your list of manuals |
Page 255 highlights
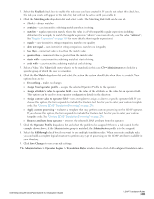
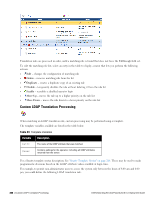
3. Select the Enabled check box to enable this rule once you have created it. If you do not select this check box, the rule you create will appear in the rules list, but will not be active until you enable it. 4. Click the Matching rule drop-down list and select a rule. The Matching Rule field can be one of: n (blank) - always matches n contains - case-insensitive substring match anywhere in string n matches - regular expression match, where the value is a Perl-compatible regular expression including delimiters (for example, to match the regular expression "admin" case-insensitively, use the value "/admin/i"; See "Regular Expressions" on page 305 for more details about regular expressions) n equals - case-insensitive string comparison, matches on equality n does not equal - case-insensitive string comparison, matches on inequality n less than - numerical value is less than the match value n greater than - numerical value is greater than the match value n starts with - case-insensitive substring match at start of string n ends with - case-insensitive substring match at end of string 5. Select a Value. The Value field states what is to be matched, in this case CN=Administrators to look for a specific group of which the user is a member. 6. Click the On Match drop-down list and select the action the system should take when there is a match. Your options here are to: n Do nothing - makes no changes. n Assign fixed operator profile - assigns the selected Operator Profile to the operator n Assign attribute's value to operator field - uses the value of the attribute as the value for an operator field. This option can be used to store operator configuration details in the directory. n Assign custom value to operator field - uses a template to assign a value to a specific operator field. If you choose this option, the form expands to include the Custom text box for you to enter your custom template code. See "Custom LDAP Translation Processing" on page 256. n Apply custom processing - evaluates a template that may perform custom processing on the LDAP operator. If you choose this option, the form expands to include the Custom text box for you to enter your custom template code. See "Custom LDAP Translation Processing" on page 256. n Remove attribute from operator - removes the selected LDAP attribute from the operator. 7. Click the Operator Profile drop-down list and select the profile to be assigned if there is a rule match. In the example shown above, if the Administrator group is matched, the Administrator profile is to be assigned. 8. Select the Fallthrough check box if you want to use multiple translation rules. When you create multiple rules, you can build a complete logical structure to perform any type of processing on the LDAP attributes available in your directory. 9. Click Save Changes to save your rule settings. The Administration > Operator Logins > Translation Rules window shows a list of all configured translation rules. Dell Networking W-ClearPass Guest 6.0 | Deployment Guide LDAP Translation Rules | 255
-
 1
1 -
2
-
3
-
4
-
5
-
6
-
7
-
8
-
9
-
10
-
11
-
12
-
13
-
14
-
15
-
16
-
17
-
18
-
19
-
20
-
21
-
22
-
23
-
24
-
25
-
26
-
27
-
28
-
29
-
30
-
31
-
32
-
33
-
34
-
35
-
36
-
37
-
38
-
39
-
40
-
41
-
42
-
43
-
44
-
45
-
46
-
47
-
48
-
49
-
50
-
51
-
52
-
53
-
54
-
55
-
56
-
57
-
58
-
59
-
60
-
61
-
62
-
63
-
64
-
65
-
66
-
67
-
68
-
69
-
70
-
71
-
72
-
73
-
74
-
75
-
76
-
77
-
78
-
79
-
80
-
81
-
82
-
83
-
84
-
85
-
86
-
87
-
88
-
89
-
90
-
91
-
92
-
93
-
94
-
95
-
96
-
97
-
98
-
99
-
100
-
101
-
102
-
103
-
104
-
105
-
106
-
107
-
108
-
109
-
110
-
111
-
112
-
113
-
114
-
115
-
116
-
117
-
118
-
119
-
120
-
121
-
122
-
123
-
124
-
125
-
126
-
127
-
128
-
129
-
130
-
131
-
132
-
133
-
134
-
135
-
136
-
137
-
138
-
139
-
140
-
141
-
142
-
143
-
144
-
145
-
146
-
147
-
148
-
149
-
150
-
151
-
152
-
153
-
154
-
155
-
156
-
157
-
158
-
159
-
160
-
161
-
162
-
163
-
164
-
165
-
166
-
167
-
168
-
169
-
170
-
171
-
172
-
173
-
174
-
175
-
176
-
177
-
178
-
179
-
180
-
181
-
182
-
183
-
184
-
185
-
186
-
187
-
188
-
189
-
190
-
191
-
192
-
193
-
194
-
195
-
196
-
197
-
198
-
199
-
200
-
201
-
202
-
203
-
204
-
205
-
206
-
207
-
208
-
209
-
210
-
211
-
212
-
213
-
214
-
215
-
216
-
217
-
218
-
219
-
220
-
221
-
222
-
223
-
224
-
225
-
226
-
227
-
228
-
229
-
230
-
231
-
232
-
233
-
234
-
235
-
236
-
237
-
238
-
239
-
240
-
241
-
242
-
243
-
244
-
245
-
246
-
247
-
248
-
249
-
 250
250 -
 251
251 -
 252
252 -
 253
253 -
 254
254 -
 255
255 -
 256
256 -
 257
257 -
 258
258 -
 259
259 -
 260
260 -
261
-
262
-
263
-
264
-
265
-
266
-
267
-
268
-
269
-
270
-
271
-
272
-
273
-
274
-
275
-
276
-
277
-
278
-
279
-
280
-
281
-
282
-
283
-
284
-
285
-
286
-
287
-
288
-
289
-
290
-
291
-
292
-
293
-
294
-
295
-
296
-
297
-
298
-
299
-
300
-
301
-
302
-
303
-
304
-
305
-
306
-
307
-
308
-
309
-
310
-
311
-
312
-
313
-
314
-
315
-
316
-
317
-
318
-
319
-
320
 |
 |