Dell Powerconnect W-ClearPass Virtual Appliances W-ClearPass Guest 6.0 Deploym - Page 147
Duplicating a Field, Displaying Forms that Use a Field, Customizing AirGroup Registration Forms
 |
View all Dell Powerconnect W-ClearPass Virtual Appliances manuals
Add to My Manuals
Save this manual to your list of manuals |
Page 147 highlights
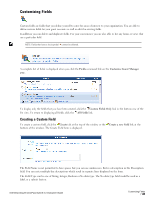
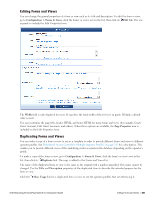
Click the Save Changes button to complete the creation of a new field. The new field is added at the top of the field list. To change the position of the new field, you can re-sort the list or you can reload the page. Duplicating a Field To duplicate a field, click the field to be duplicated, then click the Duplicate link. The field is copied and a number appended to the end of the field name-for example, if you were to duplicate the card_code field, the duplicated field would be card_code_1. To rename the field, click Edit. Editing a Field You are able to alter the properties of the field by making changes to the Field Name, Field Type or Description when you click the Edit link. This link is available when you click a field in the list view. Click the Save Changes button to have the changes made permanent. Deleting a Field Fields that do not have a lock symbol can be deleted by clicking on the Delete link. You will be asked to confirm the deletion. If you want the deletion to take place you are informed when the deletion has been completed. A field that is currently in use on a form or view may not be deleted. Displaying Forms that Use a Field Click the Show Forms link to see a list of forms that use the selected field. The list displays the forms that use the selected field. It also allows you to edit the form's fields by clicking on the Edit Fields link. Clicking on the Use link opens the form using that field. If the field is used on multiple forms, you are able to select which form you would like to view. Displaying Views that Use a Field You are able to click the Show Views link to see a list of views that use the selected field. The list displays the views that use the selected field. It also allows you to edit the view's fields by clicking on the Edit Fields link. Clicking on the Use link displays the view. If the field is used on multiple views, you are able to select which view you would like to see. Customizing AirGroup Registration Forms AirGroup allows users to register their personal mobile devices on the local network and define a group of friends or associates who are allowed to share them. If AirGroup Services is enabled, AirGroup administrators can provision their organization's shared devices and manage access, and AirGroup operators can register and provision a limited number of their own personal devices for sharing. For complete AirGroup deployment information, refer to the AirGroup Deployment Guide and the ClearPass Policy Manager documentation. On the device registration forms for AirGroup administrators and operators, the default Shared Locations and Shared Roles fields are text boxes where the user enters the information. These fields can be configured as selection options populated with existing locations or roles. Configuring the Shared Locations and Shared Role Fields To configure a predefined list of shared locations or shared roles: Dell Networking W-ClearPass Guest 6.0 | Deployment Guide Duplicating a Field | 147
-
 1
1 -
2
-
3
-
4
-
5
-
6
-
7
-
8
-
9
-
10
-
11
-
12
-
13
-
14
-
15
-
16
-
17
-
18
-
19
-
20
-
21
-
22
-
23
-
24
-
25
-
26
-
27
-
28
-
29
-
30
-
31
-
32
-
33
-
34
-
35
-
36
-
37
-
38
-
39
-
40
-
41
-
42
-
43
-
44
-
45
-
46
-
47
-
48
-
49
-
50
-
51
-
52
-
53
-
54
-
55
-
56
-
57
-
58
-
59
-
60
-
61
-
62
-
63
-
64
-
65
-
66
-
67
-
68
-
69
-
70
-
71
-
72
-
73
-
74
-
75
-
76
-
77
-
78
-
79
-
80
-
81
-
82
-
83
-
84
-
85
-
86
-
87
-
88
-
89
-
90
-
91
-
92
-
93
-
94
-
95
-
96
-
97
-
98
-
99
-
100
-
101
-
102
-
103
-
104
-
105
-
106
-
107
-
108
-
109
-
110
-
111
-
112
-
113
-
114
-
115
-
116
-
117
-
118
-
119
-
120
-
121
-
122
-
123
-
124
-
125
-
126
-
127
-
128
-
129
-
130
-
131
-
132
-
133
-
134
-
135
-
136
-
137
-
138
-
139
-
140
-
141
-
 142
142 -
 143
143 -
 144
144 -
 145
145 -
 146
146 -
 147
147 -
 148
148 -
 149
149 -
 150
150 -
 151
151 -
 152
152 -
153
-
154
-
155
-
156
-
157
-
158
-
159
-
160
-
161
-
162
-
163
-
164
-
165
-
166
-
167
-
168
-
169
-
170
-
171
-
172
-
173
-
174
-
175
-
176
-
177
-
178
-
179
-
180
-
181
-
182
-
183
-
184
-
185
-
186
-
187
-
188
-
189
-
190
-
191
-
192
-
193
-
194
-
195
-
196
-
197
-
198
-
199
-
200
-
201
-
202
-
203
-
204
-
205
-
206
-
207
-
208
-
209
-
210
-
211
-
212
-
213
-
214
-
215
-
216
-
217
-
218
-
219
-
220
-
221
-
222
-
223
-
224
-
225
-
226
-
227
-
228
-
229
-
230
-
231
-
232
-
233
-
234
-
235
-
236
-
237
-
238
-
239
-
240
-
241
-
242
-
243
-
244
-
245
-
246
-
247
-
248
-
249
-
250
-
251
-
252
-
253
-
254
-
255
-
256
-
257
-
258
-
259
-
260
-
261
-
262
-
263
-
264
-
265
-
266
-
267
-
268
-
269
-
270
-
271
-
272
-
273
-
274
-
275
-
276
-
277
-
278
-
279
-
280
-
281
-
282
-
283
-
284
-
285
-
286
-
287
-
288
-
289
-
290
-
291
-
292
-
293
-
294
-
295
-
296
-
297
-
298
-
299
-
300
-
301
-
302
-
303
-
304
-
305
-
306
-
307
-
308
-
309
-
310
-
311
-
312
-
313
-
314
-
315
-
316
-
317
-
318
-
319
-
320
 |
 |