Dell Powerconnect W-ClearPass Virtual Appliances W-ClearPass Guest 6.0 Deploym - Page 238
Exporting the Application Log, Times, Severity, Error, Warning, Debug, Options, Export, Format, Range
 |
View all Dell Powerconnect W-ClearPass Virtual Appliances manuals
Add to My Manuals
Save this manual to your list of manuals |
Page 238 highlights
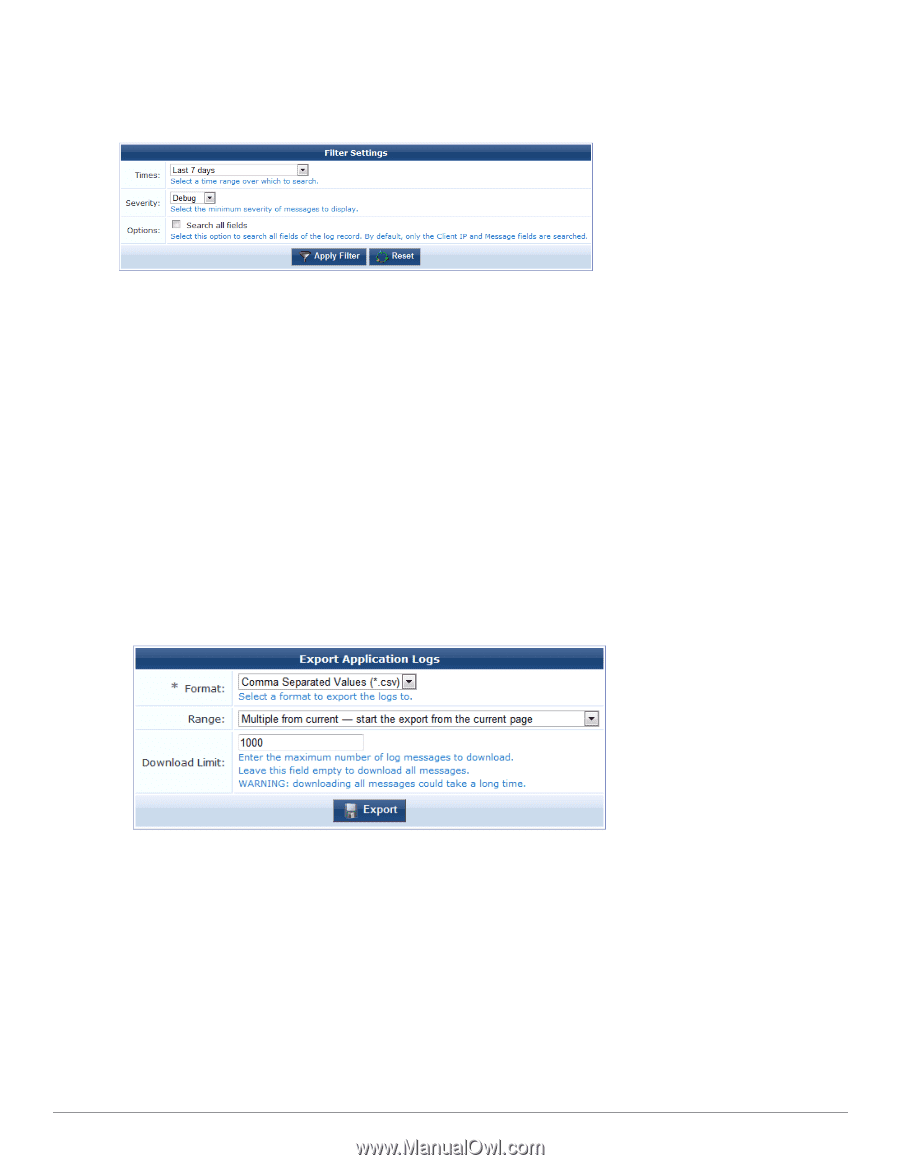
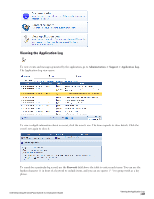
The Application Log lists the events, messages, and configuration changes for the past seven days. To view events and messages for a different period, or to limit the search items: 1. Click the Filter tab. The Filter Settings form opens. 2. You can use the Times drop-down list to specify a time period to filter for. 3. The Severity drop-down list lets you limit the range of severity to search for: l Error-Returns Error items l Warning-Returns Error and Warning items l Info-Returns Error, Warning, and Info items l Debug-Returns Error, Warning, Info, and Debug items 4. By default, only the Client IP and Message fields are searched. To search all fields, mark the check box in the Options row. Events are stored in the Application Log for seven days by default. To review a record of significant runtime events prior to the last seven days, you can use the Audit Viewer in ClearPass Policy Manager's Monitoring module. Exporting the Application Log To save the log in other formats: 1. Click the Export tab. The Export Application Logs form opens. 2. In the Format drop-down list, choose the format you want the file saved as. The available formats are CommaSeparated Values (.CSV), HTML document (.html), Tab-Separated Values (.tsv), Text file (.txt), and XML document (.xml). 3. In the Range drop-down list, select the range of pages to save. Options include the current page only, all pages starting from the current page, or all pages starting from the first page that matched any keyword or filter criteria you entered. 4. If you entered a range of pages in the Range drop-down list, the form expands to include the Download Limit row. 5. Click Export. You are given the option to open the file, save it to your Downloads folder (the default), or save it to another location. 238 | Exporting the Application Log Dell Networking W-ClearPass Guest 6.0 | Deployment Guide
-
 1
1 -
2
-
3
-
4
-
5
-
6
-
7
-
8
-
9
-
10
-
11
-
12
-
13
-
14
-
15
-
16
-
17
-
18
-
19
-
20
-
21
-
22
-
23
-
24
-
25
-
26
-
27
-
28
-
29
-
30
-
31
-
32
-
33
-
34
-
35
-
36
-
37
-
38
-
39
-
40
-
41
-
42
-
43
-
44
-
45
-
46
-
47
-
48
-
49
-
50
-
51
-
52
-
53
-
54
-
55
-
56
-
57
-
58
-
59
-
60
-
61
-
62
-
63
-
64
-
65
-
66
-
67
-
68
-
69
-
70
-
71
-
72
-
73
-
74
-
75
-
76
-
77
-
78
-
79
-
80
-
81
-
82
-
83
-
84
-
85
-
86
-
87
-
88
-
89
-
90
-
91
-
92
-
93
-
94
-
95
-
96
-
97
-
98
-
99
-
100
-
101
-
102
-
103
-
104
-
105
-
106
-
107
-
108
-
109
-
110
-
111
-
112
-
113
-
114
-
115
-
116
-
117
-
118
-
119
-
120
-
121
-
122
-
123
-
124
-
125
-
126
-
127
-
128
-
129
-
130
-
131
-
132
-
133
-
134
-
135
-
136
-
137
-
138
-
139
-
140
-
141
-
142
-
143
-
144
-
145
-
146
-
147
-
148
-
149
-
150
-
151
-
152
-
153
-
154
-
155
-
156
-
157
-
158
-
159
-
160
-
161
-
162
-
163
-
164
-
165
-
166
-
167
-
168
-
169
-
170
-
171
-
172
-
173
-
174
-
175
-
176
-
177
-
178
-
179
-
180
-
181
-
182
-
183
-
184
-
185
-
186
-
187
-
188
-
189
-
190
-
191
-
192
-
193
-
194
-
195
-
196
-
197
-
198
-
199
-
200
-
201
-
202
-
203
-
204
-
205
-
206
-
207
-
208
-
209
-
210
-
211
-
212
-
213
-
214
-
215
-
216
-
217
-
218
-
219
-
220
-
221
-
222
-
223
-
224
-
225
-
226
-
227
-
228
-
229
-
230
-
231
-
232
-
 233
233 -
 234
234 -
 235
235 -
 236
236 -
 237
237 -
 238
238 -
 239
239 -
 240
240 -
 241
241 -
 242
242 -
 243
243 -
244
-
245
-
246
-
247
-
248
-
249
-
250
-
251
-
252
-
253
-
254
-
255
-
256
-
257
-
258
-
259
-
260
-
261
-
262
-
263
-
264
-
265
-
266
-
267
-
268
-
269
-
270
-
271
-
272
-
273
-
274
-
275
-
276
-
277
-
278
-
279
-
280
-
281
-
282
-
283
-
284
-
285
-
286
-
287
-
288
-
289
-
290
-
291
-
292
-
293
-
294
-
295
-
296
-
297
-
298
-
299
-
300
-
301
-
302
-
303
-
304
-
305
-
306
-
307
-
308
-
309
-
310
-
311
-
312
-
313
-
314
-
315
-
316
-
317
-
318
-
319
-
320
 |
 |