Dell Powerconnect W-ClearPass Virtual Appliances W-ClearPass Guest 6.0 Deploym - Page 232
Sending an SMS, Administration > SMS Services > Send SMS
 |
View all Dell Powerconnect W-ClearPass Virtual Appliances manuals
Add to My Manuals
Save this manual to your list of manuals |
Page 232 highlights
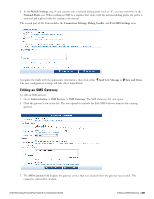
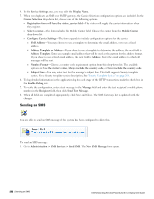
4. In the Service Settings area, you may edit the Display Name. 5. When you duplicate an SMS over SMTP gateway, the Carrier Selection configuration options are included. In the Carrier Selection drop-down list, choose one of the following options: l Registration form will have the visitor_carrier field-The visitor will supply the carrier information when they register. l Select a carrier-The form includes the Mobile Carrier field. Choose the carrier from the Mobile Carrier drop-down list. l Configure Carrier Settings-The form expands to include configuration options for the carrier: n SMS Address-You may choose to use a template to determine the email address, or to use a fixed address. n Address Template or Address-If you chose to use a template to determine the address, the next field is Address Template. Enter an example email address that will be used as the pattern for the address format. If you chose to use a fixed email address, the next field is Address. Enter the email address to which all messages will be sent. n Number Format-Choose a country code requirement option from this drop-down list. The available options are Use the visitor's value, Always include the country code, or Never include the country code. n Subject Line-You may enter text for the message's subject line. This field supports Smarty template syntax. For a Smarty template syntax description, See "Smarty Template Syntax" on page 264. 6. To log detailed information in the application log for each stage of the HTTP transaction, mark the check box in the Enable Debug row. 7. To verify the configuration, enter a test message in the Message field and enter the test recipient's mobile phone number in the Recipient field, then click Send Test Message. 8. When all fields are completed appropriately, click Save and Close. The SMS Gateways list is updated with the changes. Sending an SMS You are able to send an SMS message if the system has been configured to allow this. To send an SMS message: 1. Go to Administration > SMS Services > Send SMS. The New SMS Message form opens. 232 | Sending an SMS Dell Networking W-ClearPass Guest 6.0 | Deployment Guide
-
 1
1 -
2
-
3
-
4
-
5
-
6
-
7
-
8
-
9
-
10
-
11
-
12
-
13
-
14
-
15
-
16
-
17
-
18
-
19
-
20
-
21
-
22
-
23
-
24
-
25
-
26
-
27
-
28
-
29
-
30
-
31
-
32
-
33
-
34
-
35
-
36
-
37
-
38
-
39
-
40
-
41
-
42
-
43
-
44
-
45
-
46
-
47
-
48
-
49
-
50
-
51
-
52
-
53
-
54
-
55
-
56
-
57
-
58
-
59
-
60
-
61
-
62
-
63
-
64
-
65
-
66
-
67
-
68
-
69
-
70
-
71
-
72
-
73
-
74
-
75
-
76
-
77
-
78
-
79
-
80
-
81
-
82
-
83
-
84
-
85
-
86
-
87
-
88
-
89
-
90
-
91
-
92
-
93
-
94
-
95
-
96
-
97
-
98
-
99
-
100
-
101
-
102
-
103
-
104
-
105
-
106
-
107
-
108
-
109
-
110
-
111
-
112
-
113
-
114
-
115
-
116
-
117
-
118
-
119
-
120
-
121
-
122
-
123
-
124
-
125
-
126
-
127
-
128
-
129
-
130
-
131
-
132
-
133
-
134
-
135
-
136
-
137
-
138
-
139
-
140
-
141
-
142
-
143
-
144
-
145
-
146
-
147
-
148
-
149
-
150
-
151
-
152
-
153
-
154
-
155
-
156
-
157
-
158
-
159
-
160
-
161
-
162
-
163
-
164
-
165
-
166
-
167
-
168
-
169
-
170
-
171
-
172
-
173
-
174
-
175
-
176
-
177
-
178
-
179
-
180
-
181
-
182
-
183
-
184
-
185
-
186
-
187
-
188
-
189
-
190
-
191
-
192
-
193
-
194
-
195
-
196
-
197
-
198
-
199
-
200
-
201
-
202
-
203
-
204
-
205
-
206
-
207
-
208
-
209
-
210
-
211
-
212
-
213
-
214
-
215
-
216
-
217
-
218
-
219
-
220
-
221
-
222
-
223
-
224
-
225
-
226
-
 227
227 -
 228
228 -
 229
229 -
 230
230 -
 231
231 -
 232
232 -
 233
233 -
 234
234 -
 235
235 -
 236
236 -
 237
237 -
238
-
239
-
240
-
241
-
242
-
243
-
244
-
245
-
246
-
247
-
248
-
249
-
250
-
251
-
252
-
253
-
254
-
255
-
256
-
257
-
258
-
259
-
260
-
261
-
262
-
263
-
264
-
265
-
266
-
267
-
268
-
269
-
270
-
271
-
272
-
273
-
274
-
275
-
276
-
277
-
278
-
279
-
280
-
281
-
282
-
283
-
284
-
285
-
286
-
287
-
288
-
289
-
290
-
291
-
292
-
293
-
294
-
295
-
296
-
297
-
298
-
299
-
300
-
301
-
302
-
303
-
304
-
305
-
306
-
307
-
308
-
309
-
310
-
311
-
312
-
313
-
314
-
315
-
316
-
317
-
318
-
319
-
320
 |
 |