Dell Powerconnect W-ClearPass Virtual Appliances W-ClearPass Guest 6.0 Deploym - Page 199
SMS Receipt Fields, Configuring Access Code Logins, Customize Random Username and Passwords
 |
View all Dell Powerconnect W-ClearPass Virtual Appliances manuals
Add to My Manuals
Save this manual to your list of manuals |
Page 199 highlights
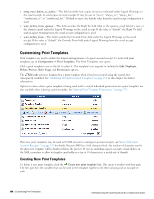
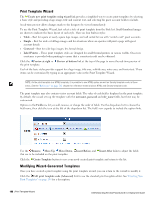
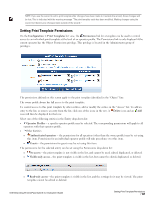
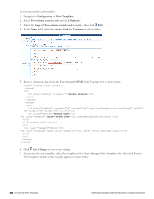
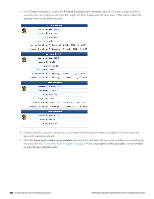
SMS Receipt Fields The behavior of SMS receipt operations can be customized with certain guest account fields. You can override global settings by setting these fields. l sms_enabled - This field may be set to a non-zero value to enable sending an SMS receipt. If unset, the default value is true. l sms_handler_id - This field specifies the handler ID for the SMS service provider. If blank or unset, the default value from the SMS plugin configuration is used. l sms_template_id - This field specifies the print template ID for the SMS receipt. If blank or unset, the default value from the SMS plugin configuration is used. l sms_phone_field - This field specifies the name of the field that contains the visitor's phone number. If blank or unset, the default value from the SMS plugin configuration is used. l sms_auto_send_field - This field specifies the name of the field that contains the auto-send flag. If blank or unset, the default value from the SMS plugin configuration is used. Additionally, the special values "_Disabled" and "_Enabled" may be used to never send an SMS or always send an SMS, respectively. The logic used to send an SMS receipt is: l If SMS receipts are disabled, take no action. l Otherwise, check the auto-send field. n If it is "_Disabled" then no receipt is sent. n If it is "_Enabled" then continue processing. n If it is any other value, assume the auto-send field is the name of another guest account field. Check the value of that field, and if it is zero or the empty string then no receipt is sent. l Determine the phone number - if the phone number field is set and the value of this field is at least 7 characters in length, then use the value of this field as the phone number. Otherwise, if the value of the auto-send field is at least 7 characters in length, then use the value of this field as the phone number. l If the phone number is at least 7 characters long, generate a receipt using the specified plain-text print template and send it to the specified phone number. Configuring Access Code Logins This section explains how to configure Guest Manager to create multiple accounts that have the ability to log in with only the username. We will refer to this as an Access Code. Customize Random Username and Passwords In this example we will set the random usernames and passwords to be a mix of letters and digits. 1. Navigate to Configuration > Guest Manager. The Configure Guest Manager form opens. 2. In the Username Type field, select Random Letters and digits. The generator matching the complexity will also include a mix of upper and lower case letters. 3. In the Username Length field, select 8 characters. 4. Configure other settings. See "Default Settings for Account Creation" on page 137 for a description. Click Save Configuration to save your changes. Create the Print Template By default, the print templates include username, password, and expiration, as well as other options. For the purpose of access codes, we only want the username presented. This access code login example bases the print template off Dell Networking W-ClearPass Guest 6.0 | Deployment Guide SMS Receipt Fields | 199
-
 1
1 -
2
-
3
-
4
-
5
-
6
-
7
-
8
-
9
-
10
-
11
-
12
-
13
-
14
-
15
-
16
-
17
-
18
-
19
-
20
-
21
-
22
-
23
-
24
-
25
-
26
-
27
-
28
-
29
-
30
-
31
-
32
-
33
-
34
-
35
-
36
-
37
-
38
-
39
-
40
-
41
-
42
-
43
-
44
-
45
-
46
-
47
-
48
-
49
-
50
-
51
-
52
-
53
-
54
-
55
-
56
-
57
-
58
-
59
-
60
-
61
-
62
-
63
-
64
-
65
-
66
-
67
-
68
-
69
-
70
-
71
-
72
-
73
-
74
-
75
-
76
-
77
-
78
-
79
-
80
-
81
-
82
-
83
-
84
-
85
-
86
-
87
-
88
-
89
-
90
-
91
-
92
-
93
-
94
-
95
-
96
-
97
-
98
-
99
-
100
-
101
-
102
-
103
-
104
-
105
-
106
-
107
-
108
-
109
-
110
-
111
-
112
-
113
-
114
-
115
-
116
-
117
-
118
-
119
-
120
-
121
-
122
-
123
-
124
-
125
-
126
-
127
-
128
-
129
-
130
-
131
-
132
-
133
-
134
-
135
-
136
-
137
-
138
-
139
-
140
-
141
-
142
-
143
-
144
-
145
-
146
-
147
-
148
-
149
-
150
-
151
-
152
-
153
-
154
-
155
-
156
-
157
-
158
-
159
-
160
-
161
-
162
-
163
-
164
-
165
-
166
-
167
-
168
-
169
-
170
-
171
-
172
-
173
-
174
-
175
-
176
-
177
-
178
-
179
-
180
-
181
-
182
-
183
-
184
-
185
-
186
-
187
-
188
-
189
-
190
-
191
-
192
-
193
-
 194
194 -
 195
195 -
 196
196 -
 197
197 -
 198
198 -
 199
199 -
 200
200 -
 201
201 -
 202
202 -
 203
203 -
 204
204 -
205
-
206
-
207
-
208
-
209
-
210
-
211
-
212
-
213
-
214
-
215
-
216
-
217
-
218
-
219
-
220
-
221
-
222
-
223
-
224
-
225
-
226
-
227
-
228
-
229
-
230
-
231
-
232
-
233
-
234
-
235
-
236
-
237
-
238
-
239
-
240
-
241
-
242
-
243
-
244
-
245
-
246
-
247
-
248
-
249
-
250
-
251
-
252
-
253
-
254
-
255
-
256
-
257
-
258
-
259
-
260
-
261
-
262
-
263
-
264
-
265
-
266
-
267
-
268
-
269
-
270
-
271
-
272
-
273
-
274
-
275
-
276
-
277
-
278
-
279
-
280
-
281
-
282
-
283
-
284
-
285
-
286
-
287
-
288
-
289
-
290
-
291
-
292
-
293
-
294
-
295
-
296
-
297
-
298
-
299
-
300
-
301
-
302
-
303
-
304
-
305
-
306
-
307
-
308
-
309
-
310
-
311
-
312
-
313
-
314
-
315
-
316
-
317
-
318
-
319
-
320
 |
 |