HP StorageWorks 8/80 HP StorageWorks Fabric OS 6.1.x administrator guide (5697 - Page 370
Assigning a Trunk area
 |
View all HP StorageWorks 8/80 manuals
Add to My Manuals
Save this manual to your list of manuals |
Page 370 highlights
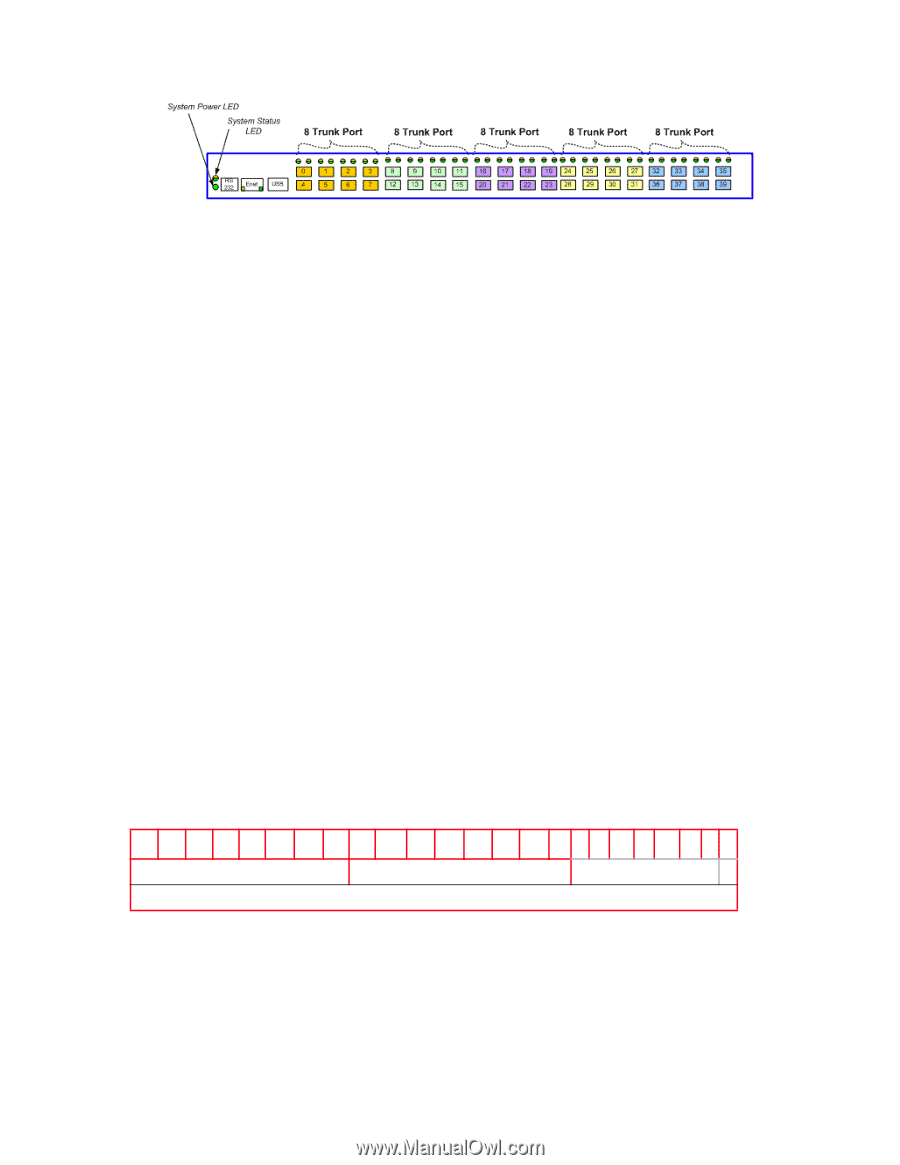
based on the user port number, with contiguous eight ports as one group, such as 0 - 7, 8- 15, 16-23 and up to the number of ports on the switch. Figure 41 Trunk group configuration for the SAN Switch 8/40 1. Connect to the switch and log in as admin. 2. Ensure that both modules (edge switch and the switch running in AG mode) have trunking the licenses enabled. 3. Ensure that the ports have trunking enabled by issuing the portCfgShow command. If Trunking is not enabled, issue the portCfgTrunkPort , 1 command. 4. Ensure ports will become the same speed within the trunk. 5. Ensure edge switch F_port trunk ports are connected within the asic supported trunk group on AG switch. 6. Ensure that both modules are running the same Fabric OS versions. 7. Configure the trunk on the edge switch by assigning the Trunk Area (TA) using the "Assigning a Trunk area" procedure. 8. Enable F_Port trunking. Assigning a Trunk area You must enable trunking on all ports to be included in a Trunk Area before you can create a Trunk Area. Use the portCfgTrunkPort or switchCfgTrunk command to enable trunking on a port or on all ports of a switch. Issue the portTrunkArea command to assign a static TA on a port or port trunk group, to remove a TA from a port or group of ports in a trunk, and to display masterless F_Port trunking information. You can remove specified ports from a TA using the portTrunkArea --disable command; however this command does not unassign a TA if its previously assigned Area_ID is the same address identifier (Area_ID) of the TA unless all the ports in the trunk group are specified to be unassigned. For more information on the portTrunkArea command, enter help portTrunkArea or see the Fabric OS Command Reference. F_Port trunking will not support shared area ports 16 - 47 on the FC8-48 and FC4-48C blades. The following table shows an example of the address identifier. Table 84 Address identifier 23 22 21 20 19 18 17 16 15 14 13 12 11 10 9 8 7 6 5 4 3 2 1 0 Domain ID Area_ID Address Identifier Port ID The following example shows how to assign a TA on an enterprise-class platform including ports 13 and 14 on slot 10 with a port index of 125: 1. Connect to the switch and log in as admin. 2. Disable the ports to be included in the TA. 3. Enable the TA for ports 13 and 14 on slot 10 with a port index of 125: switch:admin> porttrunkarea --enable 10/13-14 -index 125 Trunk index 125 enabled for ports 10/13 and 10/14. 4. Show the TA port configuration (ports still disabled): 370 Administering ISL Trunking
-
 1
1 -
2
-
3
-
4
-
5
-
6
-
7
-
8
-
9
-
10
-
11
-
12
-
13
-
14
-
15
-
16
-
17
-
18
-
19
-
20
-
21
-
22
-
23
-
24
-
25
-
26
-
27
-
28
-
29
-
30
-
31
-
32
-
33
-
34
-
35
-
36
-
37
-
38
-
39
-
40
-
41
-
42
-
43
-
44
-
45
-
46
-
47
-
48
-
49
-
50
-
51
-
52
-
53
-
54
-
55
-
56
-
57
-
58
-
59
-
60
-
61
-
62
-
63
-
64
-
65
-
66
-
67
-
68
-
69
-
70
-
71
-
72
-
73
-
74
-
75
-
76
-
77
-
78
-
79
-
80
-
81
-
82
-
83
-
84
-
85
-
86
-
87
-
88
-
89
-
90
-
91
-
92
-
93
-
94
-
95
-
96
-
97
-
98
-
99
-
100
-
101
-
102
-
103
-
104
-
105
-
106
-
107
-
108
-
109
-
110
-
111
-
112
-
113
-
114
-
115
-
116
-
117
-
118
-
119
-
120
-
121
-
122
-
123
-
124
-
125
-
126
-
127
-
128
-
129
-
130
-
131
-
132
-
133
-
134
-
135
-
136
-
137
-
138
-
139
-
140
-
141
-
142
-
143
-
144
-
145
-
146
-
147
-
148
-
149
-
150
-
151
-
152
-
153
-
154
-
155
-
156
-
157
-
158
-
159
-
160
-
161
-
162
-
163
-
164
-
165
-
166
-
167
-
168
-
169
-
170
-
171
-
172
-
173
-
174
-
175
-
176
-
177
-
178
-
179
-
180
-
181
-
182
-
183
-
184
-
185
-
186
-
187
-
188
-
189
-
190
-
191
-
192
-
193
-
194
-
195
-
196
-
197
-
198
-
199
-
200
-
201
-
202
-
203
-
204
-
205
-
206
-
207
-
208
-
209
-
210
-
211
-
212
-
213
-
214
-
215
-
216
-
217
-
218
-
219
-
220
-
221
-
222
-
223
-
224
-
225
-
226
-
227
-
228
-
229
-
230
-
231
-
232
-
233
-
234
-
235
-
236
-
237
-
238
-
239
-
240
-
241
-
242
-
243
-
244
-
245
-
246
-
247
-
248
-
249
-
250
-
251
-
252
-
253
-
254
-
255
-
256
-
257
-
258
-
259
-
260
-
261
-
262
-
263
-
264
-
265
-
266
-
267
-
268
-
269
-
270
-
271
-
272
-
273
-
274
-
275
-
276
-
277
-
278
-
279
-
280
-
281
-
282
-
283
-
284
-
285
-
286
-
287
-
288
-
289
-
290
-
291
-
292
-
293
-
294
-
295
-
296
-
297
-
298
-
299
-
300
-
301
-
302
-
303
-
304
-
305
-
306
-
307
-
308
-
309
-
310
-
311
-
312
-
313
-
314
-
315
-
316
-
317
-
318
-
319
-
320
-
321
-
322
-
323
-
324
-
325
-
326
-
327
-
328
-
329
-
330
-
331
-
332
-
333
-
334
-
335
-
336
-
337
-
338
-
339
-
340
-
341
-
342
-
343
-
344
-
345
-
346
-
347
-
348
-
349
-
350
-
351
-
352
-
353
-
354
-
355
-
356
-
357
-
358
-
359
-
360
-
361
-
362
-
363
-
364
-
 365
365 -
 366
366 -
 367
367 -
 368
368 -
 369
369 -
 370
370 -
 371
371 -
 372
372 -
 373
373 -
 374
374 -
 375
375 -
376
-
377
-
378
-
379
-
380
-
381
-
382
-
383
-
384
-
385
-
386
-
387
-
388
-
389
-
390
-
391
-
392
-
393
-
394
-
395
-
396
-
397
-
398
-
399
-
400
-
401
-
402
-
403
-
404
-
405
-
406
-
407
-
408
-
409
-
410
-
411
-
412
-
413
-
414
-
415
-
416
-
417
-
418
-
419
-
420
-
421
-
422
-
423
-
424
-
425
-
426
-
427
-
428
-
429
-
430
-
431
-
432
-
433
-
434
-
435
-
436
-
437
-
438
-
439
-
440
-
441
-
442
-
443
-
444
-
445
-
446
-
447
-
448
-
449
-
450
-
451
-
452
-
453
-
454
-
455
-
456
-
457
-
458
-
459
-
460
-
461
-
462
-
463
-
464
-
465
-
466
-
467
-
468
-
469
-
470
-
471
-
472
-
473
-
474
-
475
-
476
-
477
-
478
-
479
-
480
-
481
-
482
-
483
-
484
-
485
-
486
-
487
-
488
-
489
-
490
-
491
-
492
 |
 |