HP StorageWorks 8/80 HP StorageWorks Fabric OS 6.1.x administrator guide (5697 - Page 48
Tracking and controlling switch changes
 |
View all HP StorageWorks 8/80 manuals
Add to My Manuals
Save this manual to your list of manuals |
Page 48 highlights
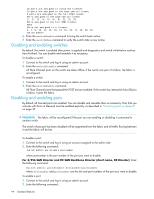
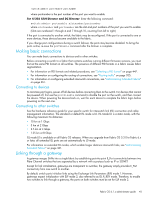
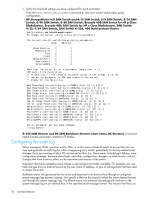
Show switches in Access Gateway mode To show switches in Access Gateway mode: 1. Connect to the switch and log in using an account assigned to the admin role. 2. Enter the agShow command. switch:admin> agshow Worldwide Name Ports Enet IP Addr Firmware Local/Remote Name 10:00:00:05:1e:02:1d:b0 16 10.32.53.4 v5.2.1 local ag_01 10:00:00:05:1e:03:4b:e7 24 10.32.60.95 v5.2.1 local ag_02 10:00:00:05:1e:35:a2:58 20 10.32.53.180 v5.2.1 remote ag_03 This command displays all the switches in Access Gateway mode in the fabric. Tracking and controlling switch changes The track changes feature allows you to keep a record of specific changes that may not be considered switch events, but may provide useful information. The output from the track changes feature is dumped to the system messages log for the switch. Use the errDump or errShow command to view the log. Items in the log created from the Track changes feature are labeled TRCK. Trackable changes are: • Successful login • Unsuccessful login • Logout • Configuration file change from task • Track changes on • Track changes off An SNMP-TRAP mode can also be enabled (see the trackChangesHelp command in the Fabric OS Command Reference). For troubleshooting information on the track changes feature, see "Inaccurate information in the system message log" on page 328. To enable the track changes feature: 1. Connect to the switch and log in using an account assigned to the admin role. 2. Enter this command to enable the track changes feature: trackChangesSet 1. A message displays, verifying that the track changes feature is on: switch:admin> trackchangesset 1 Committing configuration...done. switch:admin> 3. Use the errDump or errShow command to view the log. 2004/08/24-08:45:43, [TRCK-1001], 212,, INFO, ras007, Successful login by user admin. To display the status of the track changes feature: 1. Connect to the switch and log in using an account assigned to the admin role. 2. Enter the trackChangesShow command. The status of the track changes feature is displayed as either on or off. The display includes whether or not the track changes feature is configured to send SNMP traps. switch:admin> trackchangesshow Track changes status: ON Track changes generate SNMP-TRAP: NO switch:admin> 48 Standard features
-
 1
1 -
2
-
3
-
4
-
5
-
6
-
7
-
8
-
9
-
10
-
11
-
12
-
13
-
14
-
15
-
16
-
17
-
18
-
19
-
20
-
21
-
22
-
23
-
24
-
25
-
26
-
27
-
28
-
29
-
30
-
31
-
32
-
33
-
34
-
35
-
36
-
37
-
38
-
39
-
40
-
41
-
42
-
 43
43 -
 44
44 -
 45
45 -
 46
46 -
 47
47 -
 48
48 -
 49
49 -
 50
50 -
 51
51 -
 52
52 -
 53
53 -
54
-
55
-
56
-
57
-
58
-
59
-
60
-
61
-
62
-
63
-
64
-
65
-
66
-
67
-
68
-
69
-
70
-
71
-
72
-
73
-
74
-
75
-
76
-
77
-
78
-
79
-
80
-
81
-
82
-
83
-
84
-
85
-
86
-
87
-
88
-
89
-
90
-
91
-
92
-
93
-
94
-
95
-
96
-
97
-
98
-
99
-
100
-
101
-
102
-
103
-
104
-
105
-
106
-
107
-
108
-
109
-
110
-
111
-
112
-
113
-
114
-
115
-
116
-
117
-
118
-
119
-
120
-
121
-
122
-
123
-
124
-
125
-
126
-
127
-
128
-
129
-
130
-
131
-
132
-
133
-
134
-
135
-
136
-
137
-
138
-
139
-
140
-
141
-
142
-
143
-
144
-
145
-
146
-
147
-
148
-
149
-
150
-
151
-
152
-
153
-
154
-
155
-
156
-
157
-
158
-
159
-
160
-
161
-
162
-
163
-
164
-
165
-
166
-
167
-
168
-
169
-
170
-
171
-
172
-
173
-
174
-
175
-
176
-
177
-
178
-
179
-
180
-
181
-
182
-
183
-
184
-
185
-
186
-
187
-
188
-
189
-
190
-
191
-
192
-
193
-
194
-
195
-
196
-
197
-
198
-
199
-
200
-
201
-
202
-
203
-
204
-
205
-
206
-
207
-
208
-
209
-
210
-
211
-
212
-
213
-
214
-
215
-
216
-
217
-
218
-
219
-
220
-
221
-
222
-
223
-
224
-
225
-
226
-
227
-
228
-
229
-
230
-
231
-
232
-
233
-
234
-
235
-
236
-
237
-
238
-
239
-
240
-
241
-
242
-
243
-
244
-
245
-
246
-
247
-
248
-
249
-
250
-
251
-
252
-
253
-
254
-
255
-
256
-
257
-
258
-
259
-
260
-
261
-
262
-
263
-
264
-
265
-
266
-
267
-
268
-
269
-
270
-
271
-
272
-
273
-
274
-
275
-
276
-
277
-
278
-
279
-
280
-
281
-
282
-
283
-
284
-
285
-
286
-
287
-
288
-
289
-
290
-
291
-
292
-
293
-
294
-
295
-
296
-
297
-
298
-
299
-
300
-
301
-
302
-
303
-
304
-
305
-
306
-
307
-
308
-
309
-
310
-
311
-
312
-
313
-
314
-
315
-
316
-
317
-
318
-
319
-
320
-
321
-
322
-
323
-
324
-
325
-
326
-
327
-
328
-
329
-
330
-
331
-
332
-
333
-
334
-
335
-
336
-
337
-
338
-
339
-
340
-
341
-
342
-
343
-
344
-
345
-
346
-
347
-
348
-
349
-
350
-
351
-
352
-
353
-
354
-
355
-
356
-
357
-
358
-
359
-
360
-
361
-
362
-
363
-
364
-
365
-
366
-
367
-
368
-
369
-
370
-
371
-
372
-
373
-
374
-
375
-
376
-
377
-
378
-
379
-
380
-
381
-
382
-
383
-
384
-
385
-
386
-
387
-
388
-
389
-
390
-
391
-
392
-
393
-
394
-
395
-
396
-
397
-
398
-
399
-
400
-
401
-
402
-
403
-
404
-
405
-
406
-
407
-
408
-
409
-
410
-
411
-
412
-
413
-
414
-
415
-
416
-
417
-
418
-
419
-
420
-
421
-
422
-
423
-
424
-
425
-
426
-
427
-
428
-
429
-
430
-
431
-
432
-
433
-
434
-
435
-
436
-
437
-
438
-
439
-
440
-
441
-
442
-
443
-
444
-
445
-
446
-
447
-
448
-
449
-
450
-
451
-
452
-
453
-
454
-
455
-
456
-
457
-
458
-
459
-
460
-
461
-
462
-
463
-
464
-
465
-
466
-
467
-
468
-
469
-
470
-
471
-
472
-
473
-
474
-
475
-
476
-
477
-
478
-
479
-
480
-
481
-
482
-
483
-
484
-
485
-
486
-
487
-
488
-
489
-
490
-
491
-
492
 |
 |