HP StorageWorks 8/80 HP StorageWorks Fabric OS 6.1.x administrator guide (5697 - Page 72
Configuring the RADIUS server
 |
View all HP StorageWorks 8/80 manuals
Add to My Manuals
Save this manual to your list of manuals |
Page 72 highlights
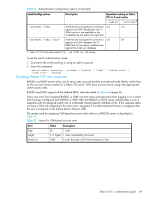
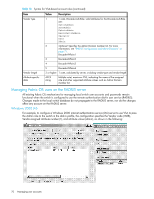
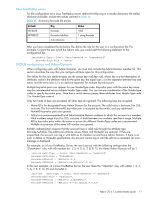
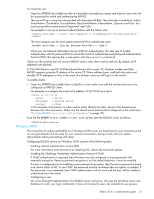
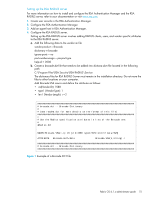
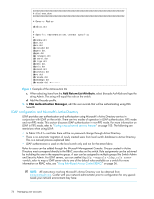
Configuring the RADIUS server You must know the switch IP address, in either IPv4 or IPv6 notation, or name to connect to switches. Use the ipAddrShow command to display a switch IP address. For Directors (chassis-based systems), the switch IP addresses are aliases of the physical Ethernet interfaces on the CP blades. When specifying client IP addresses for the logical switches in such systems, make sure the CP blade IP addresses are used. For accessing both the active and standby CP blade, and for the purpose of HA failover, both of the CP blade IP addresses should be included in the RADIUS server configuration. User accounts should be set up by their true network-wide identity, rather than by the account names created on a Fabric OS switch. Along with each account name, the administrator should assign appropriate switch access roles. To manage a fabric, these roles can be User, Admin, and SecurityAdmin. When they log in to a switch configured with RADIUS, users enter their assigned RADIUS account names and passwords at the prompt. After the RADIUS server authenticates a user, it responds with the assigned switch role in a Brocade Vendor-Specific Attribute (VSA), as defined in the RFC. An Authentication-Accept response without such VSA role assignment automatically assigns the user role. The following sections describe how to configure a RADIUS server to support clients under different operating systems. Linux The following procedures work for FreeRADIUS on Solaris and Red Hat Linux. FreeRADIUS is a freeware RADIUS server that you can find at the following website: www.freeradius.org Follow the installation instructions at the website. FreeRADIUS runs on Linux (all versions), FreeBSD, NetBSD, and Solaris. If you make a change to any of the files used in this configuration, you must stop the server and restart it for the changes to take effect. FreeRADIUS installation places the configuration files in $PREFIX/etc/raddb. By default, the PREFIX is /usr/local. Configuring RADIUS service on Linux consists of the following tasks: • Adding the Brocade attribute to the server • Creating the user • Enabling clients To add the Brocade attribute to the server: 1. Create and save the file $PREFIX/etc/raddb/dictionary.brocade with the following information: # # Brocade FabricOS 5.0.1 dictionary # VENDOR Brocade 1588 # # attribute 1 defined to be Brocade-Auth-Role # string defined in user configuration # ATTRIBUTE Brocade-Auth-Role 1 string Brocade This defines the Brocade vendor ID as 1588, the Brocade attribute 1 as Brocade-Auth-Role, and it is a string value. 2. Open the file $PREFIX/etc/raddb/dictionary in a text editor and add the line: $INCLUDE dictionary.brocade As a result, the file dictionary.brocade is located in the RADIUS configuration directory and loaded for use by the RADIUS server. 72 Managing user accounts
-
 1
1 -
2
-
3
-
4
-
5
-
6
-
7
-
8
-
9
-
10
-
11
-
12
-
13
-
14
-
15
-
16
-
17
-
18
-
19
-
20
-
21
-
22
-
23
-
24
-
25
-
26
-
27
-
28
-
29
-
30
-
31
-
32
-
33
-
34
-
35
-
36
-
37
-
38
-
39
-
40
-
41
-
42
-
43
-
44
-
45
-
46
-
47
-
48
-
49
-
50
-
51
-
52
-
53
-
54
-
55
-
56
-
57
-
58
-
59
-
60
-
61
-
62
-
63
-
64
-
65
-
66
-
 67
67 -
 68
68 -
 69
69 -
 70
70 -
 71
71 -
 72
72 -
 73
73 -
 74
74 -
 75
75 -
 76
76 -
 77
77 -
78
-
79
-
80
-
81
-
82
-
83
-
84
-
85
-
86
-
87
-
88
-
89
-
90
-
91
-
92
-
93
-
94
-
95
-
96
-
97
-
98
-
99
-
100
-
101
-
102
-
103
-
104
-
105
-
106
-
107
-
108
-
109
-
110
-
111
-
112
-
113
-
114
-
115
-
116
-
117
-
118
-
119
-
120
-
121
-
122
-
123
-
124
-
125
-
126
-
127
-
128
-
129
-
130
-
131
-
132
-
133
-
134
-
135
-
136
-
137
-
138
-
139
-
140
-
141
-
142
-
143
-
144
-
145
-
146
-
147
-
148
-
149
-
150
-
151
-
152
-
153
-
154
-
155
-
156
-
157
-
158
-
159
-
160
-
161
-
162
-
163
-
164
-
165
-
166
-
167
-
168
-
169
-
170
-
171
-
172
-
173
-
174
-
175
-
176
-
177
-
178
-
179
-
180
-
181
-
182
-
183
-
184
-
185
-
186
-
187
-
188
-
189
-
190
-
191
-
192
-
193
-
194
-
195
-
196
-
197
-
198
-
199
-
200
-
201
-
202
-
203
-
204
-
205
-
206
-
207
-
208
-
209
-
210
-
211
-
212
-
213
-
214
-
215
-
216
-
217
-
218
-
219
-
220
-
221
-
222
-
223
-
224
-
225
-
226
-
227
-
228
-
229
-
230
-
231
-
232
-
233
-
234
-
235
-
236
-
237
-
238
-
239
-
240
-
241
-
242
-
243
-
244
-
245
-
246
-
247
-
248
-
249
-
250
-
251
-
252
-
253
-
254
-
255
-
256
-
257
-
258
-
259
-
260
-
261
-
262
-
263
-
264
-
265
-
266
-
267
-
268
-
269
-
270
-
271
-
272
-
273
-
274
-
275
-
276
-
277
-
278
-
279
-
280
-
281
-
282
-
283
-
284
-
285
-
286
-
287
-
288
-
289
-
290
-
291
-
292
-
293
-
294
-
295
-
296
-
297
-
298
-
299
-
300
-
301
-
302
-
303
-
304
-
305
-
306
-
307
-
308
-
309
-
310
-
311
-
312
-
313
-
314
-
315
-
316
-
317
-
318
-
319
-
320
-
321
-
322
-
323
-
324
-
325
-
326
-
327
-
328
-
329
-
330
-
331
-
332
-
333
-
334
-
335
-
336
-
337
-
338
-
339
-
340
-
341
-
342
-
343
-
344
-
345
-
346
-
347
-
348
-
349
-
350
-
351
-
352
-
353
-
354
-
355
-
356
-
357
-
358
-
359
-
360
-
361
-
362
-
363
-
364
-
365
-
366
-
367
-
368
-
369
-
370
-
371
-
372
-
373
-
374
-
375
-
376
-
377
-
378
-
379
-
380
-
381
-
382
-
383
-
384
-
385
-
386
-
387
-
388
-
389
-
390
-
391
-
392
-
393
-
394
-
395
-
396
-
397
-
398
-
399
-
400
-
401
-
402
-
403
-
404
-
405
-
406
-
407
-
408
-
409
-
410
-
411
-
412
-
413
-
414
-
415
-
416
-
417
-
418
-
419
-
420
-
421
-
422
-
423
-
424
-
425
-
426
-
427
-
428
-
429
-
430
-
431
-
432
-
433
-
434
-
435
-
436
-
437
-
438
-
439
-
440
-
441
-
442
-
443
-
444
-
445
-
446
-
447
-
448
-
449
-
450
-
451
-
452
-
453
-
454
-
455
-
456
-
457
-
458
-
459
-
460
-
461
-
462
-
463
-
464
-
465
-
466
-
467
-
468
-
469
-
470
-
471
-
472
-
473
-
474
-
475
-
476
-
477
-
478
-
479
-
480
-
481
-
482
-
483
-
484
-
485
-
486
-
487
-
488
-
489
-
490
-
491
-
492
 |
 |