HP StorageWorks 8/80 HP StorageWorks Fabric OS 6.2 administrator guide (5697-0 - Page 162
Enabling FIPS mode
 |
View all HP StorageWorks 8/80 manuals
Add to My Manuals
Save this manual to your list of manuals |
Page 162 highlights
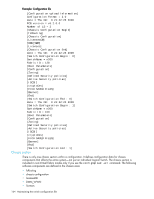
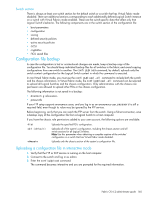
Enabling FIPS mode 1. Log in to the switch using an account assigned the admin or securityAdmin role. 2. Optional: Select the appropriate method based on your needs: • If the switch is set for RADIUS, modify each server to use only peap-mschapv2 as the authentication protocol using the aaaConfig --change or aaaConfig --remove command. • If the switch is set for LDAP, see the instructions in "Setting up LDAP for FIPS mode" on page 157. 3. Optional: Set the authentication protocols. a. Enter the following command to set the hash type for MD5 which is used in authentication protocols DHCHAP and FCAP: authutil --set -h sha1 b. Set the DH group to 1 or 2 or 3 or 4 using authUtil --set -g , where the DH group is represented by . 4. Install the LDAP CA certificate on the switch and Microsoft Active Directory server. See the instructions "LDAP certificates for FIPS mode" on page 158. 5. Block Telnet, HTTP, and RPC using the ipfilter policy command for each protocol: a. Create an IP filter rule for each policy/protocol, see "Creating an IP Filter policy" on page 135. b. Add a rule to the IP filter policy, see "Adding a rule to an IP Filter policy" on page 138. You can use the following modifications to the rule: ipfilter --addrule -rule -sip -dp -proto -act • -sip option can be given as any • -dp option for the port numbers for Telnet, HTTP, and RPC are 23, 80, and 898 respectively • -proto option should be set to tcp c. Activate the IP filter policy/protocol, see "Activating an IP Filter policy" on page 136. d. Save the IP filter policy/protocol, see "Saving an IP Filter policy" on page 136. Example ipfilter --createrule http_block_v4 --type ipv4 ipfilter --addrule http_block_v4 -rule 2 -sip any -dp 80 -proto tcp -act deny ipfilter --activate http_block_v4 ipfilter --save http_block_v4 6. Enter the following command to block access to the boot PROM: fipscfg --disable bootprom Block boot PROM access before disabling the root account. 7. Enable signed firmware by typing the configure command and respond to the prompts as follows: System services No cfgload attributes Yes Enforce secure config Upload/Download Press Enter to accept the default. Enforce firmware signature validation Yes Example: Adding a rule to the IP filter policy switch:admin> configure Not all options will be available on an enabled switch. To disable the switch, use the "switchDisable" command. Configure... System services (yes, y, no, n): [no] ... cfgload attributes (yes, y, no, n): [no] yes Enforce secure config Upload/Download (yes, y, no, n): [no] Enforce firmware signature validation (yes, y, no, n): [no] yes 160 Configuring advanced security features
-
 1
1 -
2
-
3
-
4
-
5
-
6
-
7
-
8
-
9
-
10
-
11
-
12
-
13
-
14
-
15
-
16
-
17
-
18
-
19
-
20
-
21
-
22
-
23
-
24
-
25
-
26
-
27
-
28
-
29
-
30
-
31
-
32
-
33
-
34
-
35
-
36
-
37
-
38
-
39
-
40
-
41
-
42
-
43
-
44
-
45
-
46
-
47
-
48
-
49
-
50
-
51
-
52
-
53
-
54
-
55
-
56
-
57
-
58
-
59
-
60
-
61
-
62
-
63
-
64
-
65
-
66
-
67
-
68
-
69
-
70
-
71
-
72
-
73
-
74
-
75
-
76
-
77
-
78
-
79
-
80
-
81
-
82
-
83
-
84
-
85
-
86
-
87
-
88
-
89
-
90
-
91
-
92
-
93
-
94
-
95
-
96
-
97
-
98
-
99
-
100
-
101
-
102
-
103
-
104
-
105
-
106
-
107
-
108
-
109
-
110
-
111
-
112
-
113
-
114
-
115
-
116
-
117
-
118
-
119
-
120
-
121
-
122
-
123
-
124
-
125
-
126
-
127
-
128
-
129
-
130
-
131
-
132
-
133
-
134
-
135
-
136
-
137
-
138
-
139
-
140
-
141
-
142
-
143
-
144
-
145
-
146
-
147
-
148
-
149
-
150
-
151
-
152
-
153
-
154
-
155
-
156
-
 157
157 -
 158
158 -
 159
159 -
 160
160 -
 161
161 -
 162
162 -
 163
163 -
 164
164 -
 165
165 -
 166
166 -
 167
167 -
168
-
169
-
170
-
171
-
172
-
173
-
174
-
175
-
176
-
177
-
178
-
179
-
180
-
181
-
182
-
183
-
184
-
185
-
186
-
187
-
188
-
189
-
190
-
191
-
192
-
193
-
194
-
195
-
196
-
197
-
198
-
199
-
200
-
201
-
202
-
203
-
204
-
205
-
206
-
207
-
208
-
209
-
210
-
211
-
212
-
213
-
214
-
215
-
216
-
217
-
218
-
219
-
220
-
221
-
222
-
223
-
224
-
225
-
226
-
227
-
228
-
229
-
230
-
231
-
232
-
233
-
234
-
235
-
236
-
237
-
238
-
239
-
240
-
241
-
242
-
243
-
244
-
245
-
246
-
247
-
248
-
249
-
250
-
251
-
252
-
253
-
254
-
255
-
256
-
257
-
258
-
259
-
260
-
261
-
262
-
263
-
264
-
265
-
266
-
267
-
268
-
269
-
270
-
271
-
272
-
273
-
274
-
275
-
276
-
277
-
278
-
279
-
280
-
281
-
282
-
283
-
284
-
285
-
286
-
287
-
288
-
289
-
290
-
291
-
292
-
293
-
294
-
295
-
296
-
297
-
298
-
299
-
300
-
301
-
302
-
303
-
304
-
305
-
306
-
307
-
308
-
309
-
310
-
311
-
312
-
313
-
314
-
315
-
316
-
317
-
318
-
319
-
320
-
321
-
322
-
323
-
324
-
325
-
326
-
327
-
328
-
329
-
330
-
331
-
332
-
333
-
334
-
335
-
336
-
337
-
338
-
339
-
340
-
341
-
342
-
343
-
344
-
345
-
346
-
347
-
348
-
349
-
350
-
351
-
352
-
353
-
354
-
355
-
356
-
357
-
358
-
359
-
360
-
361
-
362
-
363
-
364
-
365
-
366
-
367
-
368
-
369
-
370
-
371
-
372
-
373
-
374
-
375
-
376
-
377
-
378
-
379
-
380
-
381
-
382
-
383
-
384
-
385
-
386
-
387
-
388
-
389
-
390
-
391
-
392
-
393
-
394
-
395
-
396
-
397
-
398
-
399
-
400
-
401
-
402
-
403
-
404
-
405
-
406
-
407
-
408
-
409
-
410
-
411
-
412
-
413
-
414
-
415
-
416
-
417
-
418
-
419
-
420
-
421
-
422
-
423
-
424
-
425
-
426
-
427
-
428
-
429
-
430
-
431
-
432
-
433
-
434
-
435
-
436
-
437
-
438
-
439
-
440
-
441
-
442
-
443
-
444
-
445
-
446
-
447
-
448
-
449
-
450
-
451
-
452
-
453
-
454
-
455
-
456
-
457
-
458
-
459
-
460
-
461
-
462
-
463
-
464
-
465
-
466
-
467
-
468
-
469
-
470
-
471
-
472
-
473
-
474
-
475
-
476
-
477
-
478
-
479
-
480
-
481
-
482
-
483
-
484
-
485
-
486
-
487
-
488
-
489
-
490
-
491
-
492
-
493
-
494
-
495
-
496
-
497
-
498
-
499
-
500
-
501
-
502
-
503
-
504
-
505
-
506
-
507
-
508
-
509
-
510
-
511
-
512
-
513
-
514
-
515
-
516
-
517
-
518
-
519
-
520
-
521
-
522
-
523
-
524
-
525
-
526
-
527
-
528
-
529
-
530
-
531
-
532
-
533
-
534
-
535
-
536
-
537
-
538
-
539
-
540
-
541
-
542
-
543
-
544
-
545
-
546
-
547
-
548
-
549
-
550
-
551
-
552
-
553
-
554
-
555
-
556
-
557
-
558
-
559
-
560
-
561
-
562
-
563
-
564
-
565
-
566
-
567
-
568
-
569
-
570
-
571
-
572
-
573
-
574
-
575
-
576
 |
 |
