Sony ICD-BP150VTP Dragon Naturally Speaking 5 Users Guide - Page 139
Opening a user, Renaming a user
 |
View all Sony ICD-BP150VTP manuals
Add to My Manuals
Save this manual to your list of manuals |
Page 139 highlights
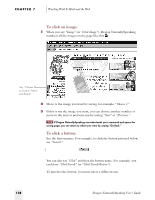
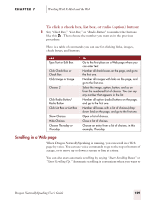
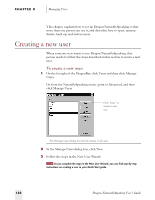
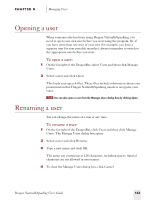
CHAPTER 8 Managing Users Opening a user When someone else has been using Dragon NaturallySpeaking, you need to open your own user before you start using the program. Or, if you have more than one user of your own (for example, you have a separate user for your portable recorder), always remember to switch to the appropriate user before you start. To open a user: 1 On the far right of the DragonBar, select Users and then click Manage Users. 2 Select a user and click Open. This loads your speech files. These files include information about your pronunciation that Dragon NaturallySpeaking needs to recognize your voice. TIP You can also open a user from the Manage Users dialog box by clicking Open. Renaming a user You can change the name of a user at any time. To rename a user: 1 On the far right of the DragonBar, click Users and then click Manage Users. The Manage Users dialog box opens. 2 Select a user and click Rename. 3 Type a new name and click OK. The name can contain up to 128 characters, including spaces. Special characters are not allowed in user names. 4 To close the Manage Users dialog box, click Cancel. Dragon NaturallySpeaking User's Guide 133
-
 1
1 -
2
-
3
-
4
-
5
-
6
-
7
-
8
-
9
-
10
-
11
-
12
-
13
-
14
-
15
-
16
-
17
-
18
-
19
-
20
-
21
-
22
-
23
-
24
-
25
-
26
-
27
-
28
-
29
-
30
-
31
-
32
-
33
-
34
-
35
-
36
-
37
-
38
-
39
-
40
-
41
-
42
-
43
-
44
-
45
-
46
-
47
-
48
-
49
-
50
-
51
-
52
-
53
-
54
-
55
-
56
-
57
-
58
-
59
-
60
-
61
-
62
-
63
-
64
-
65
-
66
-
67
-
68
-
69
-
70
-
71
-
72
-
73
-
74
-
75
-
76
-
77
-
78
-
79
-
80
-
81
-
82
-
83
-
84
-
85
-
86
-
87
-
88
-
89
-
90
-
91
-
92
-
93
-
94
-
95
-
96
-
97
-
98
-
99
-
100
-
101
-
102
-
103
-
104
-
105
-
106
-
107
-
108
-
109
-
110
-
111
-
112
-
113
-
114
-
115
-
116
-
117
-
118
-
119
-
120
-
121
-
122
-
123
-
124
-
125
-
126
-
127
-
128
-
129
-
130
-
131
-
132
-
133
-
 134
134 -
 135
135 -
 136
136 -
 137
137 -
 138
138 -
 139
139 -
 140
140 -
 141
141 -
 142
142 -
 143
143 -
 144
144 -
145
-
146
-
147
-
148
-
149
-
150
-
151
-
152
-
153
-
154
-
155
-
156
-
157
-
158
-
159
-
160
-
161
-
162
-
163
-
164
-
165
-
166
-
167
-
168
-
169
-
170
-
171
-
172
-
173
-
174
-
175
-
176
-
177
-
178
-
179
-
180
-
181
-
182
-
183
-
184
-
185
-
186
-
187
-
188
-
189
-
190
-
191
-
192
-
193
-
194
-
195
-
196
-
197
-
198
-
199
-
200
-
201
-
202
-
203
-
204
-
205
-
206
-
207
-
208
-
209
-
210
-
211
-
212
-
213
-
214
-
215
-
216
-
217
-
218
-
219
-
220
-
221
-
222
 |
 |