Brother International ZE-856A Instruction Manual - English and Spanish - Page 210
Reflection pattern switch, 1. Musterumkehrschalter, 1. Interrupteur de motif en miroir, 1.
 |
View all Brother International ZE-856A manuals
Add to My Manuals
Save this manual to your list of manuals |
Page 210 highlights
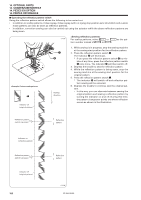
14. OPTIONAL PARTS 14. SONDERZUBEHÖRTEILE 14. PIECES EN OPTION 14. PARTES OPCIONALES 14-1. Reflection pattern switch 14-1. Musterumkehrschalter 14-1. Interrupteur de motif en miroir 14-1. Interruptor de patrón reflejado Reflection pattern switch Musterumkehrschalter Interrupteur de motif en miroir Interruptor de patrón reflejado I Installation I Einbau I Installation I Instalación 1. Remove the two screws q, and then remove the ac- tuator w. 2. Place the reflection pattern switch e over the actuator w, and install them together using the two screws q. * At this time, insert the fastening band r into the groove A of the reflection pattern switch e. 3. Use the fastening bands y to secure the harness t of the reflection pattern switch e together with the other harnesses (in three places). 4. Pass the harness t down through the hole in the work table. y e A t q r w 1395M 1. Entfernen Sie die beiden Schrauben q und das Stellglied w. 2. Setzen Sie den Musterumkehrschalter e auf das Stellglied w und montieren Sie das Stellglied und den Schalter zusammen mit den beiden Schrauben q. * Legen Sie die Binde r in die Nut A des Musterumkehrschalters e. 3. Verwenden Sie die Binden y um den Kabelbaum t des Musterumkehrschalters e zusammen mit den anderen Kabelbäumen zu befestigen (drei Stellen). 4. Ziehen Sie den Kabelbaum t durch das Loch im Nähtisch. 1396M 1. Retirer les deux vis q puis retirer l'actuateur w. 2. Placer l'interrupteur de motif en miroir e au-dessus de l'actuateur w, et les monter ensemble à l'aide des deux vis q. * A ce moment, introduire une bande d'attache r dans la rainure A de l'interrupteur de motif en miroir e. 3. A l'aide des bandes d'attache y, fixer le faisceau électrique t de l'interrupteur de motif en miroir e avec les autres faisceaux électriques (en trois endroits). 4. Faire passer le faisceau électrique t vers le bas dans le trou de la table de travail. 1. Quitar los dos tornillos q, y luego quitar el actuador w. 2. Colocar el interruptor de patrón reflejado e sobre el actuador w, e instalarlos juntos usando los dos tornillos q. * En este momento, insertar la banda de sujeción r en la ranura A del interruptor de patrón reflejado e. 3. Usar las bandas de sujeción y para asegurar el mazo de conductores t del interruptor de patrón reflejado e junto con los otros mazos de conductores (en tres lugares). 4. Pasar mazo de conductores t por el agujero en la mesa de trabajo. 191 ZE-855A,856A
-
 1
1 -
2
-
3
-
4
-
5
-
6
-
7
-
8
-
9
-
10
-
11
-
12
-
13
-
14
-
15
-
16
-
17
-
18
-
19
-
20
-
21
-
22
-
23
-
24
-
25
-
26
-
27
-
28
-
29
-
30
-
31
-
32
-
33
-
34
-
35
-
36
-
37
-
38
-
39
-
40
-
41
-
42
-
43
-
44
-
45
-
46
-
47
-
48
-
49
-
50
-
51
-
52
-
53
-
54
-
55
-
56
-
57
-
58
-
59
-
60
-
61
-
62
-
63
-
64
-
65
-
66
-
67
-
68
-
69
-
70
-
71
-
72
-
73
-
74
-
75
-
76
-
77
-
78
-
79
-
80
-
81
-
82
-
83
-
84
-
85
-
86
-
87
-
88
-
89
-
90
-
91
-
92
-
93
-
94
-
95
-
96
-
97
-
98
-
99
-
100
-
101
-
102
-
103
-
104
-
105
-
106
-
107
-
108
-
109
-
110
-
111
-
112
-
113
-
114
-
115
-
116
-
117
-
118
-
119
-
120
-
121
-
122
-
123
-
124
-
125
-
126
-
127
-
128
-
129
-
130
-
131
-
132
-
133
-
134
-
135
-
136
-
137
-
138
-
139
-
140
-
141
-
142
-
143
-
144
-
145
-
146
-
147
-
148
-
149
-
150
-
151
-
152
-
153
-
154
-
155
-
156
-
157
-
158
-
159
-
160
-
161
-
162
-
163
-
164
-
165
-
166
-
167
-
168
-
169
-
170
-
171
-
172
-
173
-
174
-
175
-
176
-
177
-
178
-
179
-
180
-
181
-
182
-
183
-
184
-
185
-
186
-
187
-
188
-
189
-
190
-
191
-
192
-
193
-
194
-
195
-
196
-
197
-
198
-
199
-
200
-
201
-
202
-
203
-
204
-
 205
205 -
 206
206 -
 207
207 -
 208
208 -
 209
209 -
 210
210 -
 211
211 -
 212
212 -
 213
213 -
 214
214 -
 215
215 -
216
-
217
-
218
-
219
-
220
-
221
-
222
-
223
-
224
-
225
-
226
-
227
-
228
-
229
-
230
-
231
-
232
-
233
-
234
-
235
-
236
-
237
-
238
-
239
-
240
-
241
-
242
-
243
-
244
-
245
-
246
-
247
-
248
 |
 |
