Brother International ZE-856A Instruction Manual - English and Spanish - Page 32
Installing the control box, 2. Montage des Schaltkastens, 2. Installation du bo, tier de commande
 |
View all Brother International ZE-856A manuals
Add to My Manuals
Save this manual to your list of manuals |
Page 32 highlights
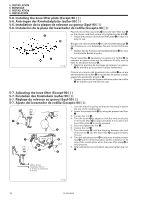
5. INSTALLATION 5. MONTAGE 5. INSTALLATION 5. INSTALACION 5-2. Installing the control box 5-2. Montage des Schaltkastens 5-2. Installation du boîtier de commande 5-2. Instalación de la caja de controles !0 q !2 !1 w r t i y o u i o 2.5-3mm 2,5-3mm e q 1408M 1. Remove the six screws q, and then remove the box cover w. 2. Remove the six screws q, and then open the cover (main P.C. board mounting plate) e. Caution: When opening the cover e, hold it securely so that it does not fall down. 3. Install the control box with the four bolts r, cushions t, rubber collars y, flat washers u, nuts i and nut o as shown in the illustration above. 1) Tighten the nuts i so that there is a gap of 2.5 - 3 mm between the top of the box and the table. * If you insert a 2.5 mm hexagonal wrench into the gap between the top of the box and the table at this time, the correct gap can be obtained when the hexagonal wrench is being lightly clamped. 2) While holding each of the nuts i with a spanner so they do not turn, securely tighten the nuts o. 4. Provisionally tighten the box cover w and the cover e with the screws q. * The box cover w and cover e will be opened once more during the procedure in "5-11. Connecting the cords", so be sure to provisionally tighten them at this time. 5. Install the power switch !0 with the two screws !.1 6. Secure the power switch cord with the five staples !.2 1. Entfernen Sie die sechs Schrauben q und nehmen Sie die Schaltkastenabdeckung w ab. 2. Entfernen Sie die sechs Schrauben q und öffnen Sie die Abdeckung e (Hauptplatineplatte). Vorsicht: Halten Sie die Abdeckung e beim Öffnen fest, so daß sie nicht herunterfallen kann. 3. Befestigen Sie den Schaltkasten mit den vier Schrauben r, Dämpfern t, Gummischeiben y, Unterlegscheiben u, Muttern i und Muttern o wie in der Abbildung gezeigt. 1) Ziehen Sie die Muttern i fest, so daßzwischen der Oberseite des Schaltkastens und dem Nähtisch ein Abstand von 2,5 bis 3 mm vorhanden ist. * Falls ein 2,5 mm-lnnensechskantschlüssel in den Zwischenraum zwischen der Schaltkastenoberseite und dem Nähtisch gesteckt wird, so ist der Abstand richtig, wenn der lnnensechskantschlüssel leicht festgeklemmt wird. 2) Halten Sie die Muttern i mit einem Schlüssel fest und ziehen Sie die Muttern o richtig an. 4. Ziehen Sie die Schaltkastenabdeckung w und die Abdeckung e mit den Schrauben q provisorisch fest. * Die Schaltkastenabdeckung w und die Abdeckung e werden im Abschnitt "5-11. Anschluß der Kabel" noch einmal geöffnet, ziehen Sie deshalb die Schrauben nur provisorisch fest. 5. Montieren Sie den Netzschalter !0 mit den beiden Schrauben !1 . 6. Befestigen Sie das Netzkabel mit den fünf Klammern !.2 13 ZE-855A,856A
-
 1
1 -
2
-
3
-
4
-
5
-
6
-
7
-
8
-
9
-
10
-
11
-
12
-
13
-
14
-
15
-
16
-
17
-
18
-
19
-
20
-
21
-
22
-
23
-
24
-
25
-
26
-
 27
27 -
 28
28 -
 29
29 -
 30
30 -
 31
31 -
 32
32 -
 33
33 -
 34
34 -
 35
35 -
 36
36 -
 37
37 -
38
-
39
-
40
-
41
-
42
-
43
-
44
-
45
-
46
-
47
-
48
-
49
-
50
-
51
-
52
-
53
-
54
-
55
-
56
-
57
-
58
-
59
-
60
-
61
-
62
-
63
-
64
-
65
-
66
-
67
-
68
-
69
-
70
-
71
-
72
-
73
-
74
-
75
-
76
-
77
-
78
-
79
-
80
-
81
-
82
-
83
-
84
-
85
-
86
-
87
-
88
-
89
-
90
-
91
-
92
-
93
-
94
-
95
-
96
-
97
-
98
-
99
-
100
-
101
-
102
-
103
-
104
-
105
-
106
-
107
-
108
-
109
-
110
-
111
-
112
-
113
-
114
-
115
-
116
-
117
-
118
-
119
-
120
-
121
-
122
-
123
-
124
-
125
-
126
-
127
-
128
-
129
-
130
-
131
-
132
-
133
-
134
-
135
-
136
-
137
-
138
-
139
-
140
-
141
-
142
-
143
-
144
-
145
-
146
-
147
-
148
-
149
-
150
-
151
-
152
-
153
-
154
-
155
-
156
-
157
-
158
-
159
-
160
-
161
-
162
-
163
-
164
-
165
-
166
-
167
-
168
-
169
-
170
-
171
-
172
-
173
-
174
-
175
-
176
-
177
-
178
-
179
-
180
-
181
-
182
-
183
-
184
-
185
-
186
-
187
-
188
-
189
-
190
-
191
-
192
-
193
-
194
-
195
-
196
-
197
-
198
-
199
-
200
-
201
-
202
-
203
-
204
-
205
-
206
-
207
-
208
-
209
-
210
-
211
-
212
-
213
-
214
-
215
-
216
-
217
-
218
-
219
-
220
-
221
-
222
-
223
-
224
-
225
-
226
-
227
-
228
-
229
-
230
-
231
-
232
-
233
-
234
-
235
-
236
-
237
-
238
-
239
-
240
-
241
-
242
-
243
-
244
-
245
-
246
-
247
-
248
 |
 |
