Brother International ZE-856A Instruction Manual - English and Spanish - Page 46
ZE-855A,856A
 |
View all Brother International ZE-856A manuals
Add to My Manuals
Save this manual to your list of manuals |
Page 46 highlights
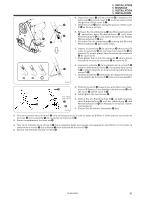
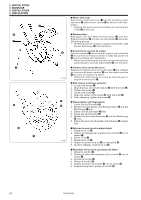
5. INSTALLATION 5. MONTAGE 5. INSTALLATION 5. INSTALACION q u P18 SOL P16 NPM i 1291M Harness Kabel Faisceau Mazo de conductores P.C. board indication Platinenmarkierung Indication de la carte P.C. Indicación de la tarjeta PC u Actuator (Tube marked "18") Betätigungstaste (Rohr mit der Bezeichnung "18") Actuateur (Tube portant la marque "18") Impulsor (Caño marcado "18") P18 SOL i Zigzag motor Zickzackmotor Moteur de zigzag Motor de zigzag P16 NPM 4. Pass the actuator harness u and the zigzag motor harness i through the cord clamp q, and then pull them into the control box through the lower hole in the control box and connect the connectors. 4. Führen Sie das Kabel der Betätigungstaste u und des Zickzackmotors i durch die Kabelklemme q, ziehen Sie sie durch das untere Loch in den Schaltkasten ein und schließen Sie die Stecker an. 4. Passer le faisceau d'actuateur u et le faisceau de moteur de zigzag i par le serre-fils q, puis les tirer dans le boîtier de commande par le trou inférieur du boîtier de commande et brancher les connecteurs. 4. Pasar el mazo de conductores del impulsor u y el mazo de conductores del motor del zigzag i a través del sujetacables q, y luego tirar de ellos en la caja de controles a través del agujero inferior en la caja de controles y conectar los conectores. q o P18 SOL P16 NPM Harness Kabel Faisceau Mazo de conductores o Solenoid Solenoid Solénoïde Solenoide i Zigzag motor Zickzackmotor Moteur de zigzag Motor de zigzag i 1292M P.C. board indication Platinenmarkierung Indication de la carte P.C. Indicación de la tarjeta PC (12-pin connector) (12 poliger Stecker) (Connecteur 12 broches) (Conector de 12 patillas) P16 NPM 4. Pass the solenoid harness o and the zigzag motor harness i through the cord clamp q, and then pull them into the control box through the lower hole in the control box and connect the connectors. 4. Führen Sie das Solenoidkabel o und das Kabel des Zickzackmotors i durch die Kabelklemme q, ziehen Sie sie durch das untere Loch in den Schaltkasten ein und schließen Sie die Stecker an. 4. Passer le faisceau de solénoïde o et le faisceau de moteur de zigzag i par le serre-fils q, puis les tirer dans le boîtier de commande par le trou inférieur du boîtier de commande et brancher les connecteurs. 4. Pasar el mazo de conductores del solenoide o y el mazo de conductores del motor del zigzag i a través del sujetacables q, y luego tirar de ellos en la caja de controles a través del agujero inferior en la caja de controles y conectar los conectores. 27 ZE-855A,856A
-
 1
1 -
2
-
3
-
4
-
5
-
6
-
7
-
8
-
9
-
10
-
11
-
12
-
13
-
14
-
15
-
16
-
17
-
18
-
19
-
20
-
21
-
22
-
23
-
24
-
25
-
26
-
27
-
28
-
29
-
30
-
31
-
32
-
33
-
34
-
35
-
36
-
37
-
38
-
39
-
40
-
 41
41 -
 42
42 -
 43
43 -
 44
44 -
 45
45 -
 46
46 -
 47
47 -
 48
48 -
 49
49 -
 50
50 -
 51
51 -
52
-
53
-
54
-
55
-
56
-
57
-
58
-
59
-
60
-
61
-
62
-
63
-
64
-
65
-
66
-
67
-
68
-
69
-
70
-
71
-
72
-
73
-
74
-
75
-
76
-
77
-
78
-
79
-
80
-
81
-
82
-
83
-
84
-
85
-
86
-
87
-
88
-
89
-
90
-
91
-
92
-
93
-
94
-
95
-
96
-
97
-
98
-
99
-
100
-
101
-
102
-
103
-
104
-
105
-
106
-
107
-
108
-
109
-
110
-
111
-
112
-
113
-
114
-
115
-
116
-
117
-
118
-
119
-
120
-
121
-
122
-
123
-
124
-
125
-
126
-
127
-
128
-
129
-
130
-
131
-
132
-
133
-
134
-
135
-
136
-
137
-
138
-
139
-
140
-
141
-
142
-
143
-
144
-
145
-
146
-
147
-
148
-
149
-
150
-
151
-
152
-
153
-
154
-
155
-
156
-
157
-
158
-
159
-
160
-
161
-
162
-
163
-
164
-
165
-
166
-
167
-
168
-
169
-
170
-
171
-
172
-
173
-
174
-
175
-
176
-
177
-
178
-
179
-
180
-
181
-
182
-
183
-
184
-
185
-
186
-
187
-
188
-
189
-
190
-
191
-
192
-
193
-
194
-
195
-
196
-
197
-
198
-
199
-
200
-
201
-
202
-
203
-
204
-
205
-
206
-
207
-
208
-
209
-
210
-
211
-
212
-
213
-
214
-
215
-
216
-
217
-
218
-
219
-
220
-
221
-
222
-
223
-
224
-
225
-
226
-
227
-
228
-
229
-
230
-
231
-
232
-
233
-
234
-
235
-
236
-
237
-
238
-
239
-
240
-
241
-
242
-
243
-
244
-
245
-
246
-
247
-
248
 |
 |
